How To Cook Brisket In The Oven Recipe For Beginners
Cooking brisket in the oven is easier than you think with this simple beginner recipe. You will learn how to prep, season, and roast a perfect beef brisket at home. This guide covers temperature, timing, and tips for juicy, fall-apart meat. Follow along and impress your family with a restaurant-quality brisket using your kitchen oven.
There is nothing quite like a perfectly cooked brisket. The meat falls apart at the touch of a fork. The outside has a beautiful crust. And the inside is juicy and full of flavor. Many people think you need a smoker or expensive equipment to achieve this. But you can cook brisket in the oven and get amazing results. This recipe is designed for beginners who want to try something new.
Whether you are cooking for a family dinner or a special occasion, this guide will walk you through every step. You will learn how to pick the right cut, season it properly, and cook it to perfection. How To Cook Brisket In The Oven Recipe is simpler than most people expect. With a little patience and the right technique, you will serve a brisket that rivals any barbecue joint. Let us get started.
Key Takeaways
- Low and slow cooking: The best oven brisket cooks at 275°F for several hours for tender results.
- Use a meat thermometer: Aim for an internal temperature of 200-205°F for perfect doneness.
- Rest the meat: Letting brisket rest for at least one hour keeps juices inside.
- Choose the right cut: The flat cut is leaner and easier for beginners to handle.
- Wrap in foil: The Texas crutch method speeds up cooking and keeps moisture locked in.
- Patience is key: Do not rush the process — great brisket takes time.
- Slice against the grain: This makes every bite tender and easy to chew.
📑 Table of Contents
- Why Cook Brisket In The Oven
- Choosing The Right Brisket Cut
- Essential Equipment And Ingredients
- Step-by-Step Oven Brisket Recipe
- Common Mistakes To Avoid
- Expert Tips For Perfect Oven Brisket
- How To Store And Reheat Leftover Brisket
- Frequently Asked Questions
- Final Thoughts On Cooking Brisket In The Oven
Why Cook Brisket In The Oven
Some people love smoking brisket outdoors. But the oven has some real advantages. First, it is weather-proof. You can cook brisket in the oven rain or shine. Second, it is more convenient. You do not need to monitor a fire or manage charcoal. Third, the oven provides consistent heat. This makes it easier to control the cooking process.
Another big advantage is convenience. Most kitchens already have a good oven. You do not need to buy a smoker or grill. This makes oven-braised brisket accessible to everyone. Cooking brisket in oven also means less cleanup in many cases. You can use a simple roasting pan or Dutch oven. The results are tender, flavorful, and incredibly satisfying.
Many experienced pitmasters agree that oven cooking can produce excellent results. The key is maintaining low heat over a long period. This method is often called low and slow cooking. It breaks down the tough connective tissues in the meat. The result is a juicy, tender brisket that everyone will love.
The Science Behind Slow Cooking
Brisket is a tough cut of beef. It comes from the chest area of the cow. This muscle works hard, so it has a lot of collagen. Collagen is a tough protein that makes meat chewy when cooked quickly. But when you cook it slowly at low heat, collagen breaks down into gelatin. This is what gives brisket its tender, silky texture.
The low and slow method typically involves temperatures between 250°F and 325°F. At these temperatures, the meat cooks evenly. The fat renders slowly and bastes the meat from within. This is why oven brisket turns out so well. The oven circulates heat gently and consistently. It creates the perfect environment for breaking down tough fibers.
Choosing The Right Brisket Cut
Not all briskets are the same. Choosing the right cut matters a lot for your final result. There are two main parts of a whole brisket. Understanding these will help you make a better choice at the store.
The Flat Cut
The flat cut, also called the first cut, is leaner. It is thinner and more uniform in shape. This makes it easier to slice evenly. The flat cut brisket is great for beginners because it is more predictable. It cooks more evenly and is easier to handle.
The downside is that it has less fat. This means it can dry out faster if you are not careful. To prevent this, use a meat thermometer and do not overcook it. The flat cut is perfect for those who prefer leaner slices of beef brisket.
The Point Cut
The point cut is fattier and more marbled. It is thicker and has more intramuscular fat. This fat melts during cooking and keeps the meat juicy. The point cut is also known as the second cut or the deckle. It produces incredibly rich and flavorful results.
The point cut can be trickier for beginners. It has irregular shapes and more fat to manage. But if you love juicy, buttery meat, the point cut is worth it. Many people choose a whole packer brisket that includes both the flat and point. This gives you the best of both worlds.
What To Look For At The Store
When buying a brisket, look for a few key things. The meat should have a good amount of marbling. Marbling refers to the thin white lines of fat running through the muscle. More marbling usually means more flavor and juiciness. The meat should be a deep red color. Avoid any brisket that looks gray or dry.
Check the size too. A good brisket for the oven usually weighs between 4 and 8 pounds. Smaller cuts cook faster and are easier to manage. Larger ones take more time and oven space. If you are new to this, start with a 4 to 5 pound beef roast cut. It is manageable and gives great results.
Essential Equipment And Ingredients
You do not need a lot of fancy tools to cook brisket in the oven. A few basic items will do the job. Here is what you will need before you start.
Equipment You Will Need
- Heavy roasting pan or Dutch oven: A thick pan holds heat well. It distributes heat evenly for consistent cooking.
- Meat thermometer: This is the most important tool. You cannot guess the internal temperature of a large cut of meat. A digital thermometer gives accurate readings every time.
- Heavy-duty aluminum foil: Foil is used for wrapping the brisket during cooking. It traps moisture and speeds up the process.
- Sharp carving knife: You will need a good knife for slicing the brisket against the grain. A dull knife will tear the meat apart.
- Cutting board: Use a large, sturdy cutting board for slicing and serving.
- Oven mitts: The pan will be very hot. Always use thick oven mitts when handling it.
Ingredients For A Perfect Brisket
The ingredient list is simple. You do not need a long shopping list. The beauty of oven brisket recipe cooking is its simplicity. Here are the basics.
- One beef brisket: About 4 to 6 pounds for a standard oven. Choose either the flat or point cut based on your preference.
- Kosher salt: About 1 tablespoon per pound of meat. Salt draws out moisture and seasons the meat deeply.
- Black pepper: Freshly ground black pepper works best. Use about half a tablespoon per pound.
- Garlic powder: Two teaspoons adds a savory depth of flavor.
- Onion powder: One teaspoon complements the beef flavor beautifully.
- Paprika: Two teaspoons adds color and a mild smoky sweetness.
- Beef broth or water: A cup of liquid added to the pan keeps the cooking environment moist.
- Butter or beef fat: A small pat of butter adds richness during the final stages of cooking.
Some people like to add wood chips for a smoky flavor. You can soak wood chips in water and place them in a foil pouch in the oven. This adds a subtle smoked brisket flavor without needing an outdoor smoker. Hickory and oak wood chips work especially well with beef brisket.
Step-by-Step Oven Brisket Recipe
Now it is time to get cooking. This step-by-step guide will take you from raw brisket to a stunning meal. Follow each step carefully for the best results.
Step One: Prep The Brisket
Remove the brisket from the refrigerator about one hour before cooking. Let it come to room temperature. This helps the meat cook more evenly. Pat the brisket dry with paper towels. Remove any excess fat from the surface. Leave about a quarter inch of fat cap. This fat will render during cooking and keep the meat moist.
Season the brisket generously on all sides. Mix your salt, pepper, garlic powder, onion powder, and paprika in a small bowl. Sprinkle the rub evenly over the entire surface. Press the seasoning into the meat with your hands. The coating should be visible but not overly thick.
Step Two: Preheat The Oven
Preheat your oven to 275°F. This is the ideal oven temperature for brisket. Lower temperatures work too but will take longer. Higher temperatures risk drying out the meat. The 275°F setting creates the perfect balance of time and tenderness.
While the oven is heating up, prepare your roasting pan. Place a rack at the bottom of the pan if you have one. If not, you can pour a cup of beef broth directly into the bottom of the pan. This creates steam and prevents the drippings from burning.
Step Three: Sear The Brisket
Place the seasoned brisket fat side up in the roasting pan. Sear it in the preheated oven for about 15 minutes. This step develops the outer crust, also known as the bark. The bark is the flavorful, caramelized exterior that makes brisket so delicious.
After searing, remove the pan from the oven. Wrap the brisket tightly in heavy aluminum foil. This is called the Texas crutch method. The foil traps moisture and speeds up the cooking process. It also prevents the meat from drying out during the long cook time.
Step Four: Cook Low And Slow
Return the wrapped brisket to the oven. Cook at 275°F for approximately 1 hour per pound of meat. So a 5 pound brisket will take about 5 hours. This is the heart of the cooking time process. Do not open the oven door frequently. Every time you open the door, heat escapes and cooking time increases.
After about 3 hours, check the brisket. The internal temperature should be around 160-170°F at this point. If the top is browning too quickly, you can add another layer of foil. Some cooks unwrap the brisket at this stage, add a layer of butter, and rewrap. This adds extra richness and helps create a beautiful bark.
Step Five: The Stall And The Wrap
Around 150-170°F internal temperature, the brisket will hit what is called the stall. The temperature seems to stop rising. This is completely normal. The evaporating moisture on the surface cools the meat. The brisket wrap technique helps push through this stall faster.
If you have not already wrapped the brisket in foil, do so now. You can also use butcher paper instead of foil. Butcher paper allows more smoke penetration but retains less moisture. Foil is more forgiving and easier for beginners. Either way, the wrap helps the brisket push through the stall and reach the target temperature.
Step Six: Check For Doneness
The brisket is done when the internal temperature reaches 200-205°F. But temperature alone is not enough. The real test is tenderness. Insert a probe or fork into the thickest part of the meat. If it slides in with little resistance, the brisket is ready. The meat should feel soft and jiggly, not firm or rubbery.
If the brisket is not tender enough at 200°F, continue cooking. Check every 30 minutes. Some briskets need to reach 210°F before they are fully tender. This depends on the cut, the thickness, and the amount of connective tissue. Be patient and trust the process.
Step Seven: Rest The Brisket
Once the brisket is done, remove it from the oven. Keep it wrapped in foil and place it in a cooler or insulated container. Let it rest for at least one hour. Some experts recommend resting for up to two hours. The brisket resting time is crucial for juicy results.
During resting, the juices redistribute throughout the meat. If you cut into it too soon, the juices will run out onto the cutting board. The meat will be dry and less flavorful. The resting period allows the fibers to relax and reabsorb moisture. This simple step makes a huge difference in the final product.
Step Eight: Slice And Serve
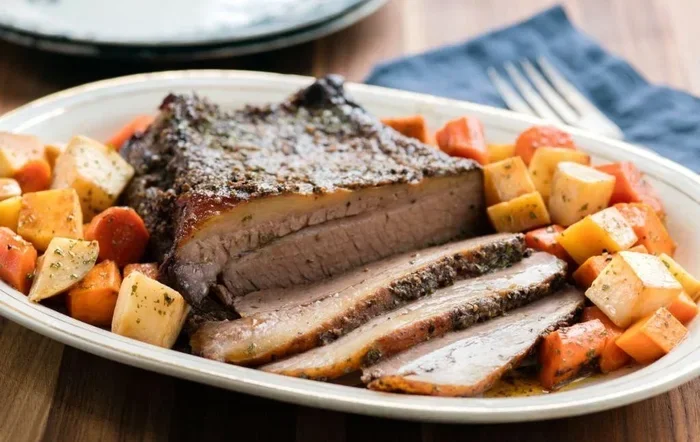
Unwrap the brisket carefully. Save the juices in the foil pan. These juices are liquid gold. Pour them over the sliced meat for extra flavor. Use a sharp carving knife to slice against the grain. The grain is the direction of the muscle fibers. Slicing against it shortens the fibers and makes each bite tender.
For the flat cut, the grain runs lengthwise. Slice across it in thin pieces about a quarter inch thick. For the point cut, the grain direction may change partway through. Adjust your slicing angle accordingly. Serve the slices with the pan juices spooned over the top. Pair with coleslaw, pickles, and white bread for a classic barbecue experience.
Common Mistakes To Avoid
Even with the best recipe, mistakes can happen. Here are some common errors that beginners make when cooking brisket in the oven. Avoid these and your results will improve dramatically.
Skipping The Rest Period
This is the number one mistake people make. They pull the brisket out and immediately slice into it. The juices run out and the meat becomes dry. Always let the brisket rest for at least one hour. Patience here pays off in juicier, more flavorful slices.
Using Too High A Temperature
Some people crank the oven to 350°F to save time. This is a big mistake. High heat dries out the exterior before the interior has time to become tender. The low and slow approach is essential for a great brisket. Trust the process and give the meat the time it needs.
Not Using A Meat Thermometer
Guessing when the brisket is done leads to inconsistent results. Undercooked brisket is tough and chewy. Overcooked brisket is dry and crumbly. A reliable meat thermometer removes all guesswork. Invest in a good instant-read or leave-in probe thermometer. Your brisket will thank you.
Cutting With The Grain
Slicing with the grain makes the meat chewier and harder to eat. Always identify the grain direction before you start slicing. Cut perpendicular to the muscle fibers for the most tender results. If you are unsure, ask the butcher for help when purchasing the brisket.
Over-Seasoning Or Under-Seasoning
Too much salt can make the meat taste harsh. Too little seasoning leaves the brisket bland. Follow the recommended amounts in the recipe and adjust to taste. The rub should be visible on the surface but not caked on in thick layers.
Expert Tips For Perfect Oven Brisket
Here are some pro tips that will elevate your oven brisket recipe from good to great. These insights come from years of experience and tested methods.
- Dry brine overnight: Salt the brisket the night before and leave it uncovered in the refrigerator. This draws out moisture, which gets reabsorbed, seasoning the meat deeply and creating a better bark.
- Use a water pan: Place a shallow pan of water in the oven during cooking. This adds moisture to the oven environment and prevents the meat from drying out.
- Let the fat cap face up: During the initial sear, cook the brisket fat side up. This allows the fat to baste the meat as it renders. During the long cook, you can flip it fat side down if the top is browning too fast.
- Save the drippings: The drippings at the bottom of the pan are incredibly flavorful. Use them to make gravy or drizzle over sliced brisket for extra richness.
- Experiment with rubs: Once you master the basic recipe, try different spice blends. Coffee rubs, cocoa rubs, and mustard-based rubs all add unique flavors to beef brisket.
- Double wrap for extra tenderness: If you prefer ultra-tender meat, wrap the brisket in two layers of foil after the first wrap. This traps even more moisture and steam.
How To Store And Reheat Leftover Brisket
Brisket tastes even better the next day. If you have leftovers, proper storage is key to maintaining quality. Let the brisket cool to room temperature before storing. Place it in an airtight container or wrap it tightly in plastic wrap. Refrigerate within two hours of cooking.
Leftover brisket keeps well in the refrigerator for up to four days. You can also freeze it for up to three months. Wrap individual slices in plastic wrap and then in foil for easy portioning. When ready to eat, reheat gently in the oven at 250°F. Add a splash of beef broth to keep the slices moist. Avoid reheating in the microwave, as it can dry out the meat quickly.
Reheating Tips
- Wrap the brisket slices in foil with a little broth or juice.
- Heat at 250°F for about 15-20 minutes.
- Check the internal temperature. It should reach 165°F for safe eating.
- Let it rest for five minutes after reheating before serving.
Proper reheating brings back much of the original moisture and flavor. You will barely notice the difference between freshly cooked and reheated brisket.
Frequently Asked Questions
How long does it take to cook brisket in the oven?
It typically takes about 1 hour per pound of meat at 275°F. A 5 pound brisket will take roughly 5 to 6 hours. The total time includes searing, cooking, and resting. Patience is the most important ingredient in any oven brisket recipe.
What is the best temperature to cook brisket in the oven?
The ideal temperature is 275°F. This low heat allows the collagen in the meat to break down slowly. It produces tender, juicy results without drying out the exterior. Some cooks prefer 250°F for even slower cooking, while others go up to 325°F for a slightly shorter cook time.
Can I cook brisket in the oven without foil?
Yes, you can cook brisket without foil. This method is called naked cooking or unwrapped cooking. It produces a thicker, crunchier bark. However, the meat may lose more moisture during cooking. You will need to monitor the internal temperature more carefully and may need to spritz the meat periodically with beef broth.
How do I know when brisket is done?
The internal temperature should reach 200-205°F. But temperature alone is not enough. The real test is tenderness. Insert a probe or fork into the thickest part. If it slides in easily with no resistance, the brisket is done. The meat should feel soft and jiggly, not firm.
Should I trim the fat off the brisket before cooking?
Leave about a quarter inch of fat on the surface. This fat cap renders during cooking and keeps the meat moist. Removing all the fat can result in dry, flavorless brisket. However, you should remove any thick, hard chunks of fat that will not render properly.
Can I use a gas oven or does it need to be electric?
Both gas and electric ovens work perfectly for cooking brisket. Gas ovens provide a slightly more humid environment, which can be beneficial for long cooks. Electric ovens offer more consistent heat distribution. Either type will produce excellent results when you follow the low and slow method properly.
Final Thoughts On Cooking Brisket In The Oven
How To Cook Brisket In The Oven Recipe is one of the most rewarding things you can make at home. It does not require expensive equipment or years of experience. With a good cut of beef brisket, a simple rub, and some patience, you can create a meal that impresses everyone at the table.
The key to success is the low and slow cooking approach. Keep the oven temperature steady at 275°F. Give the meat the time it needs to become tender. Use a meat thermometer to track the internal temperature. And never skip the resting period. These simple steps make all the difference between good brisket and great brisket.
Remember, every brisket is different. The size, the cut, and the amount of fat all affect cooking time. Do not get discouraged if your first attempt is not perfect. Each cook teaches you something new. Over time, you will develop an instinct for when the meat is ready and how to adjust your technique.
Share your oven brisket creations with family and friends. This is the kind of dish that brings people together. It sparks conversation and creates memories around the table. So put on your apron, preheat the oven, and get ready to make the best brisket of your life. You have got this.