How To Make Coffee Powder At Home With These Steps
Making coffee powder at home is simple, fun, and gives you fresher flavor than store-bought options. You only need a few basic tools and quality beans to get started. This guide walks you through every step, from choosing beans to storing your finished powder. Whether you want a fine espresso-style grind or a coarse brew, you will find the method that works best for you.
There is something truly special about brewing a cup of coffee made from freshly ground beans. The aroma fills your kitchen, and the taste is worlds apart from what you get from a jar that has been sitting on a shelf for months. If you have been wondering how to make coffee powder at home, you are in the right place. This guide covers everything you need to know, from picking the right beans to storing your finished product. We will keep things simple and easy to follow, so anyone can do it.
Making coffee powder at home is easier than most people think. You do not need expensive equipment or years of experience. A few basic tools and some good-quality beans are all it takes. The process gives you control over grind size, freshness, and flavor. Once you start making your own coffee powder at home, you will never go back to store-bought grounds. Let us dive into the details and get you started.
Key Takeaways
- Fresh coffee powder tastes better: Grinding beans at home preserves aroma and flavor far longer than pre-ground options.
- Multiple methods work well: You can use a burr grinder, blade grinder, mortar and pestle, or even a blender to make coffee powder.
- Storage matters a lot: Proper storage in airtight containers keeps your coffee powder fresh for weeks.
- Grind size changes everything: Different brewing methods need different grind sizes, from extra fine to coarse.
- Homemade coffee powder is cost-effective: Buying whole beans and grinding them yourself saves money over time.
- You can customize strength and flavor: Adjusting grind size and bean blend lets you create your perfect cup every time.
📑 Table of Contents
- What Is Coffee Powder And Why Make It At Home?
- What You Need To Make Coffee Powder At Home
- Step-By-Step Guide To Making Coffee Powder
- Different Methods To Make Coffee Powder
- How To Choose the Right Grind Size
- How To Store Your Homemade Coffee Powder
- Best Ways To Use Your Homemade Coffee Powder
- Common Mistakes To Avoid
- Expert Tips for Perfect Coffee Powder Every Time
- Conclusion
What Is Coffee Powder And Why Make It At Home?
Coffee powder is simply ground coffee beans. Whole beans get crushed or milled into a fine or coarse texture depending on how you plan to brew them. The result is the dry, granular product we all know as coffee grounds or coffee powder. When you make it yourself, you control every part of the process.
Store-bought coffee powder loses its flavor fast. Once beans are ground, they start to lose their natural oils and aroma. Within just a few weeks, much of the rich taste is gone. Making coffee powder at home means you grind only what you need. Each cup tastes fresher, stronger, and more flavorful. It is a small change that makes a big difference in your daily brew.
Why Freshness Matters So Much
Freshness is the single biggest factor in great-tasting coffee. When you buy pre-ground coffee, you do not know how long it has been sitting on a shelf. The flavor compounds break down quickly after grinding. Oxygen, light, and moisture all speed up this process. By grinding your own beans, you lock in the freshness right before brewing. The difference in taste is easy to notice from the very first sip.
What You Need To Make Coffee Powder At Home
Getting started is simple. You do not need a lot of fancy gear. Here is what you will need to make great coffee powder at home:
- Whole coffee beans: Choose fresh, high-quality beans from a local roaster or a trusted brand. Look for beans with a roast date on the bag, not just an expiration date.
- A grinding tool: This could be a burr grinder, a blade grinder, a hand grinder, or even a mortar and pestle. We will cover each option below.
- An airtight container: For storing your finished coffee powder and keeping it fresh.
- A clean, dry workspace: A kitchen counter or table works perfectly. Make sure the surface is free from moisture and strong odors.
Choosing the Right Coffee Beans
The beans you choose shape the final flavor of your coffee powder. Light roasts have more acidity and fruity notes. Medium roasts offer a balanced, smooth taste. Dark roasts bring bold, smoky, and slightly bitter flavors. Pick a roast that matches your personal preference. If you like strong coffee, go with a dark roast. If you prefer something milder, try a medium roast. Experimenting with different bean origins is also a fun way to discover new flavors.
Step-By-Step Guide To Making Coffee Powder
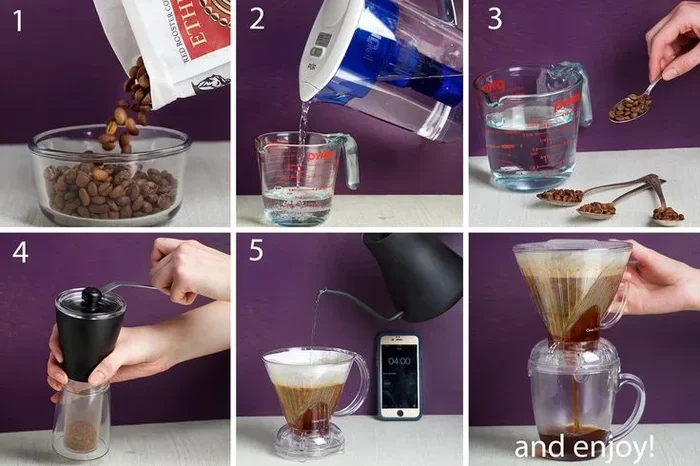
Now let us get into the process. Making coffee powder at home follows a simple sequence of steps. Here is exactly what to do:
Step 1: Measure Your Beans
Start by deciding how much coffee powder you need. A good rule of thumb is about two tablespoons of ground coffee per six-ounce cup. Measure out your whole beans accordingly. It is always better to grind a little extra than to run short. You can store the extra powder for later use.
Step 2: Choose Your Grinding Method
There are several ways to turn whole beans into fine coffee powder. Each method has its own pros and cons. Pick the one that fits your tools and your patience level. We will go through each method in detail in the next section.
Step 3: Grind the Beans
Once your beans are measured and your tool is ready, start grinding. For a fine coffee powder, grind the beans longer and more thoroughly. For a coarser texture, stop grinding sooner. The key is to be consistent. Uneven grounds can lead to uneven extraction and a less balanced cup of coffee.
Step 4: Store Properly
Transfer your freshly ground coffee powder into an airtight container right away. Keep the container in a cool, dark place. Avoid storing it near the stove or in direct sunlight. Proper storage keeps your coffee powder fresh and flavorful for up to two weeks.
Different Methods To Make Coffee Powder
Not all grinding methods are the same. Each one gives you a different texture and level of control. Here are the most popular ways to make coffee powder at home.
Method 1: Burr Grinder (Best for Consistency)
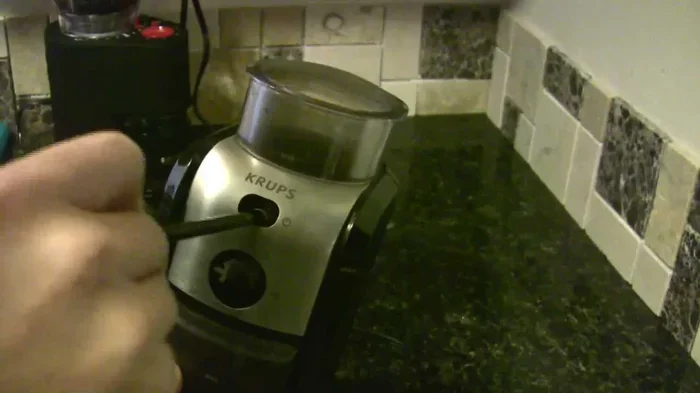
A burr grinder is the gold standard for making coffee powder at home. It uses two rotating surfaces to crush beans into a uniform size. This gives you the most consistent grind, which is important for even extraction. Burr grinders come in both electric and manual versions. They work well for every brew type, from espresso to French press. If you drink coffee regularly, a burr grinder is a worthwhile investment. The uniform coffee powder it produces is simply the best.
Method 2: Blade Grinder (Quick and Affordable)
A blade grinder uses a spinning blade to chop beans into smaller pieces. It is the most common and affordable option. You can find one at most kitchen stores for a reasonable price. The downside is that blade grinders produce uneven grounds. Some pieces will be fine, while others stay chunky. To get a more even result, pulse the grinder instead of running it continuously. Shake the grinder gently while it runs to help the beans move around. A blade grinder works fine for drip coffee makers and pour-over setups.
If you are looking for a quick way to make coffee powder without a dedicated grinder, check out how to make coffee in a microwave oven using simple kitchen tools. While a microwave is not a grinder, it can help you prepare a quick coffee drink with pre-ground powder.
Method 3: Mortar and Pestle (Traditional and Hands-On)
A mortar and pestle is one of the oldest ways to grind coffee beans. This method gives you full control over the texture. You can make a fine coffee powder or keep it coarser, depending on how long you grind. It takes more effort than an electric grinder, but many coffee lovers enjoy the hands-on process. A mortar and pestle works great for small batches. It is also very quiet, which is a bonus if you are grinding early in the morning.
Method 4: Blender or Food Processor (Good for Batch Grinding)
If you do not have a coffee grinder, a blender or food processor can do the job. Pulse the beans in short bursts to avoid overheating them. Overheating can burn the beans and ruin the flavor. Stop and shake the blender between pulses to redistribute the beans. This method works best for making larger batches of coffee powder. The results are not as uniform as a burr grinder, but they are perfectly fine for everyday brewing.
Method 5: Hand Grinder (Portable and Manual)
A hand grinder is a compact, manual option that gives you control over grind size. You turn a crank to rotate the grinding mechanism. Hand grinders are lightweight and portable, making them great for travel. They also produce a fairly consistent grind. If you want a simple, no-electric solution for making coffee powder at home, a hand grinder is an excellent choice.
How To Choose the Right Grind Size
The grind size you choose affects how your coffee tastes. Different brewing methods need different textures. Here is a quick guide to help you pick the right one:
- Extra fine: This looks almost like flour. Use it for Turkish coffee or espresso. The very fine coffee powder extracts quickly and creates a rich, strong cup.
- Fine: Slightly coarser than extra fine. Works well for espresso machines and moka pots. This is a good all-around grind size for strong coffee lovers.
- Medium-fine: A balanced texture that works for pour-over methods like the Hario V60 or Chemex. It gives a clean, bright cup.
- Medium: This is the most common grind size. It works great for drip coffee makers and standard coffee machines. Most store-bought coffee powder is this size.
- Medium-coarse: A bit rougher than medium. Good for Chemex and some French press recipes. It allows for a slower, more thorough extraction.
- Coarse: This looks like sea salt. Use it for French press or cold brew. Coarse grounds steep slowly and produce a smooth, full-bodied cup.
Getting the grind size right is one of the most important parts of making great coffee powder at home. When in doubt, start with a medium grind and adjust from there. Taste your brew and make changes until you find your perfect match.
How To Store Your Homemade Coffee Powder
Proper storage keeps your coffee powder fresh and full of flavor. Here are the best practices:
Use an Airtight Container
Oxygen is the biggest enemy of fresh coffee powder. It causes the flavorful oils to break down quickly. Store your coffee powder in a sealed container with a tight lid. A glass jar with a rubber seal works well. Avoid containers made of thin plastic, as they do not block air very effectively.
Keep It in a Cool, Dark Place
Heat and light speed up the staling process. Do not store your coffee powder near the oven, stove, or sunny window. A pantry or kitchen cabinet away from heat sources is ideal. A cool, dark cupboard keeps the flavor locked in for longer.
Avoid the Freezer (Unless You Must)
Some people store coffee powder in the freezer to extend its shelf life. This can work, but it comes with risks. Moisture from the freezer can get into the container and affect the flavor. If you do freeze your coffee powder, use a truly airtight container and only take out what you need. Let it come to room temperature before opening the container to avoid condensation.
For everyday use, storing coffee powder in a cool, dark pantry in an airtight container is the simplest and most effective method. It keeps the flavor fresh for about two weeks.
Best Ways To Use Your Homemade Coffee Powder
Once you have made your own coffee powder, the possibilities are wide open. Here are some of the best ways to use it:
- Brew a classic cup of drip coffee: Use your medium-ground powder in a standard drip coffee maker. The fresh grind makes a noticeable difference in taste.
- Make espresso or stovetop espresso: Fine coffee powder works perfectly in a moka pot or espresso machine. The rich, bold flavor is hard to beat.
- Prepare French press coffee: Coarse grounds steep beautifully in a French press. The result is a full-bodied, smooth cup.
- Create cold brew concentrate: Coarse coffee powder steeped in cold water for 12 to 24 hours makes a smooth, low-acid cold brew.
- Use in baking recipes: Homemade coffee powder adds depth to chocolate cakes, brownies, and coffee rubs for meats.
- Make a coffee scrub: Mix your coffee powder with coconut oil for a natural exfoliating body scrub. It is a great way to use up any extra powder.
When you make coffee powder at home, you are never stuck with just one option. You can adjust the grind and try different beans for different moods and occasions.
Common Mistakes To Avoid
Even experienced home coffee makers make mistakes. Here are the most common ones and how to avoid them:
- Grinding too far in advance: Coffee powder starts losing flavor within minutes of grinding. Grind only what you need for the current brew. Do not grind a week’s worth of coffee all at once.
- Using the wrong grind size: Too fine and your coffee turns bitter. Too coarse and it tastes weak. Match your grind size to your brewing method for the best results.
- Overheating the beans: If you use a blender or food processor, the friction can heat up the beans. This burns the coffee and creates a bitter taste. Use short pulses and let the machine cool down between batches.
- Storing coffee powder improperly: Leaving your coffee powder exposed to air, light, or moisture ruins the flavor fast. Always use an airtight container and keep it in a cool, dark spot.
- Skipping bean quality: Cheap, old beans produce weak and flat coffee powder. Invest in fresh, quality beans for the best flavor. Look for beans with a recent roast date.
Avoiding these simple mistakes will immediately improve the taste of your homemade coffee. A little attention to detail goes a long way.
Expert Tips for Perfect Coffee Powder Every Time
Here are some pro tips that will take your homemade coffee powder to the next level:
- Buy beans in small batches: Smaller bags stay fresher longer. Buy only what you will use within two to four weeks.
- Clean your grinder regularly: Old coffee oils build up inside grinders and can turn rancid. Wipe down your equipment after each use and give it a deep clean once a week.
- Experiment with bean blends: Try mixing beans from different regions to create your own signature flavor. A blend of Ethiopian and Brazilian beans, for example, offers a nice balance of fruitiness and nuttiness.
- Use filtered water: The water you brew with matters just as much as the coffee powder. Filtered water brings out the best in your beans.
- Preheat your brewing equipment: Warming up your coffee maker or French press before brewing helps extract more flavor from the grounds.
- Taste and adjust: Everyone’s palate is different. Keep experimenting with grind size, bean type, and brew time until you find your perfect cup.
If you enjoy exploring different coffee tools and methods, you might also be interested in learning how to use a combi oven for other kitchen tasks. A combi oven is a versatile appliance that can handle many cooking and heating jobs in the kitchen.
Conclusion
Making coffee powder at home is one of the easiest ways to upgrade your daily coffee routine. It costs less, tastes better, and gives you complete control over every cup. Whether you use a burr grinder, a blade grinder, a mortar and pestle, or a blender, the process is simple and rewarding. Start with fresh beans, choose the right grind size for your brewing method, and store your coffee powder properly. Within minutes, you will taste the difference that freshness makes.
Once you make the switch to homemade coffee powder, you will wonder why you ever settled for pre-ground options. The flavor, the aroma, and the satisfaction of making it yourself are unbeatable. Grab some quality beans, pick your favorite grinding method, and start today. Your taste buds will thank you.
Frequently Asked Questions
Can I make coffee powder without a grinder?
Yes, you can. A mortar and pestle, a blender, or even a food processor can turn whole beans into coffee powder. The results may not be as uniform as a burr grinder, but they work perfectly fine for everyday brewing. Just remember to pulse the tool and avoid overheating the beans.
How long does homemade coffee powder stay fresh?
Homemade coffee powder stays fresh for about one to two weeks when stored in an airtight container in a cool, dark place. The flavor peaks within the first few days after grinding. After that, the aroma and taste gradually decline. For the best experience, grind only what you plan to use within a few days.
What is the best grind size for espresso?
Espresso requires a fine coffee powder, almost like powdered sugar. The fine texture allows water to extract maximum flavor under high pressure. If your espresso tastes bitter, try a slightly coarser grind. If it tastes weak or sour, go finer. Adjusting the grind size is the easiest way to dial in your espresso recipe.
Can I use any type of coffee bean to make powder?
Yes, you can use any type of whole coffee bean to make coffee powder at home. Light, medium, and dark roasts all work well. Each roast level brings a different flavor profile. Light roasts are more acidic and fruity, while dark roasts are bold and smoky. Choose the one that matches your taste preference.
Is homemade coffee powder cheaper than buying pre-ground coffee?
It can be. Whole beans often cost less per cup than pre-ground coffee because you are not paying for the grinding and packaging process. Plus, you waste less because you only grind what you need. Over time, making coffee powder at home can save you a noticeable amount of money.
Can I use coffee powder for anything besides brewing?
Absolutely. Coffee powder is a versatile ingredient in the kitchen. It adds rich flavor to chocolate desserts, brownies, and coffee glazes. You can also use it as a dry rub for meats or mix it into a body scrub for exfoliation. Homemade coffee powder opens up many creative uses beyond just brewing a cup of coffee.