How To Wash Your Keurig Coffee Maker and Keep It Clean
Keeping your Keurig clean is easy when you follow a few simple steps. Regular washing removes buildup, improves taste, and extends the life of your machine. This guide covers everything from daily rinse habits to deep descaling routines.
This is a comprehensive guide about How To Wash Keurig Coffee Maker.
Key Takeaways
- Daily rinsing keeps your Keurig fresh: A quick rinse after each use prevents residue buildup and mold growth.
- Descale every 3 to 6 months: Mineral deposits from hard water can clog your machine and affect coffee flavor.
- White vinegar is your best friend: It is a safe, affordable, and effective natural cleaner for your Keurig.
- Clean every removable part: The water reservoir, drip tray, and K-cup holder all need regular attention.
- Use filtered water: It reduces scale buildup and helps your coffee taste better for longer.
- Never use harsh chemicals: Stick to mild soap, vinegar, or manufacturer-approved descaling solutions.
[FEATURED_IMAGE_PLACEHOLDER]
Why Washing Your Keurig Coffee Maker Matters
Your Keurig does more than just brew coffee. It heats water, pushes it through a pod, and delivers a warm cup in seconds. Over time, however, mineral deposits, coffee oils, and residue build up inside the machine. This can change the taste of your coffee and even affect how well your Keurig works.
Regular Keurig cleaning keeps your coffee tasting fresh. It also prevents mold, bacteria, and unpleasant odors. Think of it like washing a coffee mug. You would never drink from a dirty mug, so why let your machine stay dirty?
Many people forget about coffee maker maintenance until something goes wrong. A slow brew, strange taste, or visible buildup are all signs that your machine needs attention. The good news is that keeping your Keurig clean is simple and takes only minutes.
If you love your morning coffee maker deep clean routine, you will enjoy every cup more. Clean machines brew better coffee. They also last longer, saving you money on replacements.
In this guide, we walk you through everything you need to know about washing your Keurig. From daily habits to deep cleaning sessions, we have you covered.
What You Need to Clean Your Keurig
Before you start, gather a few basic supplies. You do not need anything fancy or expensive. Most items you probably already have in your kitchen.
Essential Cleaning Supplies
- White distilled vinegar – This is the top choice for descaling a Keurig. It breaks down mineral deposits naturally.
- Mild dish soap – Use this for washing removable parts like the reservoir and drip tray.
- Warm water – Hot or warm water helps dissolve grease and residue.
- Soft cloth or sponge – Avoid abrasive scrubbers that can scratch surfaces.
- Descaling solution – If you prefer a store-bought option, many brands make Keurig-safe descalers.
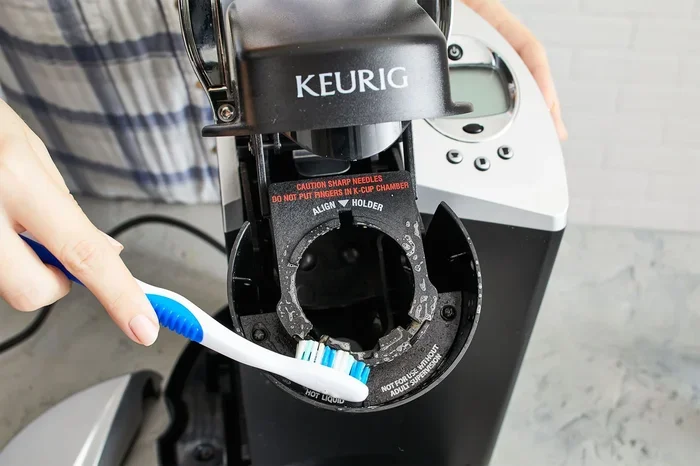
- Small brush or toothbrush – Great for reaching tight spots around the needle and K-cup holder.
Some people also use lemon juice as a natural alternative to vinegar. It works well for light cleaning and leaves a fresh scent. Avoid bleach, harsh chemicals, or abrasive powders. These can damage your machine and leave behind harmful residues.
How to Wash Your Keurig Coffee Maker Step by Step
Now let us get into the actual cleaning process. We break it down into easy steps you can follow every time.
Step 1: Unplug and Disassemble
Always unplug your Keurig before cleaning. Safety comes first. Remove the water reservoir, K-cup holder, and drip tray. These parts are all removable and washable. Check your user manual if you are unsure which parts come off.
Take this time to look inside the machine. Check for any visible buildup around the needle or inside the pod holder. A small brush or toothpick works great for clearing out stuck coffee grounds.
Step 2: Wash Removable Parts
Wash the water reservoir, drip tray, and K-cup holder with warm water and mild dish soap. Use a soft sponge to scrub away any residue. Rinse each piece thoroughly with clean water.
Let all parts air dry on a clean towel. Do not use a rough scrubber or steel wool. These can scratch the plastic and create tiny grooves where bacteria can grow.
For stubborn stains, make a paste with baking soda and water. Apply it gently, let it sit for a few minutes, then rinse clean. This is a safe and effective way to handle coffee stains on Keurig parts.
Step 3: Descale the Machine
Descaling is the process of removing mineral buildup from the inside of your machine. Hard water contains calcium and magnesium that accumulate over time. This scale can clog tubes, reduce water flow, and affect brewing temperature.
To descale, fill the water reservoir halfway with white vinegar and the rest with water. Place a large mug on the drip tray and run a brew cycle without a K-cup. Let the vinegar solution run through the machine. Repeat this until the reservoir is empty.
Then, fill the reservoir with clean water and run several rinse cycles. This removes any vinegar taste or smell. Keep running water cycles until the water smells and tastes neutral.
If you prefer a commercial descaling solution, follow the instructions on the product label. Most brands recommend mixing the solution with water and running the same brew cycle process.
Step 4: Clean the Exterior
Wipe down the outside of your Keurig with a damp cloth and a drop of mild soap. Pay attention to the control panel, the area around the pod entry, and the base. Coffee splashes and dust can accumulate here quickly.
For the needle area, use a paperclip or the cleaning needle that often comes with your Keurig. Gently insert it into the needle opening to clear any blockages. This keeps water flowing freely during each brew cycle.
Never submerge the main machine body in water. Only the removable parts should be washed in water. The electronic components must stay dry at all times.
Step 5: Reassemble and Run a Final Rinse
Once all parts are clean and dry, reassemble your Keurig. Place the reservoir, K-cup holder, and drip tray back in their positions. Plug the machine in and run one final brew cycle with just clean water.
This final rinse ensures that no soap or vinegar residue remains inside the machine. Your Keurig is now ready to brew a fresh, clean cup of coffee.
How Often Should You Clean Your Keurig?
Consistency is key when it comes to coffee machine cleaning. Here is a simple schedule you can follow:
- After every use: Remove the used K-cup and rinse the pod holder. Wipe any spills right away.
- Once a week: Wash the water reservoir, drip tray, and K-cup holder with warm soapy water.
- Every 1 to 3 months: Perform a full descaling session using vinegar or a descaling solution.
- Every 6 months: Do a thorough deep clean of all parts, including the needle and internal tubing.
If you use your Keurig daily, you may need to descale more often. Heavy use means more mineral buildup. Similarly, if you live in an area with hard water, plan for more frequent cleaning sessions.
Using filtered water in your Keurig can significantly reduce scale buildup. It also improves the taste of your coffee. Many Keurig owners find that filtered water extends the time between descaling sessions.
Common Mistakes to Avoid When Cleaning Your Keurig
Even with the best intentions, people make mistakes when cleaning their coffee makers. Here are some common errors to watch out for.
Using Too Much Vinegar
Vinegar is effective, but using too much can leave a strong smell. Stick to the recommended ratio of half vinegar and half water. If you are sensitive to the smell, run extra rinse cycles until it is completely gone.
Skipping the Rinse Cycles
Never skip the rinse cycles after descaling. Residual vinegar can affect the taste of your next few cups of coffee. Run at least three to four plain water cycles to be safe.
Using Harsh Cleaners
Bleach, abrasive cleaners, and strong detergents can damage your Keurig. They may leave chemical residues that end up in your coffee. Stick to mild soap, vinegar, or approved descaling products.
Ignoring the Needle
The puncture needle gets clogged with coffee grounds and mineral deposits. If you ignore it, your brews may be slow or uneven. Clean it regularly with a paperclip or the included cleaning tool.
Not Drying Parts Before Reassembly
Putting wet parts back together can promote mold growth. Always let pieces air dry completely before reassembling your machine.
Tips for Keeping Your Keurig Fresh Between Cleanings
Good habits between deep cleanings make a big difference. Here are some easy tips to keep your machine in top shape.
- Empty the water reservoir when you are not using the Keurig for an extended period. Stagnant water can grow bacteria and mold.
- Wipe the pod holder after each use to prevent coffee oil buildup.
- Use filtered water to reduce mineral deposits from the start.
- Leave the pod holder open after brewing to let moisture escape and prevent mold.
- Run a hot water cycle once a week without a pod. This flushes out any lingering residue.
These small habits take seconds but add up over time. They keep your coffee maker maintenance routine simple and effective.
When you want to enjoy a great cup of coffee at home, a clean machine is essential. If you are exploring other ways to brew, check out how to make coffee in a microwave oven for a quick alternative method. And if you ever need to reheat your coffee later, learn how to reheat beverages safely without ruining the flavor.
How a Clean Keurig Improves Your Coffee
You might wonder if a little buildup really affects your coffee. The answer is yes. Even thin layers of mineral deposits can change brewing temperature and water flow. This directly impacts the flavor and strength of your cup.
A clean Keurig brews at the right temperature. It extracts flavors evenly from the coffee pod. The result is a smoother, richer, and more satisfying cup every time.
Clean machines also smell better. No more stale odors or lingering vinegar traces. Just fresh, clean coffee aroma every morning. This simple upkeep transforms your daily coffee experience.
If you enjoy pairing your coffee with treats, try warming up a Cinnabon in the oven for a perfect coffee companion. The combination of a clean-brewed coffee and a warm pastry makes any morning better.
When to Call a Professional or Replace Your Keurig
Sometimes cleaning is not enough. If your Keurig still has problems after a thorough cleaning, it may be time for further action. Here are signs that your machine needs professional attention or replacement.
- Persistent leaks: Water dripping from the bottom even after cleaning all parts.
- Strange noises: Grinding or bubbling sounds that did not exist before.
- No power: The machine does not turn on even after checking the outlet.
- Repeated clogging: Descaling does not fix slow water flow anymore.
- Visible damage: Cracks, broken handles, or damaged seals on removable parts.
Most Keurig machines last several years with proper care. Regular coffee maker hygiene and maintenance go a long way. But when the machine is beyond repair, replacing it is the safest choice for your health and coffee quality.
Conclusion
Washing your Keurig coffee maker does not have to be complicated. With a few simple supplies and a regular routine, you can keep your machine running smoothly and your coffee tasting great. Daily rinsing, weekly washing, and monthly descaling are all it takes.
Remember to use gentle cleaners, avoid harsh chemicals, and always dry parts before reassembly. These small steps protect your investment and your health. A clean Keurig is a happy Keurig.
Start your cleaning routine today. Your future self will thank you every time you pour a fresh, delicious cup of coffee. Keep it simple, keep it consistent, and enjoy the difference a clean machine makes.
Frequently Asked Questions
Can I use apple cider vinegar to clean my Keurig?
Yes, apple cider vinegar works as an alternative to white distilled vinegar. However, it may leave a slightly stronger smell. Run extra rinse cycles to remove any lingering odor. White vinegar is generally the preferred choice for most users.
How do I know when my Keurig needs descaling?
Signs include slower brewing, unusual noises during operation, or a change in coffee taste. Some Keurig models also have a descale indicator light. If you notice any of these symptoms, it is time to descale your machine.
Is it safe to use bleach on my Keurig?
No, bleach is not safe for Keurig machines. It can leave harmful chemical residues that end up in your coffee. Stick to mild soap, white vinegar, or manufacturer-approved descaling solutions for safe cleaning.
Can I put the Keurig water reservoir in the dishwasher?
Check your user manual first. Most Keurig reservoirs are top-rack dishwasher safe, but hand washing is gentler and extends the life of the plastic. Use warm water and mild soap if hand washing.
How long does the descaling process take?
A full descaling session takes about 30 to 45 minutes. This includes running the vinegar solution through the machine and then flushing with several water rinse cycles. The actual hands-on time is much shorter.
What happens if I do not descale my Keurig regularly?
Mineral buildup can clog the internal tubing, reduce water flow, and lower brewing temperature. Over time, this leads to worse-tasting coffee and potential machine damage. Regular descaling prevents these problems and keeps your Keurig running at its best.