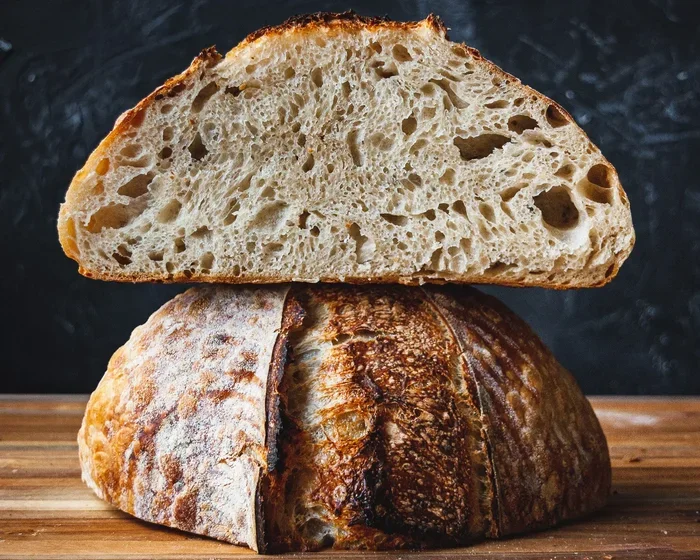
How To Make Sourdough Bread No Dutch Oven Step By Step
You can bake sourdough bread without a Dutch oven using a baking stone, sheet pan, or even a deep oven-safe pot. This step-by-step guide reveals the secrets to getting a crispy, blistered crust and a perfectly airy crumb right in your home oven. No special equipment needed—just sourdough starter, flour, water, salt, and a little patience.
Baking sourdough bread without a Dutch oven is easier than you think. Many beginners believe you need a heavy Dutch oven to get that crispy, bakery-quality crust. But the truth is, you can achieve the same beautiful results with tools you already have in your kitchen. This guide will teach you how to make sourdough bread no Dutch oven, using just a baking stone or sheet pan. You’ll learn the simple techniques that professional bakers use to get a perfect ear and a tangy crumb. Let’s dive in and make your first loaf today.
Whether you are a complete beginner or an experienced baker, this method removes the need for expensive equipment. The no-Dutch-oven approach relies on your home oven, a little steam, and smart timing. I’ll walk you through every step, from feeding your starter to slicing the finished loaf. By the end, you’ll feel confident baking sourdough bread without a Dutch oven every week.
The beauty of this method is its flexibility. You can use a baking stone, a baking steel, or even a simple sheet pan. Each tool gives you a slightly different crust, but all produce a delicious, airy loaf. I’ll explain the pros and cons of each so you can choose what works best for your kitchen. Once you understand the basics of sourdough baking without a Dutch oven, you’ll never look back.
Key Takeaways
- No Dutch Oven Needed: Achieve professional results with a baking stone, sheet pan, or deep oven-safe pot.
- Steam is Key: Create steam with a preheated tray or ice cubes for a crispy crust.
- Cold Retardation: Refrigerate the shaped dough overnight for better flavor and easier scoring.
- Simple Tools: A household oven, a baking stone or steel, and a sharp lame are all you need.
- Practice Makes Perfect: Each bake teaches you more about your oven and your dough.
- Scoring Matters: A deep, confident slash helps the bread expand beautifully.
📑 Table of Contents
- Why You Don’t Need a Dutch Oven to Bake Sourdough
- The Essential Tools for Dutch-Oven-Free Sourdough
- Step-by-Step: How To Make Sourdough Bread No Dutch Oven
- Mastering Steam and Heat Without a Dutch Oven
- Common Mistakes to Avoid When Baking Without a Dutch Oven
- Expert Tips for Perfect Sourdough Every Time
- Key Takeaways
- Conclusion
Why You Don’t Need a Dutch Oven to Bake Sourdough
The Myth of the Dutch Oven
Many recipes insist on a Dutch oven for sourdough. The idea is that the heavy pot traps steam and creates a mini oven. While this works, it’s not the only way. A Dutch oven is heavy, expensive, and takes up storage space. Most home bakers never use it for anything else. So why not bake without one?
The secret is steam management and direct heat. You can replicate the Dutch oven effect with a baking stone, a sheet pan, or even a deep oven-safe pot. The goal is the same: a crispy, caramelized crust and a well-risen interior. Once you understand the science, you can use any tool you prefer.
What a Dutch Oven Actually Does
A Dutch oven traps moisture from the dough. This steam keeps the crust soft during the early bake, allowing the bread to expand fully. This expansion is called oven spring. The thick walls also store heat and radiate it evenly. Without a Dutch oven, you need to add steam manually and ensure your oven has a hot surface.
Here’s a quick comparison of the three main Dutch oven alternatives:
| Method | Pros | Cons |
|---|---|---|
| Baking Stone or Steel | Excellent heat retention, crispy crust, easy to use | Takes time to preheat, heavy |
| Sheet Pan with Parchment | Simple, affordable, works in any oven | Less crust development, no steam unless added |
| Deep Oven-Safe Pot | Traps some steam, good for beginners | Not as heavy as Dutch oven, may not fit all loaves |
Quick Tip: If you want the closest result to a Dutch oven, use a baking steel. It stores more heat than a stone and transfers it instantly to the dough. This creates an aggressive oven spring and a deeply blistered crust.
The Essential Tools for Dutch-Oven-Free Sourdough
Baking Stone or Baking Steel
A baking stone or baking steel is the best investment for Dutch-oven-free baking. It mimics the floor of a brick oven. Preheat it for at least 45 minutes at 450°F (230°C). The stone stores heat and delivers a burst of energy when the dough lands on it. This creates an instant rise and a crunchy bottom crust.
If you don’t have a stone, a pizza stone works too. A baking steel heats faster and holds more heat. Both are affordable and last for years. Place the stone on the middle or lower rack of your oven. A perforated pizza tray is another great option because it allows air to circulate under the dough, giving you an even crispier bottom.
Sheet Pan and Parchment Paper Method
The sheet pan method is the simplest approach. Place a sheet pan on the middle rack and preheat it along with the oven. Line a second sheet pan with parchment paper. When the dough is ready, carefully transfer it onto the parchment. Then slide the loaded pan onto the preheated sheet below. The hot pan beneath acts as a heat source for a crispy bottom.
This method is great for beginners. It requires no special equipment. You can also use a perforated pizza tray for even better airflow. The crust won’t be as thick as with a stone, but it will still be delicious. This hearth bread technique gives you a lovely, even bake every time.
Deep Oven-Safe Pot as a Substitute
If you want to trap some steam but don’t have a Dutch oven, use a deep oven-safe pot or a cloche. A clay cloche covers the loaf and traps moisture. A deep metal pot with a lid works similarly. Preheat the pot in the oven, then place the dough inside and cover with the lid for the first 20 minutes of baking.
This method is a middle ground between a full Dutch oven and a bare stone. It gives you some of the steam benefits without the weight. Just make sure the pot is rated for 450°F or higher. A Dutch oven alternative like this is perfect for those who want a bit of the traditional method without the bulk.
Step-by-Step: How To Make Sourdough Bread No Dutch Oven
Day 1: Feed Your Starter and Mix the Dough
Start with an active sourdough starter that has been fed 4–12 hours before. In a large bowl, mix 500g of bread flour, 350g of water (70% hydration), and 100g of active starter. Add 10g of salt. Use the pinch and fold method to combine. Don’t knead. Just press the dough with your fingers and fold it over itself. Let it rest for 30 minutes. This is called autolyse.
After autolyse, stretch and fold the dough four times, 15 minutes apart. Wet your hands slightly to prevent sticking. This develops gluten strength without overworking the dough. You’ll notice the dough becoming smoother and more elastic. The bench rest between folds allows the gluten to relax and the hydration to distribute evenly.
Bulk Fermentation and Stretch and Folds
Bulk fermentation is the first rise. It usually takes 4–6 hours at room temperature (75°F/24°C). During this time, the dough ferments and rises. Perform a set of stretch and folds every 30 minutes for the first 2 hours. Then let it rest undisturbed. You’ll see bubbles forming and the dough increasing in volume by about 50%.
Watch the dough, not the clock. It’s ready when it looks puffy and jiggly. A warm kitchen speeds up fermentation; a cool one slows it down. If your dough overproofs, it will be sticky and hard to shape. If underproofed, it won’t expand in the oven. This bulk fermentation step is the heart of sourdough baking and sets the stage for a great loaf.
Shaping and the Cold Retard
Gently turn the dough onto a lightly floured surface. Shape it into a tight boule (round) or batard (oval). Use a bench scraper to create surface tension. Place the shaped dough seam-side up in a floured banneton or a bowl lined with a floured towel.
Now, the cold retard step. Cover the banneton with a lid or plastic wrap and refrigerate for 12–18 hours. This slow, cold fermentation develops deep, complex flavors. It also makes the dough easier to score. The next morning, take the dough out 30 minutes before baking to warm slightly. The cold retard is what gives your bread that tangy, rich taste and a beautiful ear formation when scored.
Scoring and Baking
Preheat your oven to 475°F (245°C) with a baking stone or sheet pan inside for at least 45 minutes. Remove the dough from the fridge. Carefully turn it onto parchment paper. Use a lame or razor blade to score the top. A deep, confident slash about 1/4 inch deep helps the bread expand. This scoring technique controls where the loaf opens and creates that signature ear.
Slide the dough (on parchment) onto the preheated stone or place the sheet pan into the oven. Add steam immediately. Bake covered for the first 20 minutes if using a pot, or uncovered if using a stone. Then reduce heat to 425°F (220°C) and bake for another 20–25 minutes until deeply browned. The internal temperature should reach 205–210°F (96–99°C). Let the loaf cool completely on a wire rack before slicing.
Quick Tips:
- Use rice flour or semolina on the banneton for easy release.
- Don’t be afraid to score deeply—shallow cuts won’t give you enough oven spring.
- If you don’t have a lame, a very sharp chef’s knife works in a pinch.
- Rotate the pan halfway through baking for even color.
Mastering Steam and Heat Without a Dutch Oven
Why Steam Matters for Sourdough
Steam keeps the crust soft during the first part of baking. This allows the loaf to expand fully and develop a glossy, crackly skin. Without steam, the crust sets too early and the bread doesn’t rise as much. A Dutch oven naturally provides steam, but you must create it yourself otherwise.
The window of steam is the first 15–20 minutes of baking. After that, you want dry heat to crisp the crust. So your steam method should be easy to add and remove. This steam in oven technique is the key difference between a good loaf and a great one.
How to Add Steam to a Home Oven
There are several simple ways to add steam. Place a preheated cast iron skillet or metal tray on the bottom rack. When you load the bread, pour 1 cup of boiling water into the tray. Close the door quickly to trap the steam. You can also spray the oven walls with water (not the heating elements) right after loading.
Another trick is to place a damp towel in the oven with the bread for the first 10 minutes. Or use a spray bottle to mist the inside of the oven. Avoid opening the door too often, as it releases heat and steam. A pan of water placed in the oven throughout the bake also helps maintain humidity.
Temperature and Timing
Bake at 475°F (245°C) for the first 20 minutes with steam. Then lower to 425°F (220°C) for the remaining time. This two-stage temperature creates a deep brown crust and a fully baked interior. If your oven runs hot, use an oven thermometer to verify the temperature. A baking steel will give you even better results than a stone because it conducts heat faster.
Expert Insight: Many professional bakers prefer the stone and steam method over a Dutch oven. It gives them more control over crust development and allows for larger loaves. Once you master this method, you’ll never go back to the Dutch oven for everyday baking.
Common Mistakes to Avoid When Baking Without a Dutch Oven
Skipping the Preheat
The biggest mistake is not preheating the stone or pan long enough. A cold surface will cause the bread to stick and won’t give you oven spring. Always preheat for a full 45–60 minutes. The oven should be fully saturated with heat before the dough goes in. This is non-negotiable for a crispy bottom crust.
Overproofing the Dough
Without a Dutch oven, the dough is more exposed. If you overproof, the structure collapses. Look for the dough to increase by about 50–75% during bulk fermentation. After shaping, it should not double again before baking. The cold retard helps control this timing. If the dough feels fragile and sticky, it’s overproofed and will be hard to score properly.
Not Using Enough Steam
If you skip steam, your crust will set too early and the bread will be dense. The loaf may not open up properly when scored. Always add steam for the first 20 minutes. A simple pan of water in the oven can also help maintain humidity. This steam in oven step is what gives you that crackly, blistered crust.
Using Too Much Flour on the Surface
A light dusting of flour is fine, but excess flour burns and creates a bitter taste. Use a very thin layer of rice flour or semolina on the banneton and the dough. This also helps the dough release easily after baking. Too much flour on the surface will mask the golden color of the crust.
Common Mistakes Summary:
- Not preheating long enough.
- Overproofing the dough.
- Skipping the steam step.
- Using too much surface flour.
- Opening the oven door too often.
Expert Tips for Perfect Sourdough Every Time
Use a Baking Steel for Better Heat Retention
A baking steel is the secret weapon of many home bakers. It heats up faster than stone and stores more energy. When the cold dough hits the steel, it gets an immediate burst of heat from below. This creates a dramatic oven spring and a beautifully blistered crust. You can find baking steels in various thicknesses. A 1/4-inch steel works well for most home ovens.
Try the Cold Retard for Deeper Flavor
The overnight cold retard is not just about convenience. It allows enzymes to break down starches into simpler sugars, which caramelize during baking. This creates a richer, more complex flavor and a darker, glossier crust. Even a 6-hour retard in the fridge makes a noticeable difference. It also makes scheduling your bake much easier. The cold retard is a game-changer for sourdough baking without a Dutch oven.
Keep a Baking Journal
Every oven is different. Track your hydration, fermentation times, temperatures, and results. Note the weather, the flour brand, and how the dough felt. Over time, you’ll learn exactly how your oven behaves. This baking journal is the fastest way to improve your sourdough bread without a Dutch oven technique. Write down what worked and what didn’t. You’ll be amazed at how quickly you improve.
Expert Insight: Many professional bakers prefer the stone and steam method over a Dutch oven. It gives them more control over crust development and allows for larger loaves. Once you master this method, you’ll never go back to the Dutch oven for everyday baking. The no-Dutch-oven approach also makes it easier to bake multiple loaves at once.
Key Takeaways
- No Dutch Oven Needed: A baking stone, steel, or sheet pan works perfectly for sourdough bread without a Dutch oven.
- Steam is Essential: Add steam for the first 20 minutes to get a crispy, crackly crust and good oven spring.
- Cold Retardation: Refrigerating the shaped dough overnight deepens flavor and makes scoring easier.
- Simple Tools: You only need flour, water, salt, a starter, and a preheated surface.
- Practice Makes Perfect: Each bake teaches you more about your oven and your dough’s behavior.
- Scoring is an Art: A deep, confident slash creates an beautiful ear and helps the loaf expand.
Conclusion
Baking sourdough bread no Dutch oven is a rewarding skill that anyone can learn. You don’t need fancy equipment to achieve a crispy, tangy loaf with a beautiful open crumb. With a baking stone or sheet pan, a little steam, and a bit of patience, you can bake like a professional in your own kitchen. The step-by-step method outlined here gives you full control over the process, from mixing to scoring.
Start with the sheet pan method if you’re new, then upgrade to a baking stone as you gain confidence. Remember to preheat thoroughly, add steam, and use the cold retard for the best flavor. Each bake will teach you something new. Soon, how to make sourdough bread no Dutch oven will feel like second nature. Enjoy the process, and don’t forget to share your first loaf with friends and family. Happy baking!
Frequently Asked Questions
Can I use a regular baking sheet instead of a baking stone?
Yes, a regular baking sheet works well for beginners. Preheat it in the oven for at least 30 minutes before baking. The hot sheet will still give you a decent bottom crust. For a crispier result, place a second sheet pan underneath the one with the dough.
How do I know if my sourdough starter is ready to use?
A ready starter should double in size within 4–6 hours of feeding and pass the float test. Drop a small spoonful into water—if it floats, it’s active enough to leaven bread. If it sinks, feed it again and wait a few more hours.
What is the cold retard and why is it important?
The cold retard is the step where you refrigerate the shaped dough for 12–18 hours before baking. This slow fermentation develops deeper, more complex flavors and makes the dough easier to score. It also gives you more flexibility in your baking schedule.
Can I bake sourdough on a pizza stone?
Absolutely. A pizza stone is a great Dutch oven alternative. It provides a hot, flat surface that mimics a brick oven floor. Preheat it for at least 45 minutes and use a peel or parchment paper to transfer the dough safely.
How do I add steam to my oven without a Dutch oven?
Place a preheated cast iron skillet or metal tray on the bottom rack. When you load the bread, pour 1 cup of boiling water into the tray and close the door quickly. You can also mist the oven walls with water or place a damp towel inside for the first 10 minutes.
Why didn’t my bread develop an ear?
An ear forms when the dough expands rapidly in the oven and the crust sets around the score. If you didn’t get an ear, your dough may have been underproofed, your score too shallow, or you didn’t use enough steam. Try a deeper slash and ensure you add steam for the first 20 minutes of baking.




One Comment