Find Where The Igniter Is On Your Whirlpool Gas Oven
Finding the igniter on your Whirlpool gas oven is simple once you know where to look. This guide walks you through the exact igniter location, common failure signs, and how to safely inspect or replace it. You’ll save time and money by tackling this repair yourself.
Is your Whirlpool gas oven failing to heat up? You’re not alone. Many homeowners face this frustrating issue, and the cause is often a simple igniter problem. The igniter on a Whirlpool gas oven is a small but critical component that sparks the flame to heat your food. When it wears out, your oven won’t bake or broil properly.
Knowing exactly where is the igniter on a whirlpool gas oven helps you diagnose the issue quickly. You don’t need to be a professional technician to find it. With a little patience and the right guidance, you can locate the igniter, check its condition, and even replace it yourself. This guide will show you the exact igniter location for different Whirlpool models, explain the signs of a failing igniter, and walk you through the replacement process step by step.
Key Takeaways
- Igniter Location: The igniter is typically mounted at the bottom of the oven cavity, near the bake burner.
- Two Main Types: Whirlpool ovens use either a flat glow bar igniter or a round igniter, depending on the model.
- Common Failure Signs: No heat, delayed ignition, or a bright white glow without lighting indicate a bad igniter.
- Safety First: Always disconnect power and turn off the gas supply before working on the igniter.
- Replacement is Easy: Swapping the igniter takes about 30 minutes with basic tools.
- Test Before Replacing: Use a multimeter to check igniter resistance and avoid unnecessary part purchases.
📑 Table of Contents
- Understanding The Igniter’s Role In Your Whirlpool Oven
- Where Is The Igniter Located On A Whirlpool Gas Oven?
- Signs Your Whirlpool Oven Igniter Is Failing
- Step-by-Step Guide To Finding And Inspecting The Igniter
- How To Replace A Whirlpool Gas Oven Igniter
- Safety Tips And Common Mistakes To Avoid
- Conclusion
Understanding The Igniter’s Role In Your Whirlpool Oven
The igniter is the heart of your oven’s ignition system. When you turn the oven on, the control board sends voltage to the igniter. The igniter glows hot, reaching temperatures around 1,500°F, which opens the gas valve. Gas then flows to the burner and ignites immediately. Without a working igniter, the gas valve stays closed, and no flame appears.
Whirlpool gas ovens use a glow bar igniter made of silicon carbide. This material glows brightly when electricity passes through it. The igniter is connected to the oven control board via a wiring harness. A safety valve and thermal fuse protect the system from overheating. If any of these parts fail, your oven won’t heat.
What Does The Igniter Do During Baking?
During baking, the igniter must reach a specific temperature to signal the gas valve to open. This process takes about 30 to 90 seconds. You’ll see a bright orange glow. If the igniter is weak, it may glow but not get hot enough to open the valve. This causes delayed ignition or no ignition at all. The bake burner then won’t light, and your oven stays cold.
How Broiling Uses The Igniter
The same igniter often powers the broiler function in top-mount ovens. When you set the oven to broil, the igniter glows and opens the broil burner valve. Some models have a separate igniter for the broiler, but most Whirlpool ranges use one igniter for both baking and broiling. This design simplifies the ignition system but means a single igniter failure affects both functions.
Where Is The Igniter Located On A Whirlpool Gas Oven?
The igniter location varies slightly depending on whether you have a single oven or a double oven, and whether it’s a slide-in or freestanding range. However, the igniter is always inside the oven cavity, near the bottom for baking. To find it, you’ll need to remove the oven racks and sometimes the bottom panel.
The Exact Location: Where Is The Igniter On A Whirlpool Gas Oven?
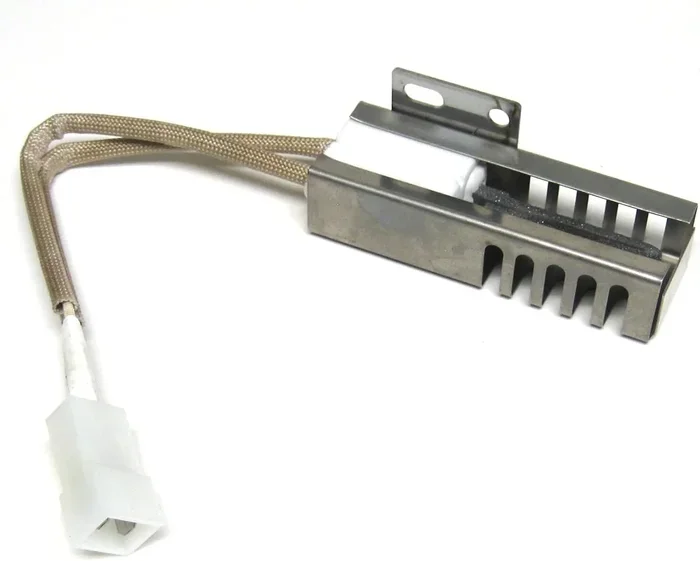
For most Whirlpool gas ovens, the igniter sits at the very bottom of the oven cavity. Look for a small, oval or round metal piece mounted on the side of the bake burner. It’s usually held in place by a single screw or bracket. The igniter has two wires connected to it. The igniter connector plugs into the wiring harness that runs to the back of the oven cavity.
In some models, the igniter is positioned under the burner itself, hidden behind the burner grate. You may need to remove the oven floor or a metal plate to see it. Always ensure the oven is completely cool before reaching inside.
Top Oven Or Broiler Igniter Position
On double-oven Whirlpool ranges, the top oven may have its own igniter. This igniter is located at the top of the upper oven cavity, near the broiler element. In single ovens, the igniter serves both the bake and broil functions. If you’re looking for the broiler igniter, check near the top of the oven, behind the broiler pan.
How To Access The Igniter Safely
Before you start, turn off the oven and unplug it from the wall. If your oven is hardwired, switch off the circuit breaker. You’ll also need to shut off the gas supply valve behind the range. Removing the oven racks gives you clear access to the bottom cavity. Some models have a removable bottom panel held by screws. Take a photo before disassembly so you can reassemble it correctly.
Signs Your Whirlpool Oven Igniter Is Failing
A failing igniter is the most common reason a Whirlpool gas oven stops heating. Recognizing the early warning signs can save you from a cold oven during dinner prep.
Common Symptoms Of A Bad Igniter
- No heat at all: The oven lights up but the burner never ignites.
- Delayed ignition: You hear a clicking or gas smell before the burner finally lights.
- Bright white glow but no flame: The igniter glows but doesn’t reach the required temperature to open the gas valve.
- Inconsistent heating: The oven heats sometimes but fails at other times, especially during long baking cycles.
- Error codes: Some Whirlpool models display an F10 or F2 error code when the igniter circuit fails.
When To Replace The Igniter
If you notice any of these symptoms, it’s time to test the igniter. A multimeter test can measure the igniter’s resistance. A healthy igniter typically reads between 10 and 50 ohms. If the reading is open (infinite) or much higher, the igniter needs replacement. Don’t wait until the oven completely stops working. A weak igniter can also cause uneven oven temperature and affect your baking results.
Comparison: Normal Ignition vs. Failing Igniter
| Condition | Normal Igniter | Failing Igniter |
|---|---|---|
| Glow Color | Bright orange within 30-90 seconds | Dim glow or bright white but no flame |
| Ignition Time | Less than 90 seconds | Over 2 minutes or never |
| Gas Valve Operation | Opens fully when igniter is hot | Stays closed or opens partially |
| Oven Temperature | Reaches set temperature steadily | Fails to rise or fluctuates widely |
| Burner Flame | Blue, steady flame | No flame or lazy, yellow flame |
Step-by-Step Guide To Finding And Inspecting The Igniter
Follow these steps to locate and inspect the igniter on your Whirlpool gas oven. This process works for most models from the 1990s to current years.
Tools You’ll Need
- Screwdriver set (Phillips and flathead)
- Multimeter for testing resistance
- Flashlight or headlamp
- Needle-nose pliers
- Replacement igniter (if needed)
Removing The Oven Rack And Bottom Panel
- Slide out the oven racks completely.
- Locate the screws on the bottom panel inside the oven cavity. Some models have a single screw at the back.
- Remove the screws and carefully lower the panel. Set it aside.
- You should now see the bake burner tube and the igniter mounted to it.
Locating The Igniter And Checking Its Condition
The igniter looks like a small ceramic bar with a glowing element in the middle. It’s attached to the burner tube with a metal bracket. Follow the two wires to the igniter connector at the back of the oven cavity. Before removing the igniter, use your multimeter to test resistance. Set the meter to the lowest ohms setting and touch the probes to the igniter terminals. A reading of 10-50 ohms means the igniter is good. If it reads open, you’ve found your problem.
Visually inspect the igniter for cracks, breaks, or white powdery deposits. A cracked igniter will not glow properly. Also check the igniter connector for corrosion or burnt terminals. Clean any corrosion with a dry cloth before testing.
Quick Tips For Inspection
- Always test the igniter with the oven completely cooled.
- Take a photo of the wiring before disconnecting anything.
- Never touch the igniter element with bare hands; oils from skin can shorten its lifespan.
- If the igniter looks intact but tests bad, replace it anyway. Internal failures are common.
How To Replace A Whirlpool Gas Oven Igniter
Replacing the igniter is a straightforward DIY repair. You’ll need about 30 minutes and no special skills. Here’s how to do it safely.
Buying The Correct Replacement Part
Not all igniters are the same. Whirlpool uses several igniter shapes and wattages. Check your model number on the rating plate inside the oven door or on the back of the range. Order the exact replacement part from Whirlpool or a trusted appliance parts retailer. The part number usually starts with “W10X” or “W10Y”. Buying the wrong igniter can lead to poor ignition or damage to the oven control board.
Installing The New Igniter
- Disconnect the power at the breaker and the gas supply valve.
- Remove the old igniter by unscrewing the mounting bracket or pulling the igniter connector straight out.
- Install the new igniter in the same position. Secure it with the bracket and screw.
- Plug the igniter connector back into the wiring harness.
- Reattach the bottom panel and oven racks.
- Restore power and gas. Turn on the oven and wait for ignition. The new igniter should glow bright orange within 30-90 seconds.
If the oven still doesn’t light, check the safety valve and thermal fuse. These parts can also cause a no-heat condition. A multimeter test on the safety valve can confirm if it’s receiving power.
Safety Tips And Common Mistakes To Avoid
Working with gas appliances requires caution. Follow these safety guidelines to protect yourself and your oven.
Electrical Safety Precautions
- Always unplug the oven or turn off the breaker before starting any repair.
- Never touch the igniter or wiring with wet hands.
- Use insulated tools when handling the igniter connector.
- If you smell gas, leave the area immediately and call your gas utility.
Common Mistakes That Can Damage The Igniter
- Touching the igniter element: The oils from your fingers create hot spots that cause the igniter to crack prematurely. Always handle it by the ceramic base.
- Forcing the connector: The igniter connector can break if you pull it at an angle. Pull straight out gently.
- Using the wrong replacement part: A mismatched igniter may glow but not open the gas valve, leading to gas buildup.
- Skipping the multimeter test: Replacing a perfectly good igniter wastes money and doesn’t fix the real issue, which could be a faulty oven control board or thermal fuse.
- Ignoring the gas smell: If you smell gas during the repair, stop immediately. Do not attempt to light the oven.
Expert Insight: When To Call A Professional
Most homeowners can replace an igniter with confidence. However, if you’re uncomfortable working with gas lines or electrical components, call a licensed appliance technician. Also, if you’ve replaced the igniter and the oven still won’t heat, the problem may lie with the oven control board, safety valve, or temperature sensor. A professional can diagnose these issues safely.
Conclusion
Finding where is the igniter on a whirlpool gas oven doesn’t have to be a mystery. The igniter is almost always at the bottom of the oven cavity, mounted near the bake burner. By following the steps in this guide, you can locate the igniter, test it, and replace it if needed. A working igniter ensures your oven heats evenly and safely for all your baking and broiling tasks.
Remember to always prioritize safety. Disconnect power and gas before you start. Use the right replacement part, and don’t hesitate to call a professional if you’re unsure. With a little effort, you can bring your Whirlpool oven back to life and enjoy perfectly cooked meals again.
Frequently Asked Questions
How do I know if my igniter is bad?
Look for signs like no heat, delayed ignition, or a bright white glow that doesn’t produce a flame. A multimeter test can confirm failure by showing infinite resistance. If the igniter glows dimly or cracks visually, it needs replacement.
Can I clean the igniter instead of replacing it?
You can gently clean the igniter with a dry cloth to remove surface debris, but this won’t fix a cracked or weakened element. If the igniter fails a resistance test, cleaning won’t restore proper function. Always replace a faulty igniter to ensure safe gas oven operation.
How much does a Whirlpool oven igniter cost?
A replacement igniter typically costs between $30 and $60, depending on the model. The part number is usually printed on the old igniter or found in your owner’s manual. Purchasing the correct Whirlpool range part ensures proper fit and ignition performance.
Is it safe to replace the igniter myself?
Yes, it’s safe as long as you disconnect power and turn off the gas supply first. Follow the wiring diagram and handle the igniter by the ceramic base only. If you feel uncertain about working with gas lines, hire a professional technician.
What should I do if the oven still won’t heat after replacing the igniter?
Check the safety valve and thermal fuse next. A multimeter test can reveal if these parts are receiving power and functioning correctly. Also verify that the igniter connector is fully seated and the wiring harness is intact.
How long does it take to replace a Whirlpool oven igniter?
Most homeowners complete the replacement in 30 to 45 minutes. The process involves removing the bottom panel, disconnecting the old igniter, and installing the new one. Having the correct replacement part ready speeds up the job significantly.