How To Dry Cranberries For Garland In Your Home Oven
Learning how to dry cranberries for garland in oven is a simple, rewarding craft project anyone can do at home. This guide walks you through every step, from selecting the freshest cranberries to threading them onto a beautiful string and drying them at the perfect low temperature. You will discover tips, common mistakes, and creative ideas that turn ordinary cranberries into stunning holiday decorations.
There is something truly magical about walking into a cozy home during the holiday season and seeing a beautiful cranberry garland draped across the mantle or hanging on the front door. These vibrant red decorations bring warmth, tradition, and a touch of rustic charm to any space. While many people buy pre-made garlands from stores, creating your own is far more rewarding. And the best part? You can do it right in your kitchen oven.
Learning how to dry cranberries for garland in oven is easier than most people think. With just a few simple supplies and a little patience, you can produce stunning dried cranberry strands that look professional and last for weeks. Whether you are a seasoned crafter or a complete beginner, this guide will walk you through every step of the process. By the end, you will feel confident enough to create beautiful homemade cranberry decorations for your own home or as heartfelt gifts for friends and family.
This article covers everything you need to know. From selecting the freshest berries to the final drying stages, we have you covered. You will learn the exact oven settings, timing, and techniques that produce the best results. We will also share creative ideas for using your finished garland and tips for storing them so they last through the holiday season and beyond.
So preheat your oven, gather your cranberries, and let us get started on this fun and festive project. Once you see how simple it is, you will wonder why you ever bought a garland from a store in the first place.
Key Takeaways
- Oven drying is the easiest and most accessible method for making beautiful cranberry garlands at home without special equipment.
- Use low heat between 200 and 225 degrees Fahrenheit to dry cranberries slowly and preserve their shape and color.
- Proper threading and spacing are essential for even airflow and consistent drying across every berry.
- Homemade cranberry decorations make thoughtful, personal gifts that friends and family will treasure during the holiday season.
- Storing dried cranberries in airtight containers with silica packets keeps them fresh and mold-free for weeks or even months.
- Avoid common mistakes like overcrowding the baking sheet and using too high a temperature for the best results.
- Experiment with combining cranberries and other dried fruits to create unique, colorful garland designs.
📑 Table of Contents
Why Drying Cranberries for Garland Is a Great Idea
Before we dive into the process, let us talk about why this project is worth your time. Drying cranberries for cranberry garland crafting is not just a fun activity. It is also a practical way to preserve fresh fruit and create lasting decorations that bring joy all season long.
The Charm of Homemade Cranberry Decorations
There is a special warmth that comes with handmade holiday decor. When guests notice a beautiful dried cranberry garland hanging in your home, they will immediately sense the personal touch. Store-bought decorations cannot match the authenticity of something you made yourself. Each berry carries a bit of your time and effort, which makes the whole piece more meaningful.
Homemade festive cranberry decor also makes wonderful gifts. Imagine handing a friend a beautifully crafted cranberry wreath or garland during the holiday season. It shows thoughtfulness and creativity. Many people love receiving handmade gifts because they know someone cared enough to make something unique with their own hands.
Cranberry holiday crafts like garlands and wreaths also connect us to older traditions. For generations, families have used fresh cranberries to decorate their homes during the colder months. By keeping this tradition alive, you are preserving something meaningful while adding your own modern twist.
Benefits of Oven Drying Over Other Methods
You might wonder why we focus on the oven when food dehydrators and air-drying methods exist. Each approach has its merits, but oven drying offers several clear advantages for beginners and busy crafters alike.
First, most households already have an oven. You do not need to buy any special equipment. Second, oven drying gives you more control over temperature and airflow. Third, it is faster than air-drying, which can take days or even weeks. Fourth, oven drying produces consistent results when you follow the right steps.
Of course, food dehydrator alternatives like dehydrators work well too. But for most people, the oven is the most accessible and convenient option. It keeps things simple and affordable. You can start your project today without any extra shopping trips.
What You Need Before You Start
Gathering your supplies ahead of time makes the whole process smoother. Here is everything you will need to create a gorgeous dried fruit garland using fresh cranberries.
Choosing the Right Cranberries
Not all cranberries are created equal when it comes to oven dried fruit projects. You want to select berries that are firm, plump, and deeply red. Avoid any cranberries that are soft, shriveled, or have white spots. These signs indicate the berries are past their prime and will not dry well.
Fresh cranberries from a local farm or grocery store work perfectly. If you can find organic cranberries, even better. The skin of the berry needs to be intact for the best results during the low heat drying process. Firmer berries hold their shape better and are easier to thread onto a string.
You will need about one pound of fresh cranberries for a standard 12-inch garland strand. If you are making a larger wreath or longer garland, simply multiply the amount accordingly. It is always smart to buy a few extra berries in case some break during the cranberry stranding process. Having backup berries saves you from having to start over.
Essential Tools and Supplies
Here is a simple list of everything you need to gather before you begin:
- Fresh cranberries – one to two pounds depending on your project size
- Heavy-duty needle – a large embroidery needle or darning needle works best
- Heavy thread or fishing line – something strong enough to hold the weight of the berries
- Baking sheets – lined with parchment paper for easy cleanup
- Parchment paper – prevents sticking and promotes even oven dried cranberries
- A sharp knife – for any prep work if needed
- A cooling rack – optional but helpful for better air circulation
Having all of these items ready before you start will save you time and frustration. There is nothing worse than getting halfway through a project and realizing you are missing something essential. A little preparation goes a long way toward a smooth and enjoyable crafting experience.
Step-by-Step: How To Dry Cranberries For Garland In Oven
This is the heart of the guide. Here we walk through the entire how to dry cranberries for garland in oven process in detail. The method is straightforward, but paying attention to small details makes all the difference between good results and great ones.
Preparing Your Cranberries
Start by rinsing your cranberries gently under cool running water. Use a colander and swirl the berries around with your hands. This removes any dirt, debris, or residue from the surface. After rinsing, spread the berries out on a clean towel and pat them dry thoroughly. Moisture on the surface can extend drying time and lead to uneven results.
Next, inspect each berry carefully. Remove any that are bruised, soft, or discolored. These berries will not dry well and could affect the appearance of your finished cranberry decorations. Set aside only the best, firmest cranberries for the next steps.
If you notice any stems still attached, gently twist them off. You want a clean surface for threading. Some people leave the stems on for a more rustic look, but removing them gives a neater, more polished result. The choice is yours, and both approaches work well for different styles of dried cranberries for crafts.
Threading the Cranberries
Now comes the fun part. Cut a length of thread or fishing line about twice as long as your desired garland length. This gives you extra room for tying knots at both ends without running short.
Push the needle through the center of each cranberry. Cranberries have a natural indentation on one side. Slide the needle through this spot for the easiest cranberry stranding. Work slowly and carefully to avoid splitting the berry. If a berry does split, simply set it aside and move to the next one.
Push the berries down the thread one at a time, leaving about half an inch of space between each one. This gap allows air to circulate around every berry during drying, which is essential for even dehydrate cranberries results. If you pack them too tightly, some berries may not dry properly and could develop mold. Take your time with this step. The effort you put in here directly affects the quality of your finished piece.
Setting the Right Oven Temperature
This is where many people make mistakes. The key to successful oven dried fruit is low and slow heat. Set your oven to the lowest possible temperature, ideally between 200 and 225 degrees Fahrenheit.
Higher temperatures will cook the cranberries instead of drying them. This causes them to burst, lose their shape, and develop an unpleasant texture. You want gentle heat that draws out moisture slowly over several hours. Patience is the secret ingredient here.
If your oven does not go low enough, you can prop the door open slightly with a wooden spoon. This allows moisture to escape and keeps the temperature from climbing too high. It is a simple trick that makes a big difference in the quality of your oven dried cranberries. You can also crack a nearby window slightly to help humidity escape from your kitchen.
The Drying Process
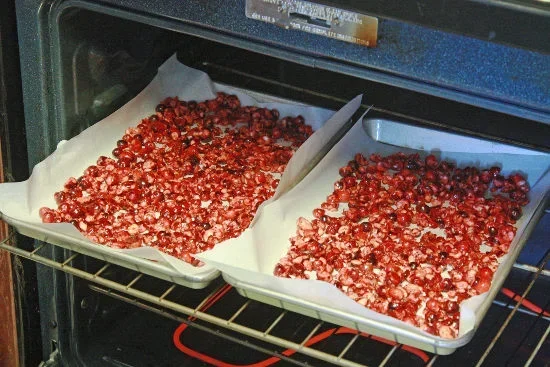
Place your threaded cranberries on a parchment-lined baking sheet. Make sure the berries are laid flat and not overlapping. Use two baking sheets if you have a large batch, rotating them on the middle rack every few hours for even results.
Place the tray in the center of your oven. Prop the door open with a wooden spoon or oven mitt to allow moisture to escape. This is critical for proper low heat drying and prevents the berries from steaming instead of drying. Without adequate airflow, your cranberries may become sticky or develop an off smell.
The drying time typically ranges from six to ten hours. Check the berries every two hours. Rotate the baking sheet if needed for more uniform results. The exact time depends on your oven, the size of the berries, and the humidity level in your kitchen. Every oven behaves a little differently, so trust your senses as much as the clock.
Testing for Doneness
After six hours, start checking the cranberries. A properly dried cranberry should feel firm but slightly flexible. It should not be rock hard or crunchy. When you squeeze it gently, it should give slightly without feeling wet or squishy inside.
The color will also change during the process. Fresh cranberries are bright red, but dried ones become deeper and slightly wrinkled. This is completely normal and actually adds to their rustic, natural charm. If any berries still feel moist in the center, give them another one to two hours and check again.
Once the berries are fully dry, turn off the oven and let the garland cool completely inside. This prevents condensation from forming on the berries as they adjust to room temperature. Rushing this step can lead to mold or spoilage later. Good things come to those who wait, and your preserving cranberries efforts will be worth it.
Oven Drying vs. Food Dehydrator: Which Is Better?
Both methods produce excellent dried cranberries for crafts, but they have distinct differences. Let us compare them side by side so you can choose the best approach for your needs and circumstances.
| Feature | Oven Drying | Food Dehydrator |
|---|---|---|
| Equipment Needed | Standard home oven | Dehydrator unit |
| Cost | No extra purchase needed | $50 to $200 for a dehydrator |
| Drying Time | 6 to 10 hours | 8 to 12 hours |
| Temperature Control | Manual, less precise | Built-in, very precise |
| Batch Size | Limited by oven size | Larger batches possible |
| Ease of Use | Simple and familiar | Set and forget |
| Best For | Occasional crafters | Frequent or large-scale projects |
For most home crafters, oven drying is the clear winner. It requires no additional investment and produces beautiful results. You already own the most important tool. However, if you plan to make dried fruit garlands regularly or in large quantities, a dehydrator might be worth the investment over time.
The dehydrate cranberries process is essentially the same for both methods. The only real difference is the equipment and the level of temperature control. A dehydrator offers more consistency over long drying periods, which can be helpful for large batches. But for a one-time project or seasonal crafting, your oven handles the job perfectly well.
Creative Ways to Use Your Dried Cranberry Garland
Once your cranberries are perfectly dried, the real fun begins. There are so many wonderful ways to display and use your homemade cranberry decorations. Let us explore some of the most popular and creative ideas that will make your home feel warm and festive.
Holiday Wreath Ideas
A cranberry wreath makes a stunning front door decoration that welcomes guests with a touch of handmade warmth. Start with a wire wreath form and wrap it with greenery, pinecones, or ribbon. Then attach your dried cranberry strands by weaving them through the form or tying them on with floral wire. The deep red berries contrast beautifully with green foliage and golden pinecones.
For a more modern look, try a simple all-cranberry wreath. Use only dried cranberries and a thin ribbon bow. This minimalist approach lets the natural beauty of the berries speak for itself. It works especially well on farmhouse-style or rustic front doors where the simple elegance can really shine.
Mantel and Table Decorations
Draping a cranberry garland along your fireplace mantel is a classic holiday tradition that never goes out of style. Weave in sprigs of eucalyptus, cinnamon sticks, or dried orange slices for added texture and fragrance. The combination of scents and colors creates a warm, inviting atmosphere in any living space that your family and guests will love.
For your dining table, try a cranberry garland runner down the center. Place candles, small potted herbs, or nut bowls along the length. This creates a beautiful focal point that guests will admire. You can also wrap cranberry strands around individual place settings as unique and thoughtful place markers for each seat at the table.
Gift-Wrapping and Craft Projects
Dried cranberries are not just for garlands. Use them to decorate gift boxes, gift bags, or holiday cards. A few cranberries tied with ribbon make a simple yet elegant gift topper. Kids love using dried cranberries in school craft projects, too. They are safe, non-toxic, and full of vibrant color that makes any project pop.
Consider making several batches of dried cranberries for crafts throughout the holiday season. You can create multiple garlands, wreaths, and decorative pieces for your home or to give away as thoughtful homemade gifts. Each piece carries a personal touch that store-bought items simply cannot replicate.
Festive Cranberry Decor Beyond the Holidays
Do not limit your cranberry holiday decor to just the winter season. Dried cranberries make lovely year-round decorations for autumn tablescapes, harvest celebrations, and even spring gatherings. Their rich red color complements seasonal themes beautifully and adds a natural element to any table setting or doorway display.
You can also experiment with fruit garland ideas by combining cranberries with other dried fruits like blueberries, cherries, or apple slices. The variety of colors and textures creates a visually striking piece of dried fruit garland art that doubles as a conversation starter at any gathering.
Storing, Preserving, and Expert Tips
Proper storage is the secret to making your cranberry garland last as long as possible. With the right approach, your dried cranberries can stay beautiful for several weeks or even months beyond the holiday season.
How to Store Dried Cranberries
Store your finished garland in a cool, dry place away from direct sunlight. A closet or pantry works well if you are not displaying it right away. For garlands that are on display, keep them away from humid areas like kitchens and bathrooms. Moisture is the enemy of dried fruit and can cause mold to develop quickly.
If you have leftover dried cranberries, place them in an airtight container with a silica gel packet. This absorbs excess moisture and keeps the berries from becoming sticky or soft. Properly stored dried cranberries can last for several months, giving you a ready supply for future cranberry crafting projects throughout the year.
Common Mistakes to Avoid
Even experienced crafters make mistakes sometimes. Here are the most common errors people make when drying cranberries for garland:
- Using too high a temperature – This cooks the berries instead of drying them. Always keep the oven at 200 to 225 degrees Fahrenheit for the best results.
- Skipping the parchment paper – Berries can stick to bare baking sheets and tear when you try to remove them, ruining your hard work.
- Overcrowding the baking sheet – This blocks airflow and leads to uneven drying. Leave enough space between each berry for proper air circulation.
- Not drying long enough – Under-dried cranberries will develop mold quickly. Always test for firmness before removing them from the oven.
- Ignoring humidity levels – On humid days, drying takes longer. Be patient and check the berries more frequently during damp weather.
- Rushing the cooling process – Let the garland cool slowly inside the turned-off oven to prevent condensation from forming on the berries.
Quick Tips for Better Results
Here are some expert tips that will elevate your cranberry garland game and help you achieve the best possible outcome:
- Use a fan near your oven door to improve airflow and speed up the drying process.
- Choose berries of similar size for more uniform drying and a polished final look.
- Double-thread your needle for faster and easier threading of the cranberries.
- Spray dried berries lightly with a clear acrylic sealant to extend their lifespan significantly.
- Work in a well-lit area so you can spot any soft or damaged berries easily.
- Label your oven mitt as a “door prop” so everyone in your household knows its purpose during drying day.
Expert Insights on Cranberry Garland Crafting
Seasoned crafters and home decorators share a few insights that can help you achieve the best results. First, they emphasize the importance of patience. Rushing the drying process is the number one reason garlands fail. Second, they recommend doing a small test batch before committing to a large project. This lets you fine-tune your oven settings and timing without wasting a lot of berries or supplies.
Many experts also suggest combining cranberries with other dried fruits for a more colorful and textured garland. Dried blueberries, cherries, and even orange slices pair beautifully with cranberries. The contrast in colors and sizes creates a visually striking piece of holiday cranberry crafts that stands out on any mantel or table.
Finally, experienced crafters always plan ahead. Drying cranberries takes time, so start your project at least two days before you need the finished garland. This buffer gives you room to fix any issues and ensures your cranberry decorations turn out perfectly. Good planning transforms a simple craft into a stunning work of art.
Final Thoughts
Creating a beautiful cranberry garland from scratch is one of the most satisfying holiday crafts you can do. The process is simple, affordable, and incredibly rewarding. When you hang up your finished piece, you will feel proud knowing that every berry was carefully selected, threaded, and dried by your own hands. That is something no store-bought decoration can ever replicate.
Remember that how to dry cranberries for garland in oven comes down to three key things: low heat, patience, and proper preparation. Get those three elements right, and you will produce stunning results every single time. Do not be afraid to experiment with different berry sizes, thread colors, and display arrangements. Each garland you make will be unique and full of character.
Now that you have all the knowledge and tips you need, it is time to put them into action. Gather your cranberries, preheat your oven, and start crafting. Your home will be filled with the warm, festive beauty of handmade cranberry decor in no time. Happy crafting and enjoy the process!
Frequently Asked Questions
Can I use frozen cranberries to make a garland?
Yes, you can use frozen cranberries, but they may release more moisture during drying. Thaw them first and pat them completely dry before threading. Frozen cranberries sometimes have softer skins, so handle them gently during the cranberry stranding process to avoid breaking them.
How long does a dried cranberry garland last?
A properly dried and stored cranberry garland can last for two to four weeks on display. If you spray it with a clear acrylic sealant, it may last even longer. Keep the garland away from humid areas and direct sunlight to preserve its color and shape throughout the holiday season.
What is the best oven temperature for drying cranberries?
The best temperature is between 200 and 225 degrees Fahrenheit. This low heat setting allows the cranberries to dry slowly without cooking or bursting. Higher temperatures will ruin the texture and appearance of your oven dried cranberries, so always use the lowest setting available on your oven.
Can I mix cranberries with other fruits on the same garland?
Absolutely! Mixing cranberries with dried blueberries, cherries, orange slices, or apple rings creates a colorful and textured dried fruit garland. Just make sure all the fruits have similar drying times so they finish at the same rate. Fruits with higher moisture content may need extra drying time.
Do I need to remove the seeds from cranberries before drying?
No, you do not need to remove the seeds. Cranberry seeds are soft and completely safe. They become barely noticeable once the berries are dried. The seeds actually help the berries maintain their structure during the low heat drying process, so leaving them in is perfectly fine.
How can I prevent my dried cranberries from getting sticky?
Sticky cranberries usually mean they were not dried long enough. Make sure each berry feels firm and slightly flexible, not moist in the center. Also, store them in an airtight container with silica gel packets to absorb excess moisture. Proper drying and storage are the keys to preventing stickiness in your dried cranberries for crafts.