How To Make Coffee Glaze With Just Three Ingredients
Making a coffee glaze is incredibly simple and requires only three pantry staples. This homemade coffee glaze recipe gives your baked goods a rich, glossy finish in minutes. You will learn the exact ratios, step-by-step instructions, and pro tips for the perfect consistency every time. Whether you are glazing a cake, donuts, or cookies, this method works beautifully. Coffee glaze is the easiest way to elevate your desserts at home.
Key Takeaways
- Only three ingredients needed: powdered sugar, brewed coffee, and vanilla extract make a perfect glaze every time.
- Takes under five minutes: This is one of the fastest dessert toppings you can make from scratch.
- Versatile and customizable: Adjust the thickness, sweetness, and coffee strength to match any recipe.
- Works on many treats: Use it on cakes, muffins, donuts, cookies, and scones for a professional finish.
- Stores easily: Keep leftover glaze in the fridge and reheat gently before using.
- No special equipment required: Just a whisk, a bowl, and your favorite baked goods.
📑 Table of Contents
- What Is Coffee Glaze And Why You Will Love It
- The Three Ingredients You Need
- Step-by-Step Coffee Glaze Recipe
- Tips For The Perfect Coffee Glaze Consistency
- Ways To Use Coffee Glaze On Your Favorite Treats
- Storing And Making Coffee Glaze Ahead
- Common Mistakes To Avoid When Making Coffee Glaze
- Coffee Glaze Variations To Try
- Why Coffee Glaze Is Better Than Store-Bought
- Conclusion
What Is Coffee Glaze And Why You Will Love It
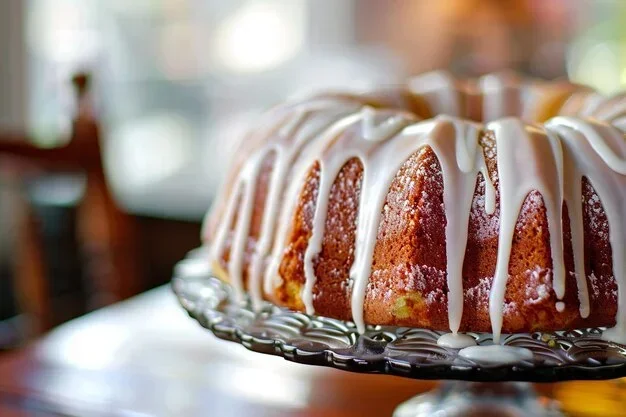
A coffee glaze is a thin, glossy topping made from a few simple ingredients. It pools gently over cakes and pastries, giving them a beautiful finish. Unlike thick frostings, a glaze sets lightly and adds a delicate layer of flavor. The coffee adds depth and richness that plain sugar glaze simply cannot match.
People love coffee glaze because it is fast, easy, and impressive. You do not need a stand mixer or special tools. Just three ingredients, a whisk, and a bowl. Within minutes, your baked goods look like they came from a professional bakery. Homemade coffee glaze also lets you control the sweetness and strength to your exact taste.
If you already enjoy brewing coffee at home, you likely have everything you need to start. The base is similar to what you use when you make coffee in a microwave oven — strong, hot, and freshly brewed. That same quality coffee becomes the star of your glaze. The result is a coffee-flavored glaze that complements chocolate, vanilla, and fruit-based desserts perfectly.
Whether you are a beginner baker or a seasoned pro, learning to make coffee glaze opens up a world of possibilities. It pairs wonderfully with Cinnabon-style pastries and other glazed treats. Once you try it, you will wonder how you ever baked without it.
The Three Ingredients You Need
The beauty of this recipe lies in its simplicity. You need exactly three ingredients, and you probably already have them in your kitchen. Here is what goes into a perfect coffee glaze:
Ingredient One: Powdered Sugar
Powdered sugar, also called confectioners’ sugar, is the base of any glaze. It dissolves easily into warm liquids and creates that smooth, silky texture. For a standard batch, you will need about one cup of powdered sugar. You can sift it to remove any lumps and ensure a perfectly smooth finish. Powdered sugar glaze is the foundation that gives your coffee glaze its glossy look.
Ingredient Two: Brewed Coffee
Strong brewed coffee is the second essential ingredient. Use about two to three tablespoons for a standard batch. The coffee should be hot when you add it, as this helps the sugar dissolve quickly. You can use any brewing method you prefer — drip, French press, or even microwaved coffee works fine. The key is to use coffee that is bold and flavorful, since the glaze will not be diluted by a large volume of liquid.
Ingredient Three: Vanilla Extract
A half teaspoon of vanilla extract adds warmth and depth to the glaze. It rounds out the coffee flavor and makes the glaze taste more complex. You can also use almond extract for a different twist. This small addition makes a big difference in the final taste of your coffee icing.
Step-by-Step Coffee Glaze Recipe
Now that you have your ingredients ready, let us walk through the process. Making coffee glaze is one of the easiest things you can do in the kitchen. Follow these simple steps for perfect results every time.
- Sift the powdered sugar. Place one cup of powdered sugar into a medium bowl. Sifting removes lumps and ensures a smooth texture. This step is important for a flawless finish on your baked goods.
- Add the vanilla extract. Pour in half a teaspoon of vanilla extract. Stir it into the sugar with a fork or small whisk to combine the dry ingredients first.
- Pour in the hot coffee. Add two tablespoons of hot, strong brewed coffee. Stir continuously as you pour. The hot liquid dissolves the sugar and creates a smooth, pourable consistency.
- Adjust the thickness. If the glaze is too thick, add more coffee one teaspoon at a time. If it is too thin, add a little more powdered sugar. The glaze should flow smoothly but still coat the back of a spoon.
- Glaze your treats. Pour the glaze over your cooled baked goods. Let it set for about ten to fifteen minutes. The glaze will become slightly tacky as it dries.
That is all there is to it. In under five minutes, you have a beautiful homemade coffee glaze ready to drizzle over your favorite desserts. The process is so simple that once you make it a few times, you will not even need to look at a recipe again.
Quick Tips
- Use hot coffee, not cold. Cold coffee will leave lumps in your glaze.
- Sift the powdered sugar before you start to save yourself time later.
- Have your baked goods completely cooled before glazing. Warm treats will melt the glaze immediately.
- Stir the glaze gently while pouring over your treats for the most even coating.
- Keep a small bowl of extra coffee nearby in case you need to thin the glaze while working.
Tips For The Perfect Coffee Glaze Consistency
The difference between a good glaze and a great glaze comes down to consistency. You want it thin enough to flow and spread, but thick enough to coat and set. Here are some expert tips to nail the texture every single time.
Understanding Glaze Thickness
A perfect coffee glaze should be pourable but not watery. Think of the consistency of warm honey. When you lift your whisk out of the glaze, it should drizzle off in a steady, thin stream. If it comes out in thick clumps, it is too thick. If it runs off too quickly, it is too thin.
How To Fix Common Consistency Problems
- Too thick? Add hot coffee one teaspoon at a time. Stir well after each addition. Stop as soon as it reaches the right flow.
- Too thin? Add powdered sugar one tablespoon at a time. Stir until fully dissolved before adding more.
- Lumpy? This usually means the sugar did not dissolve properly. Whisk more vigorously or strain the glaze through a fine mesh sieve.
- Too sweet? Add a splash more coffee to balance the sweetness. You can also add a tiny pinch of salt to cut the sugar.
Temperature Matters
The temperature of your coffee plays a big role in how the glaze behaves. Hot coffee dissolves the powdered sugar faster and more completely. If your coffee cools too much while you are working, simply reheat it gently. Coffee glaze works best when the liquid is warm but not boiling. Aim for a temperature around 150 to 160 degrees Fahrenheit for the best results.
Ways To Use Coffee Glaze On Your Favorite Treats
Once you master the basic recipe, you will want to use coffee glaze on everything. The possibilities are nearly endless. Here are some of the best ways to enjoy this versatile topping.
Coffee Glaze Cakes
Drizzle coffee glaze over a simple vanilla or chocolate cake for an instant upgrade. The coffee flavor pairs beautifully with chocolate cakes. It also works wonderfully on lemon cake, where the slight bitterness of coffee balances the bright citrus. A glaze gives your cake a professional bakery look without the hassle of frosting.
Coffee Glaze Donuts
Homemade or store-bought donuts become restaurant-quality with a coffee glaze. The glaze sets into a thin, crackly shell that shatters slightly when you bite in. For a caramel coffee glaze variation, add a tablespoon of melted butter and a drizzle of caramel sauce. This pairs perfectly with the way you reheat funnel cake in oven for a similar glazed pastry experience.
Coffee Glaze Muffins and Scones
Morning muffins and scones taste even better with a light coating of coffee glaze. It adds a subtle coffee kick that complements blueberry, cinnamon, and chocolate chip flavors. Simply dip the top of each muffin into the glaze or drizzle it on with a spoon. Let them set on a wire rack before serving.
Coffee Glaze Cookies and Biscotti
Flat cookies and biscotti are ideal candidates for a coffee glaze. The low moisture content of these baked goods means the glaze sets firmly without becoming soggy. Dip the bottoms of biscotti into the glaze for an elegant touch. This is a great way to use up leftover coffee-flavored glaze from another project.
Storing And Making Coffee Glaze Ahead
One of the best things about coffee glaze is that you can make it ahead of time. This saves you precious minutes when you are preparing for a party or gathering. Here is how to store and reheat your glaze properly.
Short-Term Storage
If you plan to use the glaze within a day or two, store it in an airtight container at room temperature. The glaze will thicken as it sits, which is normal. When you are ready to use it, gently reheat it over a double boiler or in short bursts in the microwave. Stir well between each burst to distribute the heat evenly.
Long-Term Storage
For longer storage, keep the glaze in the refrigerator for up to one week. Place it in a sealed jar or container. When you want to use it, warm it gently on the stove over low heat. Add a splash of hot coffee if it has become too thick after refrigeration. Stir until it returns to a smooth, pourable consistency.
Freezing Coffee Glaze
You can also freeze coffee glaze for up to one month. Pour it into an ice cube tray for easy portioning. Thaw the cubes overnight in the refrigerator and reheat gently. The glaze may separate slightly after freezing, but a vigorous whisk will bring it back together. Add a little extra coffee if needed to restore the right consistency.
Expert Insights
Professional bakers often make their glaze slightly thinner than you might expect. The glaze will thicken as it sits on the baked good. If you are new to glazing, start with a thinner batch and add more powdered sugar as needed. It is much easier to thicken a glaze than to thin it out. This simple trick will save you from a common mistake and help you achieve that glossy, professional finish every time.
Common Mistakes To Avoid When Making Coffee Glaze
Even simple recipes have pitfalls. Avoiding these common mistakes will help you achieve the perfect coffee glaze every time.
- Using cold coffee. Cold liquid does not dissolve powdered sugar properly. Always use hot coffee for the smoothest results.
- Glazing warm treats. Putting glaze on warm baked goods causes it to melt and slide off. Wait until your treats are completely cool.
- Adding too much coffee at once. Pour the coffee slowly while stirring. Adding too much liquid too fast creates a runny glaze that is hard to fix.
- Skipping the sifting step. Lumpy powdered sugar leads to a lumpy glaze. Sifting takes thirty seconds but makes a big difference.
- Not testing the consistency. Before you glaze your entire batch, test a small amount on a single treat. This lets you adjust the thickness without wasting ingredients.
Coffee Glaze Variations To Try
Once you have the basic recipe down, experiment with these delicious variations. Each one adds a unique twist to the classic coffee glaze and opens up new flavor combinations.
| Variation | Added Ingredient | Best Paired With |
|---|---|---|
| Caramel Coffee Glaze | 1 tbsp caramel sauce + 1 tbsp butter | Apple cakes, pear muffins |
| Chocolate Coffee Glaze | 2 tbsp cocoa powder | Chocolate cakes, brownies |
| Maple Coffee Glaze | 1 tbsp pure maple syrup | Pecan scones, banana bread |
| Espresso Glaze | 1 extra tbsp espresso powder | Tiramisu cakes, mocha cookies |
| Coconut Coffee Glaze | 1 tbsp coconut cream | Pineapple upside-down cake, coconut muffins |
Each variation keeps the same simple three-ingredient base but adds a new dimension of flavor. You can mix and match these additions based on what you have in your pantry. The espresso glaze variation is especially popular for anyone who loves a strong coffee flavor. It works beautifully on dark chocolate desserts and pairs wonderfully with the kind of treats you might heat Cinnabon in oven for a similar indulgent experience.
Why Coffee Glaze Is Better Than Store-Bought
You might be tempted to grab a jar of glaze from the store, but homemade coffee glaze has several advantages. First, you control the ingredients. You know exactly what goes into it, which means no artificial flavors or preservatives. Second, it tastes noticeably better. Fresh coffee and real vanilla create a depth of flavor that store-bought versions simply cannot match.
Third, it is incredibly cost-effective. A batch of coffee glaze costs pennies to make, especially if you already have the ingredients on hand. A jar of store-bought glaze can cost several dollars and often contains more sugar and less flavor. Fourth, making your own glaze is satisfying. There is something rewarding about creating a beautiful, glossy finish for your desserts with just three simple ingredients.
If you love the idea of homemade coffee glazes, you will also enjoy exploring other oven-based recipes. Whether you are baking a BBQ chicken tender recipe or preparing other oven-baked treats, the skills you build from making glaze translate to confidence in the kitchen. The same attention to detail and ingredient quality that makes a great glaze makes all your cooking better.
Conclusion
Coffee glaze is one of the simplest and most rewarding additions you can make to your baking repertoire. With just three ingredients — powdered sugar, hot coffee, and vanilla extract — you can transform ordinary baked goods into something extraordinary. The process takes less than five minutes, and the results look and taste professional.
Remember to use hot coffee, sift your powdered sugar, and let your baked goods cool completely before glazing. These small steps make a big difference in the final result. Once you start making coffee glaze at home, you will wonder how you ever went without it.
Try the basic recipe first, then experiment with the variations. Add caramel, chocolate, or maple to create new flavor profiles that complement your favorite desserts. Share your creations with friends and family, and watch their faces light up when they see that beautiful, glossy finish. Homemade coffee glaze is the little secret that makes every baked treat feel special. Start making it today, and you will never go back to store-bought again.
Frequently Asked Questions
Can I use instant coffee instead of brewed coffee in the glaze?
Yes, you can use instant coffee dissolved in a small amount of hot water. Use one teaspoon of instant coffee mixed with two tablespoons of hot water as a substitute. The flavor will be slightly different, but it still works well for a coffee glaze recipe. Adjust the amount based on how strong you want the coffee flavor to be.
How long does coffee glaze take to set on baked goods?
Coffee glaze typically sets within ten to fifteen minutes at room temperature. The glaze becomes slightly tacky and firm as it dries. If you are in a hurry, you can place glazed treats in the refrigerator to speed up the setting process. Just be careful not to leave them too long, as the glaze may absorb into softer baked goods.
Can I make coffee glaze without vanilla extract?
Absolutely. While vanilla extract adds a nice warm flavor, it is optional. You can skip it entirely or substitute it with almond extract or even a splash of maple extract. The glaze will still work beautifully with just powdered sugar and coffee. The coffee glaze base is versatile enough to handle these swaps without any issues.
What is the difference between coffee glaze and coffee frosting?
Coffee glaze is thinner and more pourable than coffee frosting. Glaze sets lightly and creates a glossy finish, while frosting is thicker and holds its shape. Frosting is typically used for piping and decorating, whereas glaze is meant to drizzle and coat. Both use similar base ingredients, but glaze has a higher liquid-to-sugar ratio, giving it that signature thin, glossy texture.
Can I use decaf coffee for the glaze?
Yes, decaf coffee works perfectly fine in a coffee glaze. The glaze is used in small quantities, so the caffeine content is negligible regardless of whether you use regular or decaf. Decaf is a great option if you are making treats for children or for people who are sensitive to caffeine. The flavor profile remains the same.
How do I prevent the glaze from becoming too thick while I am working?
Keep the glaze warm by placing the bowl over a cup of hot water while you work. Stir it occasionally to maintain a smooth, pourable consistency. If it does thicken up, simply add a few drops of hot coffee and whisk it back to the right consistency. This keeps your coffee glaze workable throughout the entire glazing process.
=== INTERNAL LINKS ===
For more recipes and kitchen tips, explore these related articles: