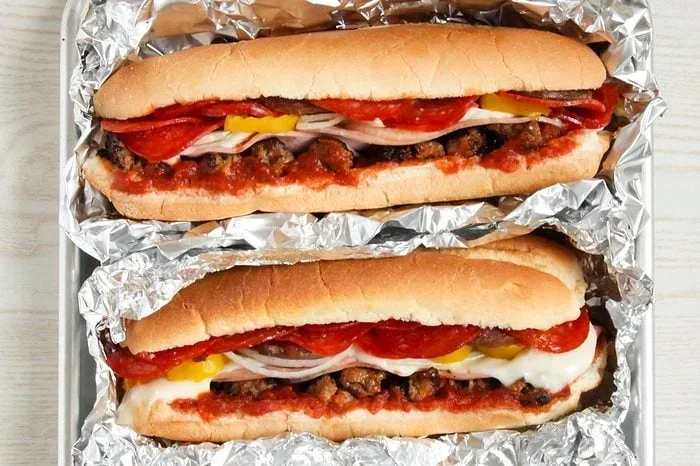
How To Make Pizza Subs In Oven
Learning how to make pizza subs in oven is one of the easiest and most satisfying cooking skills you can pick up. This simple recipe uses basic ingredients like sub rolls, pizza sauce, and melted cheese to create a crispy, golden-brown meal your whole family will devour. You do not need any fancy equipment — just a standard home oven and about 20 minutes of prep time. Whether you prefer pepperoni, veggies, or a meat lover’s combo, this guide covers every step you need. By the end, you will know exactly how to whip up perfect oven-baked pizza subs every single time.
There is something truly magical about pulling a tray of homemade pizza subs out of the oven. The smell of melted cheese, warm marinara sauce, and toasted Italian bread fills your kitchen in the best possible way. If you have ever wondered how to make pizza subs in oven, you have come to the right place. This guide walks you through every single step with clear instructions and practical tips that anyone can follow.
Pizza subs are essentially a hybrid between two beloved foods — pizza and a submarine sandwich. You get all the classic pizza flavors stacked inside a soft, crusty sub roll. Then you bake everything together in the oven until the cheese turns bubbly and the edges turn golden brown. The result is a warm, gooey, and incredibly satisfying meal that works for lunch, dinner, or even a late-night snack.
What makes this recipe so appealing is how simple it is. You do not need advanced cooking skills or expensive ingredients. A trip to the grocery store for a few basics is all it takes. Whether you are feeding a family of four or meal-prepping for the week ahead, oven-baked pizza subs deliver big flavor with minimal effort. Let us dive into the details and get you cooking.
Key Takeaways
- Easy and Fast: Making pizza subs in the oven takes less than 30 minutes from start to finish.
- Minimal Ingredients: You only need sub rolls, pizza sauce, cheese, and your favorite toppings.
- Customizable: Swap in any toppings you like — meat lovers, veggie, or classic pepperoni all work great.
- Crispy Results: Baking in the oven gives you a golden, crunchy crust that beats stovetop methods every time.
- Budget-Friendly: This recipe costs much less than ordering delivery pizza subs from a restaurant.
- Kid-Friendly: Children love helping assemble their own pizza subs, making it a fun family activity.
- Leftovers Work Well: Store extras in the fridge and reheat them in the oven for a quick snack the next day.
📑 Table of Contents
- What Are Pizza Subs and Why Make Them in the Oven?
- Ingredients You Will Need for Perfect Pizza Subs
- Step-by-Step Instructions for Oven-Baked Pizza Subs
- Pro Tips for the Crispiest, Most Flavorful Pizza Subs
- Fun Variations and Customizations to Try
- Comparison: Different Pizza Sub Styles
- Storage and Reheating Tips
- Conclusion
What Are Pizza Subs and Why Make Them in the Oven?
A pizza sub is a sandwich that combines all the flavors of pizza inside a long Italian-style bread roll. Think of it as a pizza that happens to be shaped like a sub. Traditional pizza subs include tomato sauce, mozzarella cheese, and pepperoni, but the beauty of this dish is that you can customize it however you want.
Why Oven-Baked Beats Other Methods
You might be wondering why baking in the oven is the best way to prepare pizza subs. The answer comes down to texture and flavor. When you bake pizza subs in oven, the heat surrounds the bread evenly. This creates a crispy outer crust while keeping the inside soft and warm. The cheese melts perfectly, and the sauce thickens slightly as it bakes.
Other methods like microwaving tend to make the bread soggy. Frying on a stovetop can burn the outside before the inside heats through. The oven solves both problems. It gives you that golden-brown, crispy finish everyone loves without any guesswork. Plus, you can bake multiple subs at once, which makes it ideal for feeding a crowd.
The oven also allows you to add a final broil at the end, which browns the cheese on top beautifully. This step takes your pizza subs from good to restaurant-quality. Once you try oven-baked pizza subs, you will never go back to microwaving leftovers again.
Ingredients You Will Need for Perfect Pizza Subs
Gathering your ingredients before you start is the key to a smooth cooking experience. The good news is that you probably already have most of these items in your pantry or fridge. Here is a complete list of what you need to make delicious oven-baked pizza subs.
The Bread
The foundation of any great pizza sub is the bread. You want a sub roll or an Italian bread loaf that is soft on the inside but sturdy enough to hold all the toppings. Hoagie rolls work perfectly, and so do French bread halves. Avoid using thin, flatbread-style rolls because they will not hold up well under the weight of the sauce and cheese.
Look for rolls that are about six to eight inches long. They should feel light and airy when you squeeze them gently. If the bread is too dense, your pizza subs will feel heavy. If it is too thin, they may tear when you bite in. The right roll makes all the difference in the final result.
The Sauce and Cheese
For the sauce, marinara sauce or pizza sauce works best. You can use store-bought sauce or homemade if you prefer. The sauce should be smooth and not too watery, because excess moisture can make the bread soggy during baking. Spread a generous layer on the inside of the roll, but do not overdo it — you want just enough to coat the bread without soaking through.
When it comes to cheese, low-moisture mozzarella is the gold standard for pizza subs. It melts beautifully and stretches in those satisfying strings everyone loves. You can also mix in a little sharp cheddar or provolone for extra flavor. Use enough cheese to cover the sauce layer completely. The cheese acts as a glue that holds everything together inside the sub.
Toppings and Seasonings
Your toppings are where you get to be creative. Classic pepperoni is the most popular choice, but sliced Italian sausage, ham, bacon, and ground beef all work wonderfully. For a vegetarian option, try bell peppers, red onions, mushrooms, black olives, and fresh spinach leaves.
Do not forget the seasonings. A sprinkle of Italian seasoning or oregano adds an authentic pizza flavor. A pinch of garlic powder and a dash of red pepper flakes give the subs a subtle kick. A light drizzle of olive oil on the outside of the bread before baking helps achieve that beautiful crispy finish.
Step-by-Step Instructions for Oven-Baked Pizza Subs
Now that you have everything ready, it is time to put it all together. Follow these simple steps to create restaurant-quality pizza subs right in your own kitchen.
Step 1: Prep the Sub Rolls
Preheat your oven to 375 degrees Fahrenheit (190 degrees Celsius). While the oven is heating up, take your sub rolls and slice them lengthwise. Do not cut all the way through — leave one side connected so the roll opens like a book. This pocket will hold all the delicious fillings inside.
Place the opened rolls on a baking sheet lined with parchment paper. Lightly brush the cut sides with olive oil. This small step adds flavor and helps the bread crisp up during baking. It also creates a barrier that prevents the sauce from soaking through the bread too quickly.
Step 2: Layer the Ingredients
Now comes the fun part — building your pizza subs. Start by spreading a layer of pizza sauce on the cut side of each roll. Keep the layer even but do not make it too thick. About two tablespoons per roll is usually perfect.
Next, add a generous handful of shredded mozzarella cheese over the sauce. Follow that with your chosen toppings. If you are using meat, make sure it is pre-cooked if needed. Pepperoni goes straight on raw, but raw ground beef or sausage should be browned first.
Add any extra cheese on top of the toppings. This second layer ensures that every bite has that perfect melted cheese pull. Sprinkle your Italian seasoning blend over the top for an extra burst of flavor. The layering order matters because it keeps the bread from getting too wet while ensuring every bite is balanced.
Step 3: Bake to Perfection
Place the baking sheet in the preheated oven and bake for 10 to 12 minutes. The exact time depends on your oven and how crispy you like the crust. Check the subs at the 10-minute mark. The cheese should be fully melted and bubbling, and the edges of the bread should turn a light golden brown.
For an extra crispy finish, switch your oven to broil for the last 1 to 2 minutes. Watch them closely during this step because the cheese can go from perfectly golden to burnt very quickly. The broil gives the top layer a beautiful, slightly charred look that mimics a pizza oven finish.
Remove the baking sheet from the oven and let the pizza subs cool for about 2 to 3 minutes before cutting. This brief rest allows the cheese to set slightly, which makes slicing easier and prevents the toppings from sliding out. Serve them warm and enjoy that incredible crispy crust and melted cheese combination.
Pro Tips for the Crispiest, Most Flavorful Pizza Subs
Making great pizza subs is about more than just following a recipe. A few expert-level tips can take your results from average to absolutely outstanding. Here is what the pros know about creating the best oven-baked pizza subs every time.
Getting the Right Oven Temperature
Temperature control is one of the most important factors in making great pizza subs. 375 degrees Fahrenheit is the sweet spot for most ovens. It heats the bread evenly, melts the cheese perfectly, and warms the toppings without drying them out. If your oven runs hot, drop the temperature down to 350 degrees and add a minute or two to the baking time.
If you want an extra crispy crust, try baking at 400 degrees Fahrenheit for a shorter time of 8 to 10 minutes. The higher heat crisps the bread faster while keeping the inside moist. Just keep a close eye on them to prevent burning. Every oven is different, so your first batch might need a little adjustment to find your perfect setting.
Avoiding Common Mistakes
The most common mistake people make is using too much sauce. Excess sauce soaks into the bread and makes it soggy instead of crispy. Stick to a thin, even layer and you will see a big difference in texture. Another mistake is skipping the olive oil brush on the bread. That small step adds crunch and flavor that plain bread simply cannot match.
Using the wrong cheese is another pitfall. Fresh mozzarella has too much moisture and can make the sub wet. Stick with low-moisture shredded mozzarella for the best results. Also, do not overstuff your pizza subs. Packing too many toppings makes them hard to eat and can cause the bread to fall apart. Less is more when it comes to building a structurally sound pizza sub.
Fun Variations and Customizations to Try
One of the best things about pizza subs in oven is how easy it is to switch things up. Once you master the basic recipe, you can experiment with different flavors and styles. Here are some popular variations to try on your next cooking night.
Meat Lovers Pizza Sub
For meat lovers, load up your pizza sub with pepperoni, Italian sausage, ham, and crispy bacon. You can also add a layer of ground beef that has been seasoned with Italian spices and browned in a skillet. The combination of multiple meats creates a rich, savory flavor that is incredibly satisfying. Top it off with extra mozzarella and a sprinkle of smoked paprika for a deep, smoky taste.
Veggie Pizza Sub
The veggie version is just as delicious and packed with nutrients. Use roasted red peppers, sautéed mushrooms, sliced black olives, red onion rings, and fresh basil leaves. A sprinkle of feta cheese or goat cheese adds a tangy twist that complements the vegetables beautifully. Brush the bread with garlic-infused olive oil before baking for an extra flavor boost.
White Pizza Sub
For a change of pace, try a white pizza sub. Skip the tomato sauce and spread a layer of ricotta cheese mixed with garlic and herbs instead. Top with mozzarella, parmesan, and your choice of toppings. This version is creamy, rich, and has a completely different flavor profile than traditional red-sauce pizza subs. It is a fantastic option for anyone who wants something a little different.
Comparison: Different Pizza Sub Styles
Not all pizza subs are created equal. Different styles offer unique textures and flavors that cater to different preferences. Here is a quick comparison of the most popular pizza sub variations you can make in the oven.
| Style | Base | Cheese | Best For | Bake Time |
|---|---|---|---|---|
| Classic Pepperoni | Marinara sauce | Mozzarella | Traditional flavor lovers | 10-12 min |
| Meat Lovers | Marinara sauce | Mozzarella + cheddar | Hearty appetites | 10-12 min |
| Veggie Delight | Marinara sauce | Mozzarella + feta | Vegetarians and health-conscious eaters | 8-10 min |
| White Pizza | Ricotta and garlic | Ricotta + mozzarella + parmesan | Creamy flavor fans | 8-10 min |
| Spicy Italian | Spicy marinara | Mozzarella + provolone | Those who love heat | 10-12 min |
Each style brings its own unique twist to the table. The classic pepperoni version is the go-to for a reason — simple, delicious, and always satisfying. The meat lovers sub is perfect for when you want something hearty and filling. The veggie option is lighter and fresh, making it ideal for a quick lunch. The white pizza sub is a gourmet choice that impresses guests and family members alike. And the spicy Italian version adds a kick that wakes up your taste buds.
No matter which style you choose, the oven-baking method remains the same. The key is adjusting your toppings and sauce to match the flavor profile you are going for. Experiment with different combinations and find your personal favorite. That is the beauty of making pizza subs at home — you are in complete control of every ingredient.
Storage and Reheating Tips
If you have leftover pizza subs, storing them properly ensures they taste great the next day. Let them cool completely before placing them in an airtight container. They will keep in the refrigerator for up to three days. Avoid storing them with the sauce and cheese inside the bread, as this makes the bread soggy over time.
When you are ready to eat leftovers, reheat them in the oven at 350 degrees Fahrenheit for about 5 to 7 minutes. This restores the crispy crust and melts the cheese back to perfection. Microwaving leftovers is not recommended because it makes the bread chewy and loses the crispy texture that makes pizza subs so special. A quick reheat in the oven brings back that fresh-from-the-oven quality every time.
You can also freeze uncooked pizza subs for later. Assemble them without baking, wrap tightly in foil, and freeze for up to one month. When you are ready to eat, unwrap and bake directly from frozen, adding 3 to 5 extra minutes to the cooking time. This makes pizza subs in oven a great option for meal prep and busy weeknight dinners.
Conclusion
Making pizza subs in oven is one of the easiest and most rewarding cooking projects you can take on. With just a few simple ingredients and about 30 minutes of your time, you can create a meal that rivals any pizzeria or deli counter. The crispy golden crust, the gooey melted cheese, and the vibrant flavors of your favorite toppings come together in every single bite.
This recipe is endlessly customizable, which means you can make it your own every single time you cook it. Whether you stick with the classic pepperoni version or venture into meat lovers, veggie, or white pizza territory, the results are always delicious. Your family will love these homemade oven-baked pizza subs, and you will love how simple they are to make.
So the next time you are craving pizza but want something a little different, give this recipe a try. Gather your ingredients, preheat the oven, and enjoy the process of creating something warm, comforting, and absolutely delicious right in your own kitchen. Once you master the basics, you will never look at a sub roll the same way again. Happy baking!
Frequently Asked Questions
Can I use a different type of bread for pizza subs?
Yes, you can use Italian bread, ciabatta rolls, or even baguette halves as a substitute for traditional sub rolls. Just make sure the bread is sturdy enough to hold the sauce and cheese without falling apart. Avoid using thin or flatbread-style rolls because they tend to get soggy during baking.
How do I know when pizza subs are done baking?
Your pizza subs are ready when the cheese is fully melted and bubbling, and the edges of the bread turn a light golden brown. The internal temperature should reach about 165 degrees Fahrenheit if you want to be precise. Most oven-baked pizza subs take between 10 and 12 minutes at 375 degrees Fahrenheit.
Can I make pizza subs ahead of time and bake them later?
Absolutely. You can assemble the pizza subs ahead of time, cover them tightly with plastic wrap, and refrigerate them for up to 24 hours. When you are ready to bake, remove them from the fridge, let them come to room temperature for about 10 minutes, and then bake as directed. This works great for meal prep and entertaining guests.
What is the best cheese to use for pizza subs?
Low-moisture mozzarella is the best cheese for pizza subs because it melts smoothly and stretches beautifully without making the bread soggy. You can also mix in provolone, sharp cheddar, or parmesan for extra flavor. Avoid using fresh mozzarella because its high moisture content can make the sub wet and limp.
Can I freeze pizza subs before baking them?
Yes, you can freeze uncooked pizza subs for up to one month. Assemble them without baking, wrap each one tightly in aluminum foil, and place them in a freezer-safe bag. When you are ready to bake, unwrap and place them directly in the oven, adding 3 to 5 extra minutes to the baking time to account for the frozen start.
How do I reheat leftover pizza subs without making them soggy?
The best way to reheat leftover pizza subs is in the oven at 350 degrees Fahrenheit for 5 to 7 minutes. The dry heat restores the crispy crust and melts the cheese back to perfection. Avoid using the microwave because it steams the bread and makes it chewy. If you do not have an oven, a toaster oven on a medium setting works as a good alternative.