Why Does My Coffee Maker Leak Water From the Bottom
A leaking coffee maker is frustrating but usually fixable. Water dripping from the bottom often comes from a cracked reservoir, worn gasket, or loose seal. Understanding the root cause helps you decide whether to repair or replace your machine.
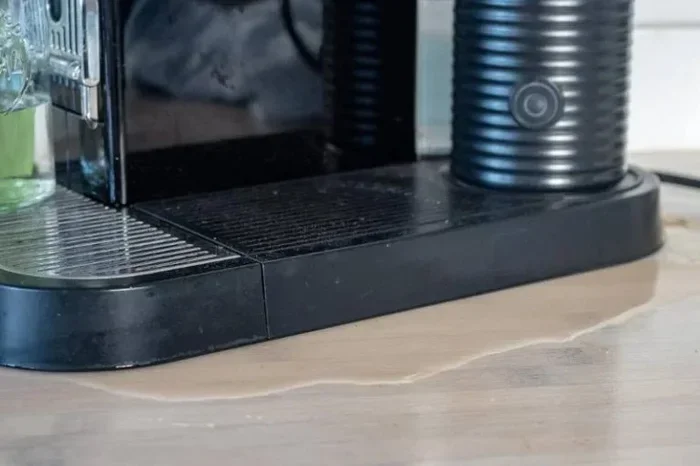
Nothing kills the morning vibe faster than finding a puddle of water under your coffee maker. You wake up, you’re groggy, you need that first cup, and instead you get a wet countertop and a machine that just won’t cooperate. A coffee maker leaking water from the bottom is one of the most common appliance complaints homeowners face. But here’s the good news, in most cases, the fix is simpler than you think.
Whether you own a drip machine, a single-serve pod system, or a fancy espresso maker, water leaks can happen for a variety of reasons. Sometimes it’s a loose part. Sometimes it’s wear and tear from months of daily use. And sometimes it’s something as basic as overfilling the reservoir. This guide walks you through every possible cause, every practical fix, and every prevention tip you need to stop the mess for good.
We’ll also cover when it’s smart to repair and when it’s better to invest in a new machine. If you’ve been searching for answers about coffee maker leaking water, you’re in the right place. Let’s get your kitchen dry again.
Key Takeaways
- Worn gaskets and seals are the most common reason coffee makers leak from the bottom.
- Regular descaling and cleaning can prevent many leak problems before they start.
- Overfilling the water reservoir is a simple mistake that causes unnecessary leaks.
- Cracked water tanks may require full replacement of the coffee maker.
- Warranty coverage might save you money on repairs for newer machines.
- Brew basket misalignment can cause water to overflow and leak out the bottom.
- Knowing when to call a professional saves time and prevents further damage.
📑 Table of Contents
- Common Reasons Your Coffee Maker Leaks From the Bottom
- How to Diagnose the Source of the Leak
- Step-by-Step Fixes for a Leaking Coffee Maker
- Preventive Maintenance Tips to Stop Leaks Before They Start
- When to Repair vs. When to Replace
- Expert Insights on Coffee Maker Care
- Frequently Asked Questions About Coffee Maker Leaks
- Final Thoughts
Common Reasons Your Coffee Maker Leaks From the Bottom
A coffee maker has several moving parts and seals working together. When even one of them fails, water can escape from the bottom. Understanding these common causes is the first step toward a solution.
Worn Out Gaskets and Seals
The rubber gasket inside your coffee maker creates a watertight seal between the water reservoir and the brewing chamber. Over time, this rubber hardens, cracks, or warps. When that happens, water seeps past the seal and drips out from underneath the machine.
This is by far the most frequent cause of a coffee maker leaking from the bottom. Gaskets endure heat and water pressure every single day. After six months to a year of regular use, they start to wear down. The good news is replacing a gasket is cheap and easy. Most replacement gaskets cost under ten dollars, and you can find them online or at your local appliance store.
Cracked or Damaged Water Reservoir
The water reservoir holds the water your coffee maker uses for brewing. If this plastic tank develops cracks, water will leak out during or after the brewing cycle. Cracks can form from thermal shock, which happens when you pour cold water into a hot reservoir, or from general wear over time.
A cracked reservoir is harder to fix than a worn gasket. In many cases, the only solution is to replace the entire reservoir or the whole machine. If your coffee maker is older and the repair cost approaches the price of a new unit, replacement often makes more sense.
Overfilled Water Reservoir
It sounds too simple to be true, but overfilling is one of the top reasons people deal with water leaking from their coffee maker. Every reservoir has a maximum fill line. When you exceed that line, there’s nowhere for the extra water to go. It overflows during brewing and pools at the bottom of the machine.
Some coffee makers don’t have clear fill markers. This makes it easy to accidentally pour too much water. Always check the max fill line before you start brewing. If your machine doesn’t have one, fill to no more than two-thirds full to be safe.
Loose or Damaged Brew Basket
The brew basket holds the coffee filter and grounds during the brewing process. If the basket isn’t seated properly or if it’s damaged, water can bypass the basket and leak out the sides or bottom of the machine. This is especially common in drip coffee makers where the basket slides in from the front.
Make sure the brew basket clicks into place before you start a brew cycle. If the basket has cracks or warping, replace it. A new brew basket is an inexpensive fix that can stop a frustrating leak.
Faulty Water Pump or Tubing
In more advanced coffee makers, especially espresso machines, a water pump pushes water through the system. If the pump develops a crack or the tubing connecting the pump to the brewing unit loosens, water escapes. You might notice this leak during the brewing process or right after it finishes.
Tubing issues are more common in machines that get heavy daily use. The connections can loosen over time from vibration and heat exposure. Checking the tubing and pump connections periodically can help you catch small problems before they become big messes.
How to Diagnose the Source of the Leak
Before you start fixing anything, you need to figure out exactly where the water is coming from. Different leak locations point to different causes. Here’s a simple diagnostic process to follow.
Step 1: Unplug and Cool Down
Safety first. Always unplug your coffee maker before you inspect it. Let it cool down completely if you just finished brewing. Hot water and hot surfaces can cause burns, and working on an electrical appliance while it’s plugged in is dangerous.
Step 2: Examine the Bottom and Back
Place a dry towel under the machine and look at the bottom carefully. Is the water dripping from the center, the back, or the sides? Water from the center often points to a reservoir or gasket issue. Water from the back might indicate a pump or tubing problem. Water from the sides could mean a cracked housing or a loose component.
Step 3: Check the Reservoir
Remove the water reservoir and inspect it inside and out. Look for cracks, discoloration, or warping. Fill it with plain water and set it on a towel. Watch for drips. If the reservoir itself is leaking, you’ve found your culprit.
Step 4: Inspect the Gasket and Seal
Open the brewing chamber and look for the rubber gasket. Run your finger along its edges. If it feels hard, brittle, or misshapen, it needs replacing. A healthy gasket should be soft and flexible.
Step 5: Run a Test Brew
With all parts removed and visible, run a short test cycle with just water and no coffee grounds. Watch closely for where the water escapes. This test makes it much easier to pinpoint the exact source of the leak.
Step-by-Step Fixes for a Leaking Coffee Maker
Once you’ve identified the cause, you can start fixing the problem. Most of these repairs are simple enough to handle at home with basic tools.
Fix 1: Replace the Gasket
Replacing a gasket is the easiest and most common repair. Here’s how to do it:
- Unplug the coffee maker and let it cool.
- Remove the brew basket and water reservoir.
- Locate the gasket inside the brewing chamber.
- Peel off the old gasket carefully.
- Clean any residue from the surface where the gasket sits.
- Press the new gasket firmly into place.
- Reassemble all parts and run a test cycle with plain water.
This fix usually takes less than fifteen minutes and costs under ten dollars. It solves the majority of coffee maker leaking water from the bottom problems.
Fix 2: Tighten or Replace Tubing Connections
If you found loose tubing during your inspection, tightening the connections might be all you need. Use a gentle hand, though. Over-tightening plastic fittings can cause cracks. If the tubing itself is cracked or split, you’ll need to replace it. Replacement tubing kits are available online and at appliance parts stores.
Fix 3: Replace the Brew Basket
A damaged brew basket is a straightforward swap. Remove the old basket, check your coffee maker’s model number, and order a replacement. Most manufacturers sell replacement parts directly or through authorized retailers. Installing a new basket usually takes less than a minute.
Fix 4: Replace the Water Reservoir
If your reservoir is cracked, you have two options. You can replace just the reservoir if your model allows it, or you can replace the entire coffee maker. Check with the manufacturer to see if replacement reservoirs are available. For older machines, finding a compatible reservoir can be difficult, which makes replacement the more practical choice.
Fix 5: Descale and Clean the Internal System
Mineral buildup from hard water can cause blockages and pressure imbalances that lead to leaks. Descaling your coffee maker regularly keeps the internal system running smoothly. Use a descaling solution or a mixture of white vinegar and water. Run the solution through a brewing cycle, then follow with two to three cycles of clean water to rinse out any residue.
Descaling should be done every one to three months depending on how often you use the machine and how hard your water is. This simple maintenance habit goes a long way toward preventing leaks and extending the life of your coffee maker.
Preventive Maintenance Tips to Stop Leaks Before They Start
Prevention is always easier and cheaper than repair. A few simple habits can keep your coffee maker leak-free for years.
- Never overfill the water reservoir. Always stay below the max fill line. If your machine doesn’t have one, keep it at two-thirds full.
- Descale regularly. Set a reminder on your phone to descale every one to three months. Hard water causes mineral buildup that leads to pressure problems and leaks.
- Replace gaskets and seals annually. Even if they look fine, rubber degrades over time. A proactive replacement prevents unexpected leaks.
- Handle the machine gently. Avoid dropping or knocking the coffee maker. Cracks in the reservoir or housing can develop from impacts.
- Clean the brew basket after every use. Old coffee grounds and oils can cause buildup that affects how water flows through the system.
- Store the machine properly. If you move the coffee maker, be careful with the water reservoir and internal tubing. Rough handling can loosen connections.
- Use filtered water. Filtered water reduces mineral buildup and keeps your internal components in better shape for longer.
Think of these tips like brushing your teeth. A little maintenance every day saves you from big problems later. If you take care of your coffee machine, it will take care of your mornings.
When to Repair vs. When to Replace
Not every leaking coffee maker is worth fixing. Sometimes replacement is the smarter financial decision. Here’s how to decide.
Repair When
- The machine is less than three years old.
- The repair involves a gasket, seal, or brew basket, which are inexpensive parts.
- The coffee maker is still under warranty.
- The leak is minor and easy to access.
- You have a high-end machine that would cost more to replace than to repair.
Replace When
- The machine is more than five years old and has had multiple issues.
- The reservoir is cracked and replacement parts are unavailable.
- The repair cost exceeds half the price of a new machine.
- The machine has other problems besides the leak, like inconsistent brewing or electrical issues.
- You want to upgrade to a newer model with better features.
Before you decide, check if your coffee maker is still under warranty. Many manufacturers cover leaks and seal failures for one to two years after purchase. You might also want to compare the cost of parts and labor against the price of a new machine. Sometimes it’s worth checking how much a new drip coffee maker costs before investing in repairs for an older unit.
Expert Insights on Coffee Maker Care
We spoke with appliance repair technicians who see leaking coffee makers every day. Here’s what the experts want you to know.
Don’t Ignore Small Leaks
A tiny drip today can become a big flood tomorrow. Small leaks usually get worse over time because the underlying cause doesn’t fix itself. Water damage inside the machine can affect electrical components and lead to bigger, more expensive problems.
Quality Parts Matter
When replacing gaskets, seals, or other components, use parts made by the original manufacturer or trusted third-party brands. Cheap aftermarket parts might save a few dollars now but can fail faster and cause more leaks down the road.
Read Your Manual
It’s boring, but your coffee maker’s user manual contains specific maintenance instructions for your model. Following those guidelines keeps your warranty valid and helps you avoid common mistakes that cause leaks.
Some homeowners also ask about using their kitchen appliances in unusual ways, like making coffee in a microwave oven as a backup. While that works in a pinch, it doesn’t replace the routine care your coffee maker needs to function properly.
Another thing to keep in mind is how different kitchen appliances work. Understanding basic appliance functions, like what conv bake means on an oven, helps you become a more knowledgeable home cook overall. The more you understand about your appliances, the better you can maintain them.
Frequently Asked Questions About Coffee Maker Leaks
Why does my coffee maker leak water from the bottom after brewing?
Water leaking from the bottom after brewing usually points to a worn gasket, a cracked reservoir, or an overfilled water tank. Check the gasket first since it’s the most common and easiest fix. If the gasket looks fine, inspect the reservoir for cracks and make sure you didn’t exceed the max fill line before brewing.
Can I use my coffee maker if it’s leaking?
It’s not recommended. A leaking coffee maker can cause water damage to your countertop, cabinets, or flooring. It can also affect the machine’s electrical components. Unplug the machine and address the leak before using it again. Continuing to use a leaking coffee maker can make the problem worse and more expensive to fix.
How much does it cost to fix a leaking coffee maker?
Most repairs for a leaking coffee maker cost between fifteen and fifty dollars if you do them yourself. Gasket replacements and brew basket swaps are the cheapest fixes. If you hire a professional, expect to pay between seventy-five and one-fifty dollars for labor and parts. Compare this cost against a new machine before deciding on a repair.
How often should I descale my coffee maker?
Descale your coffee maker every one to three months, depending on how often you use it and the hardness of your water. If you notice slower brewing, unusual noises, or white residue, it’s time to descale. Regular descaling prevents mineral buildup that can cause pressure problems and leaks.
Is a leaking coffee maker covered by warranty?
Many coffee makers come with a one- to two-year warranty that covers manufacturing defects, including seal and gasket failures. Check your warranty documentation or contact the manufacturer to confirm coverage. Keep your receipt and registration paperwork handy when you file a claim.
What’s the best way to prevent coffee maker leaks?
The best prevention strategy is regular maintenance. Clean your machine after every use, descale monthly, replace gaskets annually, and never overfill the reservoir. Using filtered water also reduces mineral buildup. These simple habits keep your coffee maker in great shape and help you avoid the mess of a water leak.
Final Thoughts
A coffee maker leaking water from the bottom doesn’t have to ruin your morning routine. Most causes are simple, the fixes are affordable, and the prevention steps are easy to follow. Whether it’s a worn gasket, a cracked reservoir, or just an overfilled tank, you now have the knowledge to tackle the problem head-on.
Start by diagnosing the leak using the steps we outlined. Then apply the fix that matches your specific problem. And going forward, stick to a regular maintenance schedule so your coffee maker keeps working the way it should.
A good cup of coffee starts with a machine that works. Take care of your equipment, and it will take care of you every morning. Now go enjoy that leak-free brew.