How To Cook Chicken Breast In Oven And Keep It Juicy
Learning how to cook chicken breast in oven is easier than you think. This guide walks you through everything from prep to plating so your chicken stays moist and flavorful. You will discover the ideal oven temperature, cooking times, and simple tricks that guarantee juicy chicken breast every single time.
There is something deeply satisfying about pulling a perfect baked chicken breast out of the oven. The outside is golden, the inside is tender, and the whole kitchen smells amazing. Yet so many people struggle with this simple cut of meat. The chicken comes out dry, tough, and honestly kind of bland. If you have ever wondered how to cook chicken breast in oven and keep it juicy, you are in the right place. This guide covers every step in detail so you can nail it every single time.
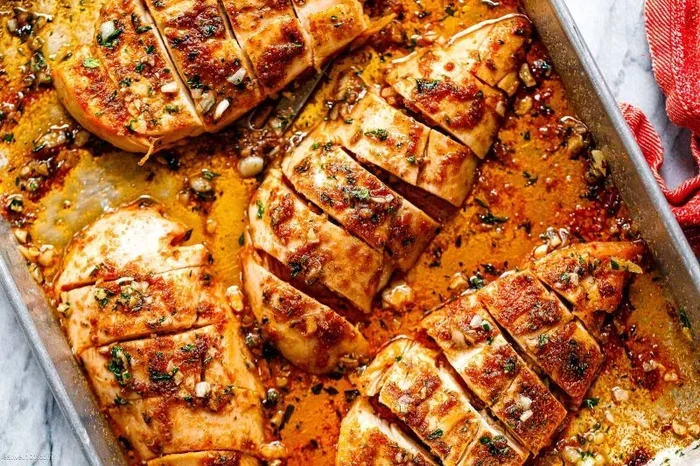
Oven-baked chicken breast is one of the most popular chicken breast recipes out there. It is simple, healthy, and incredibly versatile. You can serve it over a salad, slice it for sandwiches, or pair it with roasted vegetables. The key is understanding a few fundamentals about baking chicken in oven techniques. Once you know the right temperature, timing, and preparation methods, the process becomes almost foolproof. Let us dive in and make your next chicken breast the best one yet.
Key Takeaways
- Right Temperature Matters: Baking chicken breast at 400°F to 425°F delivers the best balance of crispy edges and juicy meat.
- Brining or Pounding Helps: Flattening chicken breasts evenly ensures they cook through without drying out.
- Use a Meat Thermometer: The internal temperature should reach 165°F for safe, perfectly cooked chicken.
- Resting Is Non-Negotiable: Letting chicken rest for 5 to 10 minutes locks in moisture.
- Seasoning Before Baking: A simple mix of olive oil, salt, and herbs goes a long way in keeping chicken flavorful.
- Avoid Overcooking: Checking doneness early prevents dry, tough chicken breast every time.
📑 Table of Contents
Why Oven-Baked Chicken Breast Is the Best Choice
When you think about oven-baked chicken, you probably picture a simple weeknight dinner. And you would be right. But there is so much more to love about cooking chicken breast in the oven. It is hands-off, requires minimal equipment, and produces consistently great results.
Unlike stovetop cooking, where you need to watch the heat closely, the oven does most of the work for you. You can prep the chicken, set a timer, and focus on other things. This makes it perfect for busy weeknights or meal prep sessions. Plus, oven-baked chicken breast tends to retain more moisture than pan-fried versions when done correctly.
Another big advantage is versatility. You can roast a whole batch of boneless chicken breast pieces at once. They all cook evenly in the same oven space. This means you can prep several meals ahead of time and store them in the fridge for up to four days. Whether you are feeding a family of four or prepping lunches for the entire work week, this method scales beautifully.
Health Benefits of Baked Chicken Breast
Baked chicken breast is one of the leanest protein sources available. A single serving provides about 26 grams of protein with very little fat. Baking uses no added oil or butter in most cases, making it a heart-healthy cooking method. It also preserves more of the natural nutrients compared to deep frying or heavy sautéing.
If you are watching your calorie intake or following a high-protein diet, oven-baked chicken is a go-to choice. It fits into almost any eating plan, from keto to low-carb to general healthy eating. The simplicity of the method means you control exactly what goes into your food. No hidden sugars, no excess sodium from restaurant cooking, just clean, wholesome protein.
How to Prep Chicken Breast for the Oven
Proper preparation is the foundation of great baked chicken breast. Skipping this step is the number one reason people end up with dry results. Take a few extra minutes here, and the difference in your final dish will be dramatic.
Choosing the Right Chicken Breast
Start with fresh, quality chicken breast. Look for pieces that are plump and have a pinkish color. Avoid any that look gray or have a strong odor. If you buy boneless chicken breast, check that there are no loose pieces of bone or cartilage still attached. Skin-on chicken breast works great in the oven too, but skinless is also perfectly fine.
For the most even cooking, try to buy chicken breasts that are similar in size. This way, they all finish at the same time. If one piece is much thicker than another, it will either be overcooked or undercooked when you pull the tray out.
Brining and Pounding Techniques
One of the best secrets for juicy chicken is brining. A quick brine of salt water helps the meat absorb and retain moisture during baking. Simply dissolve one tablespoon of salt in four cups of cold water. Submerge the chicken breast for 20 to 30 minutes. Then rinse and pat dry before seasoning.
If you do not have time to brine, try pounding the chicken. Place each breast between two sheets of plastic wrap and use a meat mallet or rolling pin to flatten it to an even thickness. This prevents the thin edges from drying out while the thicker center cooks through. Even chicken breast prep like this makes a huge difference in the final texture.
Seasoning Your Chicken Breast
Seasoning is where the flavor really comes alive. A basic mix of olive oil, salt, black pepper, and garlic powder works beautifully for beginners. But you can get creative with chicken breast seasoning ideas. Try paprika, cumin, dried oregano, onion powder, or a sprinkle of chili flakes for a little heat.
Rub the seasoning mixture evenly over each piece of chicken. Make sure you coat all sides. The olive oil helps the seasoning stick and also creates a light barrier that locks in moisture. For even more flavor, let the seasoned chicken sit at room temperature for 15 to 20 minutes before it goes into the oven.
The Best Oven Temperature and Cooking Time
Getting the temperature right is the single most important factor in how to cook chicken breast in oven. Too low and the chicken dries out over a long cook time. Too high and the outside burns before the inside is done. The sweet spot for most oven-baked chicken recipes is between 400°F and 425°F.
Ideal Temperature Settings
For standard boneless chicken breast, 425°F is the gold standard. This high heat cooks the chicken quickly, which means less time for moisture to escape. The result is a slightly crispy exterior with a tender, juicy interior. If you prefer a more gentle cook, 400°F works well too. It just adds a few extra minutes to the total chicken cooking time.
If you are cooking bone-in chicken breast, you may want to lower the temperature slightly to 400°F. Bone-in pieces need more time to cook through, and a lower temperature gives the heat time to reach the bone without overcooking the outer meat.
How Long to Bake Chicken Breast
Cooking times vary based on thickness and whether the chicken is bone-in or boneless. Here is a general guide for how long to bake chicken breast at 425°F:
- Thin sliced chicken breast (less than 1/2 inch): 15 to 18 minutes
- Average boneless chicken breast (about 1 inch thick): 20 to 25 minutes
- Thick boneless chicken breast (1.5 inches or more): 25 to 30 minutes
- Bone-in chicken breast: 30 to 35 minutes
The most reliable way to check doneness is with a meat thermometer. Insert it into the thickest part of the breast. When the internal temperature chicken reaches 165°F, it is done. Remove it from the oven right away. The temperature will continue to rise slightly as the chicken rests.
Understanding Chicken Breast Doneness
Many people rely on visual cues to determine if chicken is cooked. While cutting into the meat can help, it lets juices escape and can dry out the piece. The chicken breast doneness check with a thermometer is far more accurate. The meat should be white throughout with no pink remaining near the bone or center.
If you do not have a meat thermometer, make a small cut into the thickest part. The juices should run clear, not pink. The meat should feel firm but still have a slight give when you press it. However, a thermometer remains the best tool for consistent chicken breast tenderness every time you cook.
Seasoning Ideas and Flavor Combinations
One of the great things about baking chicken in oven is how easy it is to experiment with flavors. You can keep it simple or go all out with bold seasoning blends. Here are some ideas to try on your next batch of juicy chicken breast.
Classic Herb Seasoning
Mix olive oil with fresh rosemary, thyme, and minced garlic. Add salt and pepper to taste. This combination is timeless and pairs well with almost any side dish. The herbs infuse the chicken with a warm, savory aroma during baking that fills your kitchen with a wonderful scent.
Spicy Southwest Flavor
For a bolder taste, try chili powder, cumin, smoked paprika, lime zest, and a touch of cayenne pepper. This chicken breast seasoning blend adds a nice kick and works beautifully in tacos or burrito bowls. The smokiness from the paprika gives the chicken a depth of flavor that is hard to beat.
Lemon and Garlic Brightness
Combine lemon juice, minced garlic, olive oil, and a sprinkle of Italian seasoning. This bright, fresh flavor profile is light and refreshing. It pairs especially well with roasted vegetables or a simple side of rice and steamed broccoli. The acidity from the lemon helps tenderize the meat slightly, contributing to that chicken breast moisture you are looking for.
Honey Mustard Glaze
For a slightly sweet and tangy finish, brush the chicken with a mixture of Dijon mustard, honey, and a splash of apple cider vinegar during the last five minutes of baking. This creates a beautiful caramelized glaze on the outside while keeping the inside moist and tender.
Common Mistakes to Avoid
Even experienced cooks make mistakes when preparing baked chicken breast. Knowing what to avoid is just as important as knowing what to do. Here are the most common pitfalls and how to steer clear of them.
Overcooking the Chicken
This is the number one enemy of juicy chicken. Once chicken breast passes 165°F internally, it starts losing moisture rapidly. Overcooked chicken becomes dry, stringy, and unappetizing. Set your timer and check the temperature early. It is always better to pull the chicken out a few minutes early and let carryover cooking finish the job.
Skipping the Resting Period
After baking, your chicken breast needs time to rest. This allows the juices to redistribute throughout the meat. If you cut into it immediately, all those flavorful juices run out onto the cutting board instead of staying in the chicken. Let it rest for at least 5 to 10 minutes before slicing or serving.
Not Pounding to Even Thickness
As mentioned earlier, uneven chicken breasts lead to uneven cooking. The thin parts dry out while the thick parts may still be underdone. Taking the time to pound the chicken to a consistent thickness is one of the simplest and most effective chicken breast tips you can follow.
Using Too Much Seasoning
While seasoning is important, more is not always better. A heavy hand with salt can make the chicken taste overly salty and draw out moisture. Use a moderate amount and taste as you go. A light, even coating of seasoning on all sides is all you need for great flavor.
Crowding the Baking Sheet
Give each piece of chicken some space on the baking sheet. If pieces are touching or stacked, steam builds up instead of allowing the heat to circulate properly. This leads to soggy skin and uneven cooking. Use a large enough pan or bake in batches if needed.
Expert Tips for Perfectly Juicy Chicken Breast
Now that you know the basics, let us level up with some chicken breast tips from experienced cooks and culinary professionals. These small adjustments can take your oven-baked chicken from good to absolutely perfect.
Start with Room Temperature Chicken
Take the chicken out of the refrigerator 20 to 30 minutes before baking. Cold chicken placed in a hot oven cooks unevenly. The outside overcooks while the center lags behind. Bringing the chicken closer to room temperature ensures more uniform cooking throughout every piece.
Use Parchment Paper or a Wire Rack
Lining your baking sheet with parchment paper prevents sticking and makes cleanup easier. Even better, place the chicken on a wire rack set over the baking sheet. This allows hot air to circulate around the entire piece of chicken, resulting in more even browning and a crispier texture without drying out the bottom.
Add a Little Fat to the Pan
A drizzle of olive oil or a small pat of butter on each piece of chicken adds richness and helps the seasoning adhere. The fat also conducts heat more evenly, contributing to better browning. This small step makes a noticeable difference in the final result of your baked chicken breast.
Flip Halfway Through Cooking
For even browning and cooking, flip the chicken breast halfway through the baking time. This ensures both sides get equal exposure to the oven heat. It is a simple step that many people overlook but makes a real difference in the texture and color of the finished chicken.
Slice Against the Grain
When it is time to serve, always slice chicken breast against the grain. This shortens the muscle fibers and makes the meat more tender and easier to chew. If you slice with the grain, each bite can feel tough and stringy, even if the chicken was perfectly cooked.
Store Leftovers Properly
If you have leftover juicy chicken breast, store it in an airtight container in the refrigerator within two hours of cooking. Properly stored baked chicken keeps well for up to four days. Reheat gently in the oven or microwave with a splash of water or broth to maintain moisture. Avoid reheating at high heat, as this is the fastest way to turn tender chicken into dry, rubbery strips.
Serving Suggestions for Baked Chicken Breast
Baked chicken breast pairs with almost anything. Here are some ideas to round out your meal:
- Rice or quinoa: A simple grain bowl with roasted chicken, veggies, and a drizzle of tahini or soy sauce.
- Roasted vegetables: Asparagus, broccoli, sweet potatoes, and Brussels sprouts all complement chicken beautifully.
- Salad: Slice the chicken and toss it over a fresh green salad with cherry tomatoes, cucumber, and a light vinaigrette.
- Sandwiches and wraps: Use the chicken in a wrap with lettuce, avocado, and your favorite sauce for a quick lunch.
- Pasta: Shred the chicken and toss it into penne with marinara, pesto, or a creamy Alfredo sauce.
The versatility of oven-baked chicken breast means you can use it in countless meals throughout the week. One batch of chicken breast oven recipe can become multiple different dishes, saving you time and reducing food waste.
Conclusion
Cooking chicken breast in oven does not have to be intimidating or hit-or-miss. With the right temperature, proper preparation, and a few simple techniques, you can consistently produce juicy chicken breast that everyone at the table will love. The key takeaways are straightforward: prep the chicken evenly, season well, bake at 400°F to 425°F, use a meat thermometer, and let it rest before serving.
Once you master these basics, you can get creative with different chicken breast seasoning blends and serving styles. The method is forgiving enough for beginners yet flexible enough for experienced cooks to experiment. So the next time you are planning dinner, remember these tips and give oven-baked chicken breast a try. You will wonder why you ever relied on anything else. Happy cooking, and enjoy that perfectly juicy baked chicken breast!
Frequently Asked Questions
What is the best temperature to cook chicken breast in the oven?
The best temperature for baked chicken breast is between 400°F and 425°F. This high heat cooks the chicken quickly while keeping it moist and creating a slightly crispy exterior. Avoid lower temperatures for longer times, as they tend to dry out the meat.
How long does it take to cook chicken breast in the oven?
At 425°F, average boneless chicken breast takes about 20 to 25 minutes. Thicker pieces may need up to 30 minutes. Always check the internal temperature with a meat thermometer to ensure it reaches 165°F in the thickest part of the breast.
Should I cover chicken breast with foil when baking?
You do not need to cover chicken breast with foil for most recipes. Leaving it uncovered allows the outside to brown and crisp up. However, if you notice the top is browning too quickly, you can loosely tent it with foil for the remaining cooking time.
How do I keep chicken breast from drying out in the oven?
To keep juicy chicken breast, brine or pound the chicken to even thickness, use olive oil or a light coating of fat, bake at a high temperature, and do not overcook. Letting the chicken rest for 5 to 10 minutes after baking also helps lock in moisture.
Can I use frozen chicken breast for oven baking?
Yes, you can bake frozen chicken breast, but it will take about 50% longer than thawed chicken. Make sure the internal temperature reaches 165°F before serving. For best results and more even cooking, thaw the chicken in the refrigerator overnight before baking.
What is the best way to season chicken breast for the oven?
A simple blend of olive oil, salt, pepper, garlic powder, and paprika works wonderfully for chicken breast seasoning. You can also experiment with herbs like rosemary and thyme or add a touch of honey or mustard for extra flavor. Coat all sides evenly for the best results.
=== SEO Title ===
How To Cook Chicken Breast In Oven And Keep It Juicy
=== Meta Title ===
How To Cook Chicken Breast In Oven And Keep It Juicy
=== URL Slug ===
how-to-cook-chicken-breast-in-oven-and-keep-it-juicy