How To Clean Stainless Steel Toaster Oven Easily And Fast
Cleaning your stainless steel toaster oven doesn’t have to be hard or time-consuming. With the right tools and a simple method, you can remove grease, food residue, and stains in under 30 minutes. This guide walks you through every step to get your stainless steel toaster oven looking and working like new again.
Your toaster oven is one of the most useful appliances in any kitchen. It heats up fast, cooks food evenly, and saves energy compared to a full-size oven. But here is the thing nobody talks about much. A stainless steel toaster oven gets dirty fast. Grease splatters, food crumbs, and baked-on residue build up quickly. And when that happens, your oven not only looks bad but also works less efficiently.
If you have been putting off cleaning your toaster oven, you are not alone. Many people avoid it because they think it will be a huge hassle. The good news is that cleaning a stainless steel toaster oven is actually simple. You do not need expensive products or special tools. With a few common household items and about 20 to 30 minutes, you can make your oven look brand new again. This guide shows you exactly how to do it.
We will cover everything from the supplies you need to the step-by-step cleaning process. You will also learn how to handle tough grease, prevent future buildup, and avoid common mistakes. By the end, you will feel confident giving your toaster oven cleaning a go. Let us get started.
Key Takeaways
- Use baking soda and vinegar: These two household items are all you need to degrease and shine your toaster oven.
- Clean after every use: Wiping down the interior prevents tough buildup and makes deep cleaning easier.
- Never use steel wool: Abrasive tools scratch stainless steel and cause permanent damage.
- Remove the crumb tray first: Cleaning detachable parts separately gives you better access and faster results.
- Dry thoroughly after cleaning: Leaving moisture on stainless steel can cause spots and water marks.
- Polish with olive oil: A light coat of olive oil restores the shine and protects the surface.
📑 Table of Contents
- Why Stainless Steel Toaster Ovens Get Dirty So Fast
- Supplies You Need For A Deep Clean
- Step-By-Step Guide To Clean Your Stainless Steel Toaster Oven
- How To Remove Tough Grease And Baked-On Stains
- How To Maintain A Sparkling Stainless Steel Toaster Oven
- Common Cleaning Mistakes To Avoid
- Quick Tips For A Perfect Stainless Steel Finish
- Conclusion
Why Stainless Steel Toaster Ovens Get Dirty So Fast
Stainless steel toaster ovens are popular for good reason. They look sleek, they last a long time, and they heat up quickly. But that same stainless steel surface has a downside. It shows every smudge, fingerprint, and grease streak. Understanding why your oven gets dirty so fast helps you clean it more effectively and prevent future buildup.
The Science Behind Grease Buildup
When you cook food in a toaster oven, fats and oils become airborne. They float through the air and settle on every surface. Stainless steel has a slightly porous surface that traps grease particles. Over time, this creates a thick layer of grime that is hard to ignore. The heating element also causes food residue to carbonize, turning soft spills into stubborn, baked-on stains.
How Food Residue Affects Performance
Grease buildup does more than make your oven look bad. It affects how your toaster oven works. When the interior is coated with grime, heat does not distribute evenly. Your food may cook slower or burn in spots. The crumb tray gets clogged, which can cause smoke and unpleasant odors. Regular cleaning keeps your oven running at peak performance and helps it last longer.
Why Stainless Steel Needs Special Care
Stainless steel is not the same as regular steel. It has a protective chromium oxide layer that prevents rust. But this layer can be damaged by harsh chemicals and abrasive scrubbing. That is why you need gentle but effective clean stainless steel methods. Using the right products protects the finish while removing dirt and grease at the same time.
Supplies You Need For A Deep Clean
Before you start, gather everything you need. Having all your supplies ready makes the process faster and smoother. You probably already have most of these items in your kitchen.
Here is what you will need for a thorough toaster oven cleaning:
- Baking soda – a natural degreaser that lifts grime without scratching
- White vinegar – cuts through grease and adds shine
- Warm water – for making cleaning solutions and rinsing
- Soft microfiber cloths – safe for stainless steel and lint-free
- A soft sponge or non-abrasive scrubber – for gentle cleaning
- Dish soap – a small amount for cutting through grease
- Olive oil or stainless steel polish – for finishing and shine
- A bowl or spray bottle – for mixing and applying solutions
- A toothbrush or soft-bristle brush – for reaching tight corners
Avoid using steel wool, harsh chemical cleaners, or abrasive pads on your stainless steel toaster oven. These can scratch the surface and strip the protective coating. Stick to soft, gentle tools for the best results.
Step-By-Step Guide To Clean Your Stainless Steel Toaster Oven
Now that you have your supplies ready, let us get into the cleaning process. Follow these steps in order for the best results. This method works for both the interior and exterior of your oven.
Step One: Unplug And Cool Down
Safety comes first. Always unplug your toaster oven before cleaning. Wait at least 30 minutes for it to cool completely. Cleaning a hot oven is dangerous and can cause burns. Make sure the oven is at room temperature before you touch any surface.
Step Two: Remove All Removable Parts
Take out the crumb tray, the wire rack, and any other detachable pieces. These parts clean much better when they are separate. Soak them in warm, soapy water for 10 to 15 minutes. This loosens baked-on food and makes scrubbing easier. Use your soft sponge to gently clean each piece. Rinse them thoroughly and set them aside to dry.
Step Three: Remove Loose Crumbs And Debris
With the oven empty and cool, flip it upside down over a trash can. Shake gently to remove loose crumbs from the bottom. You can also use a soft brush or a dry microfiber cloth to sweep out any remaining debris. This step is quick but important. It prevents crumbs from turning into smoke the next time you use the oven.
Step Four: Make Your Cleaning Paste
For the interior surfaces, mix three tablespoons of baking soda with one tablespoon of water. Stir until you get a thick paste, similar to the consistency of toothpaste. This baking soda cleaner is a powerful yet gentle degreaser. It will break down grease and food residue without damaging the stainless steel.
Step Five: Apply The Paste And Let It Sit
Using your fingers or a soft cloth, spread the baking soda paste all over the interior walls, the ceiling, and the floor of the oven. Avoid the heating element. Let the paste sit for 15 to 20 minutes. During this time, it works to dissolve grease and loosen baked-on food. You will see the grime start to soften, which makes the next step much easier.
Step Six: Scrub The Interior
After the paste has had time to work, dip your soft sponge in warm water and wring it out. Gently scrub the interior surfaces in circular motions. The grime should come off relatively easily. For stubborn spots, use your toothbrush to work the paste into the corners. Be patient and take your time. Do not press too hard, as this can scratch the stainless steel.
Step Seven: Wipe Down With Vinegar Solution
Once you have scrubbed away the grime, fill a spray bottle with equal parts white vinegar and warm water. Spray the interior surfaces generously. The vinegar reacts with the baking soda, creating a fizz that lifts remaining dirt. Wipe everything down with a clean, damp microfiber cloth. Repeat this process until all the paste and residue are gone.
Step Eight: Clean The Exterior
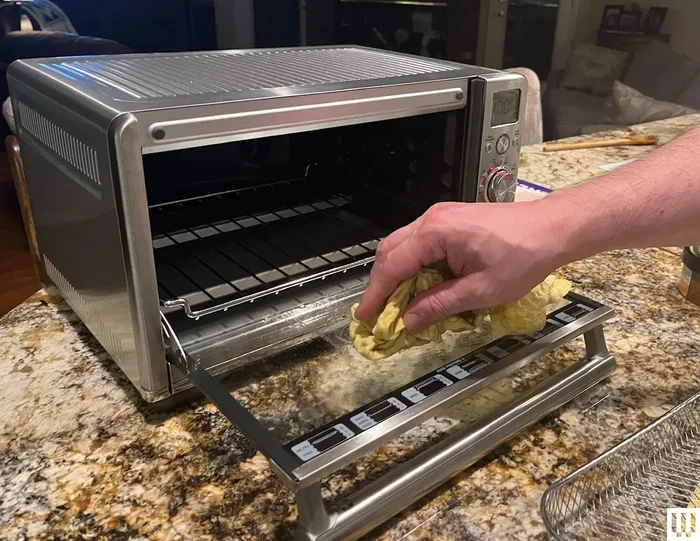
The exterior of your stainless steel toaster oven also needs attention. Spray your vinegar and water solution onto a microfiber cloth, not directly onto the oven. Wipe the outside surfaces, following the grain of the stainless steel. This prevents streaking and keeps the finish looking smooth. Pay special attention to the door handle, the control panel, and any areas where your hands touch frequently.
Step Nine: Polish And Shine
After everything is clean and dry, apply a small amount of olive oil to a fresh microfiber cloth. Rub it gently over the stainless steel surfaces in the direction of the grain. This adds a protective layer and gives your oven a beautiful shine. For extra protection, you can use a commercial stainless steel cleaner instead of olive oil. Both options work well.
Step Ten: Reassemble And Plug Back In
Once all parts are completely dry, put the crumb tray, wire rack, and any other pieces back in place. Plug your oven back in. Your clean toaster oven is now ready to use. You will notice the difference immediately. It looks great, smells fresh, and heats more efficiently.
How To Remove Tough Grease And Baked-On Stains
Sometimes regular cleaning is not enough. Heavy grease buildup and baked-on stains need extra attention. Here are some targeted methods for the toughest messes in your toaster oven interior.
The Steam Method
Steam is one of the best ways to loosen stubborn food residue. Fill a small oven-safe bowl with water and add two tablespoons of vinegar. Place it inside the cold oven and heat it on the highest setting for 5 to 10 minutes. The steam softens the baked-on grime, making it much easier to wipe away. After steaming, let the oven cool for a few minutes, then wipe everything down with a damp cloth.
The Lemon And Baking Soda Trick
Lemon is a natural acid that cuts through grease effectively. Mix the juice of one lemon with two tablespoons of baking soda to form a paste. Apply this to the tough stains and let it sit for 10 minutes. Scrub gently with your soft sponge. The combination of the acid from the lemon and the mild abrasion from the baking soda works wonders on even the most stubborn stains.
When To Use A Commercial Degreaser
If household methods do not fully remove the grease, you may need a commercial degreaser. Look for a product that is safe for stainless steel and non-toxic. Spray it on the affected areas, let it sit for the recommended time, and wipe clean. Always rinse the oven thoroughly after using any chemical cleaner. Residue left behind can affect the taste of your food and may damage the stainless steel surface over time.
For comparison, here is how common cleaning methods stack up for a deep clean toaster oven:
| Method | Effectiveness | Time Required | Safe For Stainless Steel |
|---|---|---|---|
| Baking soda paste | Good for light to medium grease | 20 minutes | Yes |
| Vinegar and water | Good for surface grease | 10 minutes | Yes |
| Steam method | Great for baked-on residue | 15 minutes | Yes |
| Lemon and baking soda | Great for tough stains | 20 minutes | Yes |
| Commercial degreaser | Best for heavy grease buildup | 15-30 minutes | Yes, if labeled safe |
How To Maintain A Sparkling Stainless Steel Toaster Oven
Cleaning your oven once is great. Keeping it clean over time is even better. Regular maintenance makes each cleaning session faster and easier. Here are some habits that will keep your stainless steel toaster oven in top shape.
Clean After Every Use
Get into the habit of wiping down the interior after each use. While the oven is still slightly warm (but not hot), use a damp microfiber cloth to wipe away any splatters or crumbs. This takes less than a minute and prevents buildup from accumulating. A quick wipe after every session means your monthly deep clean takes only a few minutes.
Line The Bottom With Foil Or A Silicone Mat
Placing a piece of aluminum foil or a silicone baking mat on the bottom of your oven catches drips and crumbs before they become baked-on messes. Make sure the foil does not touch the heating element. Replace the liner after a few uses or whenever it gets dirty. This simple trick saves you a lot of scrubbing time.
Clean The Crumb Tray Regularly
The crumb tray collects a surprising amount of debris. Check it after every two to three uses and empty it. If food builds up in the tray, it can smoke and even create a fire hazard. Removing the tray and giving it a quick rinse keeps your oven safe and clean.
Use Parchment Paper For Messy Foods
When you are cooking greasy or saucy foods, line the baking tray with parchment paper. This creates a barrier that catches drips and prevents them from sticking to the oven surfaces. Parchment paper is cheap and disposable, so you can just throw it away after cooking.
Inspect And Clean The Door Seal
The rubber seal around the oven door keeps heat inside while cooking. Over time, food particles and grease can accumulate on this seal. Use a damp cloth to wipe it down regularly. A clean seal improves energy efficiency and ensures your food cooks evenly. If the seal looks worn or damaged, replace it to maintain optimal performance.
Common Cleaning Mistakes To Avoid
Even with good intentions, people make mistakes when cleaning their stainless steel toaster oven. Avoiding these errors protects your oven and makes the cleaning process more effective.
Using Abrasive Cleaners Or Scouring Pads
This is the most common mistake. Steel wool, harsh scouring pads, and abrasive cleaners scratch the stainless steel surface. Once the protective layer is damaged, the steel becomes more prone to staining and rusting. Always use soft cloths, sponges, and non-abrasive cleaners.
Spraying Cleaner Directly On The Oven
Never spray liquid cleaners directly onto the oven surfaces. The liquid can seep into the electrical components and cause damage. Always spray onto your cloth or sponge first, then wipe the surface. This applies to both the interior and the exterior.
Skipping The Drying Step
Leaving moisture on stainless steel leads to water spots and streaks. After every cleaning session, dry all surfaces thoroughly with a clean, soft cloth. This is especially important after using the vinegar and water solution, as the acid can leave marks if not dried properly.
Ignoring The Exterior
Many people focus only on the interior and forget the outside. But the exterior collects grease, fingerprints, and dust just as quickly. A dirty exterior not only looks bad but can also affect the oven’s performance if grease builds up around the vents and controls.
Not Reading The Manufacturer’s Manual
Every toaster oven is slightly different. The manufacturer’s manual contains specific cleaning instructions and warnings. Some parts may be dishwasher safe, while others should be hand-washed. Reading the manual takes five minutes and can save you from accidentally damaging your appliance.
Expert Insight
According to kitchen appliance experts, the best approach to toaster oven maintenance is a combination of quick daily wipes and a thorough monthly deep clean. This two-tier strategy keeps grease and food buildup under control without requiring a major cleaning session every time. Experts also recommend using only non-toxic, food-safe cleaning products near areas where food is cooked. This ensures that no harmful chemical residue contaminates your meals.
Quick Tips For A Perfect Stainless Steel Finish
Getting your stainless steel toaster oven to look truly polished takes a few extra steps beyond basic cleaning. Here are some quick tips that make a big difference.
- Always wipe in the direction of the grain. Stainless steel has a directional finish. Wiping against the grain creates visible streaks that are hard to remove.
- Use distilled water for rinsing. Tap water contains minerals that can leave spots on stainless steel surfaces. Distilled water prevents this problem entirely.
- Buff with a dry cloth after cleaning. A final pass with a dry microfiber cloth removes any remaining moisture and adds shine.
- Reapply olive oil or polish monthly. This creates a protective barrier that repels grease and makes future cleaning easier.
- Keep a cleaning kit nearby. Store your baking soda, vinegar, and microfiber cloths in a small caddy near your oven. This makes it easy to clean up spills right away.
These simple habits transform your cleaning routine from a chore into a quick, effortless task. A well-maintained stainless steel toaster oven not only looks better but also performs better and lasts longer.
Conclusion
Cleaning your stainless steel toaster oven does not have to be a dreaded task. With the right supplies, a clear process, and a little regular maintenance, you can keep your oven looking and working its best. The key is to clean often, use gentle methods, and avoid common mistakes that can damage the surface.
Remember to start with the basics: baking soda paste for the interior, vinegar solution for wiping, and olive oil for polishing. Remove all removable parts and clean them separately. Take your time with tough stains and use the steam or lemon methods when needed. And most importantly, make cleaning a habit rather than an afterthought.
A clean toaster oven cooks better, smells better, and lasts longer. The effort you put into maintaining your appliance pays off every time you use it. So grab your baking soda and vinegar, and give your stainless steel toaster oven the care it deserves. Your kitchen will thank you.
Frequently Asked Questions
What is the best cleaner for a stainless steel toaster oven?
A mixture of baking soda and water is the best all-around cleaner for a stainless steel toaster oven. It is gentle, non-toxic, and cuts through grease effectively. For the exterior, a blend of vinegar and water works great for removing fingerprints and surface grime without damaging the finish.
Can I use vinegar to clean my stainless steel toaster oven?
Yes, white vinegar is safe and effective for cleaning stainless steel toaster ovens. It cuts through grease, removes water spots, and adds shine. Mix equal parts vinegar and water in a spray bottle or use it to rinse away baking soda residue after scrubbing. Always dry the surface afterward to prevent water marks.
How often should I deep clean my stainless steel toaster oven?
A deep clean every two to four weeks is ideal for regular users. If you use your toaster oven daily or cook greasy foods often, aim for every two weeks. For light users, once a month is sufficient. Wiping down the interior after each use reduces the need for frequent deep cleaning sessions.
Is it safe to put the toaster oven tray in the dishwasher?
Check your manufacturer’s manual first. Many toaster oven trays and racks are dishwasher safe, but some stainless steel parts can warp or discolor in a dishwasher. When in doubt, hand wash with warm soapy water and a soft sponge. This is the safest method for all removable parts.
How do I remove burnt-on food from my stainless steel toaster oven?
The steam method works best for burnt-on food. Place a bowl of hot water with vinegar inside the cold oven, then heat it for 5 to 10 minutes. The steam softens the burnt residue. Afterward, apply a baking soda paste and scrub gently with a soft sponge. Repeat if needed for the most stubborn spots.
Can steel wool be used on a stainless steel toaster oven?
No, never use steel wool or any abrasive scrubber on stainless steel. These tools scratch the protective chromium oxide layer and cause permanent damage. Scratched stainless steel is harder to clean and more prone to rust. Always use soft cloths, sponges, or non-abrasive brushes instead.