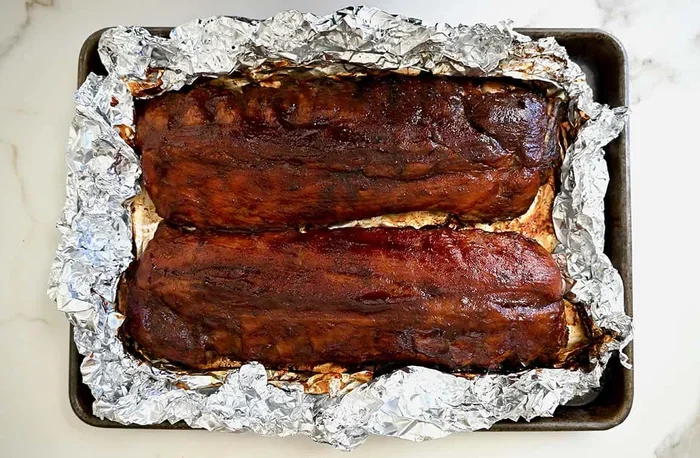
How To Cook Beef Ribs In The Oven With Foil Perfectly
Learning how to cook beef ribs in the oven with foil is one of the easiest ways to get restaurant-quality ribs at home. This method traps moisture, creates a tender texture, and lets you control the cook with minimal effort. Whether you use beef back ribs or short ribs, the foil technique locks in flavor and delivers fall-off-the-bone results. You will learn the full process from seasoning to slicing. Follow along and impress your family with juicy, smoky oven ribs that taste like they took all day.
There is something magical about how to cook beef ribs in the oven with foil. The kitchen fills with a rich, smoky aroma, and when you pull those ribs out, they look and taste like they spent hours in a smoker. But here is the truth: you do not need a smoker or a backyard grill to get incredible results.
Using foil in your oven is a game-changer. It locks in steam, keeps the meat moist, and practically cooks the ribs for you while you go about your day. This method works beautifully for both beef back ribs and beef short ribs. No matter which cut you choose, the foil technique delivers tender, juicy meat with minimal fuss.
In this guide, we will walk through every step of the process. From choosing the right ribs to pulling them out of the oven at just the right moment, you will have everything you need. Let us get started.
Key Takeaways
- Foil creates a steamy environment: Wrapping beef ribs in foil traps moisture and speeds up tender cooking.
- Low and slow is the secret: Cooking at 275-325°F ensures ribs stay juicy and don’t dry out.
- Resting matters: Letting ribs rest after cooking redistributes juices for a better bite.
- You need minimal equipment: A baking sheet, foil, and basic seasonings are all you need.
- Customization is easy: Swap rubs, liquids, and add-ins to match your flavor preferences.
- Timing varies by rib type: Beef back ribs take 3-4 hours while short ribs may need 2.5-3 hours.
📑 Table of Contents
- Why Cooking Beef Ribs in Foil in the Oven Works So Well
- Choosing the Right Beef Ribs for Your Recipe
- Ingredients and Tools You Will Need
- Step-by-Step Guide to Cooking Beef Ribs in the Oven With Foil
- Tips for Perfectly Tender and Juicy Oven Ribs
- Common Mistakes to Avoid When Cooking Beef Ribs in the Oven
- Serving Suggestions and Pairing Ideas
- Storing and Reheating Leftover Ribs
- Frequently Asked Questions
- Final Thoughts on Cooking Beef Ribs in the Oven With Foil
Why Cooking Beef Ribs in Foil in the Oven Works So Well
Many people assume that oven ribs cannot compare to grilled or smoked ribs. But when you use the foil method, the results can rival any barbecue pit. Here is why this approach works so well.
The Science Behind Foil-Wrapped Ribs
When you wrap beef ribs in foil, you create a sealed environment. Steam builds up inside the foil packet and surrounds the meat. This steam gently breaks down the collagen and fat in the ribs. The result is meat that is tender, juicy, and almost melts in your mouth.
Foil also acts as a barrier. It prevents the surface of the ribs from drying out during long cooking times. Without foil, oven ribs can lose moisture quickly, especially at higher temperatures. The foil keeps everything locked in place.
Another benefit is convenience. Foil-wrapped ribs need very little attention. You can set them and forget them. This makes the oven method perfect for weeknight dinners or weekend gatherings where you want to spend time with guests instead of hovering over the stove.
Oven vs. Smoker: What You Need to Know
Smoking ribs gives a distinct bark and deep smoky flavor. The oven does not replicate that exact experience. But foil-wrapped oven ribs have their own advantages. You get more consistent heat, easier temperature control, and no risk of undercooking or overcooking from fluctuating outdoor conditions.
Many pitmasters actually use a hybrid approach. They start ribs on the smoker and finish them in the oven with foil. For home cooks, the all-oven method is simpler and just as effective. The foil does a lot of the heavy lifting when it comes to moisture retention.
Choosing the Right Beef Ribs for Your Recipe
Not all beef ribs are the same. Choosing the right cut makes a big difference in your final result. Let us look at the two most popular options.
Beef Back Ribs
Beef back ribs come from the upper back of the cow, near the loin. They are long, meaty, and have a nice layer of fat between the bones. These ribs are the most common choice for oven recipes. They respond well to the foil method and cook evenly.
Beef back ribs have a mild, beefy flavor that absorbs rubs and marinades beautifully. They are perfect for beginners because they are forgiving. Even if you slightly overestimate the cooking time, they still turn out great.
Beef Short Ribs
Beef short ribs come from the lower chest area. They are shorter, fattier, and have more connective tissue. These ribs are incredibly rich and flavorful. They work wonderfully with the foil method because the extra fat renders down during cooking.
Short ribs are often sold in bone-in or boneless cuts. Bone-in short ribs look impressive on the plate and add more flavor to the dish. Boneless short ribs are easier to slice and eat. Both options produce excellent results in the oven.
How to Select the Best Ribs at the Store
When shopping for beef ribs, look for meat that is a deep red color. Avoid ribs that look brown or gray. The fat should be white and firm, not yellow or soft. Choose ribs with a good thickness of meat, about a quarter inch or more.
Check the bone-to-meat ratio. More meat means more to enjoy. If you are buying from a butcher, ask them to trim the ribs to a uniform thickness. Even cooking depends on consistent size.
Ingredients and Tools You Will Need
One of the best things about this recipe is how simple it is. You do not need a long list of fancy ingredients. Here is what you need to get started.
Essential Ingredients
- Beef ribs: 3 to 4 pounds of beef back ribs or short ribs
- Kosher salt: For seasoning the meat evenly
- Black pepper: Freshly ground for the best flavor
- Garlic powder: Adds a savory depth to the rub
- Paprika: Provides color and a mild smoky taste
- Brown sugar: Helps create a caramelized crust
- Beef broth or apple cider vinegar: Added to the foil for moisture and flavor
- Butter or olive oil: For brushing the ribs before wrapping
Tools and Equipment
- Heavy-duty aluminum foil: Regular foil tears easily. Use the strong kind
- Baking sheet or roasting pan: A rimmed sheet pan works best
- Meat thermometer: Essential for checking internal temperature
- Sharp knife and cutting board: For trimming and slicing
- Pastry brush: For applying butter or glaze
Optional Flavor Boosters
Want to take your ribs to the next level? Try adding a few extras inside the foil packet. A splash of Worcestershire sauce adds umami depth. A few sprigs of fresh rosemary or thyme give an herbal aroma. Onion slices and garlic cloves placed between the ribs create a rich, savory base.
Some cooks like to add a drizzle of honey or maple syrup for sweetness. Others prefer a splash of beer for a malty, complex flavor. Feel free to experiment and find your perfect combination.
Step-by-Step Guide to Cooking Beef Ribs in the Oven With Foil
Now for the part you have been waiting for. Follow these steps for perfectly cooked oven ribs every single time.
Step 1: Prep the Ribs
Start by removing the membrane from the back of the ribs. Use a butter knife to loosen one corner, then grab it with a paper towel and pull it off. This thin membrane blocks seasoning from reaching the meat and creates a chewy texture.
Next, pat the ribs dry with paper towels. Dry meat absorbs seasoning better and develops a nicer crust. Trim any excess fat if it feels too thick, but leave some for flavor and moisture.
Step 2: Apply the Rub
Mix your dry rub ingredients together in a small bowl. A simple blend of salt, pepper, garlic powder, paprika, and brown sugar works wonders. Coat both sides of the ribs generously with the rub.
Press the seasoning into the meat with your hands. This helps it stick and creates a flavorful crust during cooking. For the best results, let the rubbed ribs sit in the refrigerator for at least one hour or overnight.
Step 3: Wrap in Foil
Tear off a large piece of heavy-duty foil, about 18 inches long. Place the ribs in the center, bone side down. Add a splash of beef broth or apple cider vinegar to the pan. This liquid creates steam inside the foil and keeps the ribs moist.
Wrap the ribs tightly in the foil. Fold the edges over several times to seal the packet completely. Place the wrapped ribs seam-side up on a baking sheet. The seam facing up prevents any liquid from leaking out.
Step 4: Cook Low and Slow
Preheat your oven to 275°F. This low temperature is the key to tender, fall-off-the-bone ribs. Place the baking sheet on the middle rack of the oven.
Cook beef back ribs for about 3 to 3.5 hours. Short ribs need about 2.5 to 3 hours. The ribs are done when a fork slides easily between the bones and the meat pulls back slightly from the ends.
Use a meat thermometer to check the internal temperature. The target is around 200-205°F at the thickest part. This temperature ensures the collagen has fully broken down and the meat is tender.
Step 5: Unwrap and Finish
Carefully remove the baking sheet from the oven. The foil packet will be hot and full of steam. Use tongs or oven mitts to open the foil, tilting it away from you to avoid the steam.
Brush the ribs with your favorite barbecue sauce or a simple glaze made from honey and apple cider vinegar. Place the ribs back in the oven, this time uncovered, for 15 to 20 minutes. This step caramelizes the sauce and adds a beautiful glaze.
Step 6: Rest and Serve
Remove the ribs from the oven and let them rest for 10 to 15 minutes. This resting period allows the juices to redistribute throughout the meat. Cutting too early causes the juices to run out, leaving the ribs dry.
Slice between the bones to separate individual ribs. Serve with extra sauce on the side, along with coleslaw, cornbread, or baked beans for a complete meal.
Tips for Perfectly Tender and Juicy Oven Ribs
Even with a great recipe, small details can make or break your ribs. Use these tips to elevate your results.
Use the Right Oven Temperature
Cooking ribs at too high a temperature is the most common mistake. High heat dries out the meat before the connective tissue has time to break down. Stick to 275°F for the best results. If you are in a hurry, you can go up to 325°F, but check the ribs earlier than expected.
Do Not Skip the Resting Step
Resting is not just for steak. Ribs benefit from a good rest after cooking. The heat inside the meat continues to distribute, and the fibers relax. This means juicier, more flavorful bites on your plate.
Keep the Foil Tight
A loose foil packet lets steam escape, which defeats the purpose of the method. Make sure the foil is wrapped snugly around the ribs. You want a sealed environment that traps all the moisture and flavor.
Experiment with Different Liquids
The liquid you add to the foil packet affects the final flavor. Beef broth gives a rich, savory base. Apple cider vinegar adds brightness and helps tenderize the meat. Cola or beer brings a unique sweetness and depth. Try different options to find your favorite.
Add a Glaze in the Final Stage
The uncovered finishing stage is where your ribs get their signature look and taste. A glaze adds sweetness, color, and a slight caramelized texture. Brush it on lightly and watch for any burning. You want a golden shine, not charred edges.
Common Mistakes to Avoid When Cooking Beef Ribs in the Oven
Even experienced cooks make mistakes. Knowing what to avoid saves time, ingredients, and frustration.
Cooking at Too High a Temperature
This is the number one mistake people make. Cranking the oven to 400°F or higher seems faster, but it produces dry, tough ribs. Low and slow is not just a saying. It is the proven method for tender oven ribs.
Not Using Enough Liquid
Skipping the liquid in the foil packet leads to dry ribs. The steam created by the liquid is what keeps the meat moist during the long cook. Always add at least a quarter cup of broth or vinegar to the pan before wrapping.
Opening the Foil Too Often
Every time you open the foil, you release steam and heat. This slows down the cooking process and dries out the ribs. Resist the urge to peek. Trust the process and let the oven do its work.
Skipping the Resting Period
Cutting into ribs right out of the oven is tempting. But the juices will run all over the cutting board instead of staying in the meat. Give them the full 10 to 15 minutes of resting time for the best texture.
Using the Wrong Cut of Ribs
Not all ribs are created equal for this method. Very thin cuts can overcook quickly. Very thick cuts may need extra time. Choose ribs that are at least one inch thick for the most reliable results.
Serving Suggestions and Pairing Ideas
Great ribs deserve great sides. Here are some pairing ideas that complement beef ribs cooked in foil perfectly.
- Coleslaw: The crunch and coolness of coleslaw balance the richness of ribs
- Cornbread: Sweet cornbread soaks up the juices beautifully
- Baked beans: A classic barbecue side that adds heartiness
- Grilled corn on the cob: Charred corn with butter complements the smoky flavor
- Mac and cheese: Creamy, cheesy pasta is a crowd-pleasing side
- Roasted vegetables: Carrots, parsnips, and Brussels sprouts add a healthy contrast
For drinks, pair your ribs with a cold beer, sweet tea, or a bold red wine like a Cabernet Sauvignon. The right beverage enhances the overall dining experience and makes the meal feel complete.
Storing and Reheating Leftover Ribs
Leftover oven ribs are even better the next day. The flavors have time to meld and deepen overnight. Store cooked ribs in an airtight container in the refrigerator for up to four days.
To reheat, wrap the ribs in foil and warm them in the oven at 300°F for about 15 to 20 minutes. This gentle reheating method keeps the meat moist. Avoid microwaving, which can dry out the ribs and make the meat tough.
If you want to freeze ribs, wrap them tightly in foil and then place them in a freezer bag. They will keep for up to three months. Thaw overnight in the refrigerator before reheating.
Frequently Asked Questions
Can I use regular aluminum foil instead of heavy-duty foil?
You can, but heavy-duty foil is much less likely to tear during cooking. Regular foil is thinner and can break open, releasing steam and drying out your ribs. If you only have regular foil, double-wrap the ribs for extra strength.
How do I know when beef ribs are done in the oven?
The best way to check is with a meat thermometer. When the internal temperature reaches 200 to 205 degrees Fahrenheit, the ribs are done. You can also test by inserting a fork between the bones. If the meat pulls back easily and the fork slides in without resistance, they are ready.
Can I cook beef ribs in the oven with foil without a rub?
Absolutely. You can simply season the ribs with salt and pepper and let the foil do the work. The slow cooking process draws out the natural flavor of the beef. However, a good rub adds depth and complexity that makes the ribs even more delicious.
What is the best liquid to add to the foil packet?
Beef broth and apple cider vinegar are the most popular choices. Beef broth adds richness, while vinegar adds a tangy brightness that helps tenderize the meat. You can also use beer, cola, or a combination of broth and a splash of your favorite sauce.
Can I cook frozen beef ribs using this method?
It is best to thaw ribs before cooking for even results. If you cook from frozen, add at least an extra hour to the cooking time and make sure the internal temperature reaches the safe minimum of 145°F. For the best texture, always thaw ribs in the refrigerator overnight.
Do I need to flip the ribs during cooking?
No. The foil wraps the ribs completely, so they cook evenly on all sides. Flipping is unnecessary and could cause the foil to open, releasing steam. Just let them cook undisturbed until the timer goes off.
Final Thoughts on Cooking Beef Ribs in the Oven With Foil
Mastering how to cook beef ribs in the oven with foil opens up a world of delicious possibilities. This method is simple, reliable, and produces consistently outstanding results. Whether you are a beginner or a seasoned home cook, the foil technique takes the guesswork out of oven ribs.
The beauty of this approach lies in its simplicity. You need just a few ingredients, basic tools, and a little patience. The oven does the hard work for you. While the ribs slow-cook in their foil pouch, you can prepare sides, set the table, or simply relax.
Remember to choose good quality ribs, apply a flavorful rub, and resist the urge to rush the process. Low heat, sealed foil, and adequate liquid are the three pillars of this method. Get those right, and you will have ribs that rival any barbecue restaurant.
So next time you crave tender, juicy, fall-off-the-bone beef ribs, skip the grill and head to your oven. Wrap them in foil, set the temperature, and let time work its magic. Your taste buds will thank you.