How Long To Cook Pastrami In Oven The Ultimate Guide
Learning how long to cook pastrami in oven is the key to achieving tender, juicy, deli-quality pastrami right at home. This guide covers exact cooking times, oven temperatures, and step-by-step instructions so you can make perfect pastrami every single time. Whether you are using a brisket flat or point, following the right time and temperature will give you amazing results.
Making pastrami at home might seem intimidating, but it is actually simpler than you think. The most common question people ask is, “How long to cook pastrami in oven?” The answer depends on a few factors, but with the right approach, you can create deli-quality pastrami that rivals anything from your favorite sandwich shop. This guide walks you through everything you need to know, from choosing the right cut to slicing the final product.
The beauty of oven-baked pastrami is that you do not need a smoker or special equipment. A standard home oven handles the job beautifully. You just need patience, a good brisket, and a solid recipe. Let us dive into the details so you can make this happen in your own kitchen.
Key Takeaways
- Low and slow is the way to go: Cooking pastrami in the oven at 250°F to 300°F ensures tender, juicy meat.
- Plan for 4 to 6 hours of cooking time: Depending on the size of your brisket, expect a long but rewarding cook.
- Use a meat thermometer: The internal temperature should reach 200°F to 205°F for the best texture.
- Rest your pastrami for at least 30 minutes: This lets the juices redistribute and keeps the meat moist.
- Slice against the grain: This is the single most important step for tender pastrami slices.
- Apply the rub the night before: Letting the rub sit overnight deepens the flavor dramatically.
- Wrap in foil during cooking: This keeps moisture locked in and prevents the meat from drying out.
📑 Table of Contents
- What Is Pastrami and Why Cook It in the Oven
- How Long To Cook Pastrami In Oven: Time and Temperature Guide
- Choosing the Right Cut for Oven Pastrami
- Preparing Your Pastrami Before Cooking
- Step-by-Step Cooking Process for Oven Pastrami
- Resting and Slicing Your Pastrami Like a Pro
- Common Mistakes and How to Fix Them
- Serving Ideas and Storage Tips
- Final Thoughts on Cooking Pastrami in the Oven
What Is Pastrami and Why Cook It in the Oven
Pastrami is a cured and smoked meat that traditionally comes from beef brisket. Delis around the world love it for its rich, peppery flavor and tender texture. Making pastrami involves curing the meat, applying a spice rub, and then cooking it low and slow until it becomes melt-in-your-mouth tender.
Cooking pastrami in the oven is a popular method because it is accessible and forgiving. You control the temperature, the timing, and the environment. Whether you are a beginner or a seasoned cook, the oven gives you consistent results every time. Plus, the aroma that fills your kitchen during the cook is absolutely incredible.
The History Behind Pastrami
Pastrami has roots in Romanian and Eastern European cuisine. Immigrants brought the tradition to the United States, and it became a staple of New York delis in the late 1800s. The classic New York pastrami sandwich, served on rye with mustard, is still one of the most beloved deli items today. Making it at home connects you to that rich culinary history.
How Long To Cook Pastrami In Oven: Time and Temperature Guide
This is the heart of the article. When people search for how long to cook pastrami in oven, they want clear, specific numbers. Here they are. The general rule is to cook pastrami at a low temperature for several hours. The exact time depends on the size and shape of your brisket.
Recommended Oven Temperature
The sweet spot for cooking pastrami in the oven is between 250°F and 300°F. This low temperature allows the meat to cook slowly and evenly. At this range, the collagen in the brisket breaks down gently, which creates that signature tender texture. Going too hot will dry out the meat and ruin the result.
Some recipes call for starting at a higher temperature to form a bark, then dropping it down. This is a great technique if you want a more pronounced crust on your pastrami. However, for beginners, keeping a steady temperature throughout is the easiest approach.
Cooking Time Based on Brisket Size
The cooking time for pastrami varies based on the weight of your brisket. Here is a general guideline:
- 3 to 4 pound brisket: Expect about 4 to 5 hours of cooking time.
- 5 to 6 pound brisket: Plan for 5 to 6 hours in the oven.
- 7 to 8 pound brisket: Allow 6 to 7 hours for a full cook.
- Large point cuts (8+ pounds): These may need 7 to 8 hours due to higher fat content.
These times are approximate. The real indicator of doneness is the internal temperature, not the clock. Always use a reliable meat thermometer to check your progress.
Internal Temperature Targets
The target internal temperature for pastrami is between 200°F and 205°F. At this range, the connective tissue in the brisket has fully broken down. The meat should be tender and easy to pull apart with a fork. If you pull it off too early, it will be tough and chewy. If you wait too long, it may become mushy.
A good practice is to start checking the internal temperature after about 4 hours. Insert the thermometer into the thickest part of the meat, avoiding any large fat pockets. Keep cooking until you hit that 200°F to 205°F range.
Choosing the Right Cut for Oven Pastrami
Not all briskets are created equal when it comes to making pastrami. The cut you choose has a big impact on the final result. Let us look at the two main options and what works best for oven cooking.
Flat Cut vs. Point Cut
The flat cut is leaner and more uniform in shape. It is the traditional choice for pastrami because it slices neatly and has a consistent texture. The point cut is fattier and more marbled, which makes it incredibly juicy but harder to slice cleanly.
For beginners making oven pastrami, the flat cut is the better choice. It is more forgiving and produces more uniform slices. However, if you love rich, fatty meat and do not mind a little extra effort when slicing, the point cut is a fantastic option too.
Buying Tips for Your Brisket
When you buy a brisket for pastrami, look for a well-marbled piece with a good layer of fat on one side. Avoid very thin cuts, as they will dry out during the long cook. Ask your butcher for a whole packer brisket if possible, as it gives you the most flexibility.
If you are using a pre-corned brisket from the store, you can skip the curing step and go straight to the rub and cooking process. This saves a significant amount of time and is perfect for weeknight meal planning.
Preparing Your Pastrami Before Cooking
Preparation is just as important as the cooking process itself. Taking the time to properly prep your brisket will make a huge difference in flavor and texture.
Making the Pastrami Rub
The spice rub is what gives pastrami its distinctive flavor. A classic pastrami rub includes black pepper, coriander, garlic powder, paprika, and mustard seed. Some recipes also include curing salt for a traditional deli taste.
To make the rub, simply mix your spices together in a bowl. The exact measurements depend on your taste preferences, but a good starting point is:
- 2 tablespoons cracked black pepper
- 1 tablespoon ground coriander
- 1 tablespoon garlic powder
- 1 tablespoon paprika
- 1 teaspoon mustard seed
- 1 teaspoon brown sugar
Adjust the quantities based on the size of your brisket. You want a generous coating of the rub on all sides of the meat.
Applying the Rub and Resting
Apply the rub to the brisket at least 12 hours before cooking, or ideally the night before. Pat the brisket dry with paper towels first, then coat all sides evenly with the rub. Wrap it tightly in plastic wrap and place it in the refrigerator overnight.
This resting period does two important things. First, it allows the flavors to penetrate deep into the meat. Second, it helps form a tacky surface called a pellicle, which promotes better bark formation during the cook. Do not skip this step if you want the best possible flavor.
Step-by-Step Cooking Process for Oven Pastrami
Now that your brisket is prepped and rested, it is time to cook it. This section walks you through the entire process step by step.
Step 1: Preheat the Oven
Set your oven to 275°F. This is a great middle-ground temperature that works well for most brisket sizes. Let the oven fully preheat before you put the meat in. A stable oven temperature from the start ensures even cooking throughout.
Step 2: Wrap the Brisket
Place the brisket on a large piece of heavy-duty aluminum foil. Wrap it tightly, sealing all the edges so no steam escapes. The foil creates a sealed environment that keeps the meat moist and tender. Some cooks like to place the brisket on a wire rack over a sheet pan first, which promotes more even heat circulation.
Step 3: Place in the Oven
Put the wrapped brisket in the oven, fat side up if possible. Place it on the center rack for the most consistent heat. Set a timer based on the weight guidelines from earlier in this article.
Step 4: Check Temperature Regularly
After about 3 hours, start checking the internal temperature every 30 minutes. Use an instant-read meat thermometer inserted into the thickest part of the meat. You are aiming for 200°F to 205°F. The meat is done when it is tender and a fork slides in and out easily.
Step 5: Let It Rest
Once the pastrami reaches the target temperature, remove it from the oven. Keep it wrapped in the foil and let it rest for at least 30 minutes. This resting period is crucial. It allows the juices to redistribute throughout the meat, which makes every slice juicy and flavorful.
Step 6: Slice and Serve
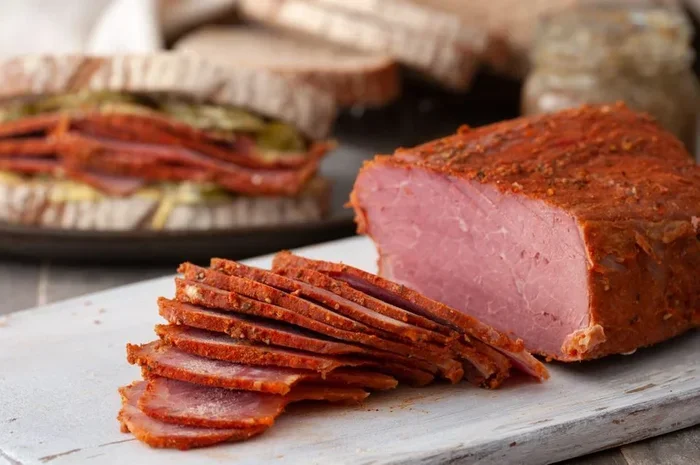
Unwrap the pastrami and place it on a cutting board. Use a sharp knife and slice against the grain. This is the most important slicing technique for tender pastrami. If you slice with the grain, the meat will be chewy and tough. Cutting against the grain shortens the muscle fibers and makes each bite melt in your mouth.
Slice the pieces about a quarter-inch thick for the classic deli-style pastrami experience. Serve it on rye bread with mustard, or enjoy it on its own. The possibilities are endless.
Resting and Slicing Your Pastrami Like a Pro
Resting and slicing might seem like the boring parts, but they actually make or break the final result. Let us go over the best practices for both.
Why Resting Matters
During the cooking process, the juices in the meat get pushed toward the center. If you cut into it right away, those juices will run out and your pastrami will be dry. Resting gives the juices time to redistribute evenly. This means every slice will be moist and flavorful.
The minimum resting time is 30 minutes. For larger briskets, you can rest for up to an hour. Keep the meat wrapped in foil during this time to retain heat and moisture.
How to Identify the Grain
Finding the grain of the meat is simple. Look at the surface of the brisket and you will see lines of muscle fiber running in a specific direction. These lines are the grain. Your goal is to cut perpendicular to these lines, which shortens the fibers and makes the meat tender.
If the grain changes direction partway through the brisket (which is common with point cuts), adjust your slicing angle to stay perpendicular to the grain at each point. This takes a little extra attention but makes a noticeable difference in texture.
Slicing Thickness Guidelines
For classic deli pastrami, aim for slices that are about a quarter-inch thick. This is thick enough to hold together on a sandwich but thin enough to be tender. If you prefer thinner pastrami for a more delicate texture, go down to an eighth-inch. Thicker slices work well if you are serving the pastrami as a main course rather than on sandwiches.
Common Mistakes and How to Fix Them
Even experienced cooks make mistakes when making pastrami. Here are the most common errors and how to avoid them.
Cooking at Too High a Temperature
The biggest mistake people make is setting the oven too hot. They want to speed up the process, but high heat dries out the meat and prevents the collagen from breaking down properly. Stick to 250°F to 300°F and be patient. The low and slow approach is what gives pastrami its signature tenderness.
Skipping the Resting Period
It is tempting to cut into that beautiful pastrami the moment it comes out of the oven. Resist that urge. Skipping the rest means losing precious juices, which results in dry, less flavorful meat. Set a timer, make your sides, and let the pastrami rest. Your patience will be rewarded.
Not Using a Meat Thermometer
Relying on time alone is a recipe for inconsistent results. Every oven is different, and every brisket varies in size and shape. A meat thermometer takes the guesswork out of the equation. It is the single most important tool for making perfect pastrami in the oven.
Slicing With the Grain
This mistake turns tender pastrami into something tough and chewy. Always identify the grain direction before you start slicing. If you are unsure, cut a small test slice and check the texture. Adjust your angle if needed. Once you find the right direction, stick with it for all the remaining slices.
Over-Rubbing or Under-Rubbing
Too much rub can overpower the natural flavor of the beef. Too little rub means bland pastrami. The key is balance. Apply enough rub to coat the surface generously, but do not cake it on in thick layers. A thin, even layer allows the spice flavors to complement the meat rather than mask it.
Serving Ideas and Storage Tips
Now that your pastrami is cooked and sliced, it is time to enjoy it. Here are some serving ideas and storage tips to make the most of your creation.
Classic Serving Suggestions
The traditional way to serve pastrami is on rye bread with yellow mustard and a side of pickles. This combination has stood the test of time for a reason. The tangy mustard cuts through the richness of the meat, and the crispy rye bread adds a great texture contrast.
You can also serve pastrami on its own as an appetizer or main course. Pair it with sauerkraut, Swiss cheese, or a simple salad. For a more elaborate meal, try pastrami-stuffed cabbage rolls or pastrami egg rolls for a fun twist on the classic.
Storing Leftover Pastrami
Leftover pastrami stores well in the refrigerator. Wrap it tightly in plastic wrap or aluminum foil, or place it in an airtight container. Properly stored pastrami will keep for up to 5 days in the fridge.
You can also freeze pastrami for longer storage. Wrap individual slices in plastic wrap, then place them in a freezer bag. Frozen pastrami keeps for up to 3 months. To reheat, wrap a slice in foil and warm it in the oven at 300°F for about 15 minutes. This keeps the moisture in and prevents the meat from drying out.
Final Thoughts on Cooking Pastrami in the Oven
Making pastrami at home is a rewarding experience that produces incredible results. The key to success is understanding how long to cook pastrami in oven and following the right process from start to finish. Keep the temperature low, the cook time long, and always use a meat thermometer to check for doneness.
Remember that every brisket is different, so adjust your timing based on the size of your cut and the performance of your specific oven. With a little practice, you will develop an intuition for when your pastrami is perfectly done. The aroma, the texture, and the flavor will all tell you when it is ready.
So go ahead and give it a try. Invite some friends over, make a batch of your favorite sandwiches, and enjoy the fruits of your labor. Once you taste homemade pastrami, you will never go back to the deli counter again.
Frequently Asked Questions
Can I cook pastrami in the oven without curing it first?
Yes, you absolutely can. Many home cooks use a pre-corned brisket from the store, which skips the curing step entirely. You simply apply the pastrami rub and cook it in the oven. This is the fastest and easiest way to make oven pastrami at home. The result is still delicious and full of flavor.
What is the best pastrami cooking temperature for the oven?
The best oven temperature for cooking pastrami is between 250°F and 300°F. This low temperature allows the meat to cook slowly and evenly, breaking down the collagen for a tender texture. Avoid going above 325°F, as higher temperatures will dry out the brisket before the connective tissue has time to fully break down.
How do I know when my oven pastrami is done?
The best way to tell is by using a meat thermometer. Your pastrami is done when the internal temperature reaches 200°F to 205°F. At this point, the meat should be tender and easy to pull apart with a fork. Do not rely solely on cooking time, as every brisket and oven varies.
Can I use a smaller brisket to make pastrami faster?
Yes, a smaller brisket will cook faster. A 3 to 4 pound flat cut typically takes about 4 to 5 hours at 275°F. Just keep in mind that smaller cuts have less fat, which means they can dry out more easily. Check the internal temperature frequently and consider wrapping the meat more tightly to retain moisture.
How long does leftover pastrami last in the fridge?
Leftover pastrami keeps well in the refrigerator for up to 5 days when stored properly. Wrap it tightly in plastic wrap or aluminum foil, or place it in an airtight container. For longer storage, freeze individual slices for up to 3 months. Reheat gently in the oven to maintain the best texture and flavor.
What is the difference between corned beef and pastrami?
The main difference is the seasoning and the cooking method. Corned beef is cured in a brine with salt and nitrates, while pastrami is rubbed with a dry spice blend that includes black pepper, coriander, and garlic. Both are typically made from beef brisket, but pastrami is usually smoked or baked after curing, giving it a more intense, peppery flavor profile.
=== CONCLUSION ===
Cooking pastrami in the oven is a rewarding process that anyone can master with the right guidance. The answer to how long to cook pastrami in oven comes down to a few simple factors: the size of your brisket, the oven temperature, and the target internal temperature. Stick to 250°F to 300°F, plan for 4 to 8 hours depending on the cut, and always use a meat thermometer to check for doneness at 200°F to 205°F.
Take your time with the preparation, let the rub work overnight, and never rush the resting period. These small efforts add up to a final product that is tender, juicy, and full of flavor. Whether you are making pastrami for the first time or refining your technique, this guide gives you everything you need for success. So fire up your oven, grab a good brisket, and enjoy the process of creating something truly special at home.