How To Make A Coffee Table Look Antique and Vintage Style
Transform an ordinary coffee table into a stunning antique piece using simple distressing, vintage paint, and authentic styling techniques. This guide walks you through every step, from surface preparation to finishing touches, so your furniture looks genuinely aged and charming. Whether you own a modern table or a thrift store find, these methods deliver a timeless vintage appeal that elevates any room.
There is something truly magical about a coffee table that tells a story. An antique coffee table carries the warmth of years gone by, with scratches and patina that no factory can replicate. But what if your current table looks brand new and plain? The good news is that you can make a coffee table look antique without spending a fortune or hiring a professional. With a few simple tools and some patience, you can transform any piece of furniture into a stunning vintage centerpiece for your living room.
The beauty of a vintage coffee table makeover lies in its simplicity. You do not need fancy equipment or years of woodworking experience to get started. Whether you are working with solid wood, particleboard, or a thrift store find, the techniques in this guide will help you achieve that timeless, aged look. Your living room will feel warmer, more inviting, and full of character once you finish the project. Let us walk through each step together so you can get started right away.
Before you grab your sandpaper and paint, take a moment to look at your coffee table closely. Understanding what you are working with makes the entire process much smoother and more successful. Every material responds differently to distressing and finishing techniques, so this first step is absolutely essential.
Key Takeaways
- Assess First: Always evaluate your coffee table material and condition before starting any makeover project.
- Distress with Purpose: Use sanding, scraping, and chemical techniques to create authentic aged effects that mimic natural wear.
- Two-Tone Paint Wins: Layering paint colors and sanding back creates a believable vintage finish with depth and character.
- Hardware Matters: Updating legs, handles, and decorative details elevates the antique look significantly.
- Style Completes the Look: Proper styling with vintage accessories makes your coffee table feel genuinely old and loved.
- Maintenance Keeps It Looking Great: Simple care routines preserve your antique finish for years to come.
📑 Table of Contents
Assess Your Coffee Table Before You Begin
Identifying Your Table Material
Start by checking what your coffee table is made of. Solid wood tables like oak, pine, or walnut take stain and paint beautifully. They also respond well to distressing methods because the layers wear away naturally over time. If your table has a veneer top, you need to be more gentle during sanding. Veneer is thin and can sand through quickly if you are not careful. Always test your sanding in a hidden spot first.
Particleboard and MDF tables present a different challenge. These materials do not absorb stain the same way real wood does. However, you can still achieve a lovely antique look by using paint techniques rather than staining. A painted finish on particleboard can look incredibly vintage and charming once you add the right distressing and finishing touches.
Glass-top coffee tables also work for this project, but the approach changes. You would focus on distressing the base or frame rather than the glass surface itself. Adding vintage-style details to the wooden base and frame enhances the antique feel without damaging the glass. Consider using antique brass corners or aged metal accents to complete the look.
Evaluating the Current Condition
Next, examine the surface for any damage, scratches, or existing finishes. If your table has a glossy factory finish, you will need to sand it down before applying any new paint or stain. A light scuff with fine-grit sandpaper helps new products adhere better and last longer. This step is often skipped by beginners, but it makes a huge difference in the final result.
Check the legs and joints too. Loose joints or wobbly legs can add to the authentic antique look if you fix them properly. Tighten any screws and apply wood glue to wobbly connections. A table that feels sturdy but shows natural wear tells a much better story than one that feels cheap or falls apart at a touch.
Clean the entire surface with a damp cloth before you start working. Remove dust, grease, and any leftover product residue from previous use. This ensures your paint, stain, or finish adheres evenly and lasts much longer. Let the table dry completely before moving on to the next step.
Distressing Techniques to Make A Coffee Table Look Antique
Distressing is the heart of any antique coffee table makeover. It is the process of creating the appearance of age and natural wear. Done correctly, it makes a new table look like it has been loved for decades in a busy household. Done incorrectly, it can look artificial and forced. The key is to focus on areas where natural wear would actually occur over time.
Sanding and Scraping Methods
Sanding is the most straightforward way to add character to your coffee table. Focus on areas that would naturally wear down over years of everyday use. The edges of the table, the corners, and the top surface near where people would place their drinks are perfect spots. These areas see the most contact and would show the most wear on a real antique piece.
Use a piece of fine-grit sandpaper, around 120 to 150 grit. Sand in circular motions along the edges and corners. You want to expose the bare wood underneath the finish. Do not sand large areas evenly or uniformly. The goal is to create natural-looking wear patterns that mimic years of use, not a sanded-down uniform appearance.
A metal scraper works wonders on stubborn spots and adds deeper marks. Gently scrape the surface to create grooves and texture that suggest heavy use over time. Vary the depth and placement of your scrapes to keep things looking authentic and random. Real antique furniture never wears evenly, so your distressing should reflect that natural irregularity.
Quick Tip: Hold your sandpaper wrapped around a block of wood for better control. This prevents you from sanding too aggressively in one spot and helps you maintain a natural, uneven look throughout the piece.
Chemical Aging with Vinegar and Paint
For a more dramatic aged effect, try a vinegar and steel wool solution. This natural method darkens wood and creates an old-world appearance that is hard to achieve with store-bought products alone. The reaction between the vinegar and the natural tannins in the wood creates beautiful, organic aging effects.
Soak a piece of fine steel wool in white vinegar for 24 to 48 hours. Strain the liquid into a jar and let it cool completely before using it. Brush the solution onto your bare wood and watch it darken within minutes. The color develops gradually, giving you time to control the intensity of the aged effect.
Let the solution dry completely before moving to the next step. This method works especially well on pine and oak, which have higher tannin content and react more dramatically. The result looks remarkably similar to wood that has aged naturally over many years of use in a home.
You can also use dark wax over your painted finish to add depth and an authentic vintage feel. Apply a small amount to a cloth and rub it into the corners, edges, and recessed areas. Wipe away the excess with a clean, dry cloth. This creates natural shadows and depth that make your coffee table look genuinely old and well-loved.
Applying Vintage Paint and Stain
Color choice plays a huge role in achieving the right antique look for your coffee table. Darker, muted tones work best for vintage aesthetics. Bright, modern colors will fight against the aged effect you are trying to create. Think warm, earthy tones that evoke a sense of history and character.
The Two-Tone Paint Method
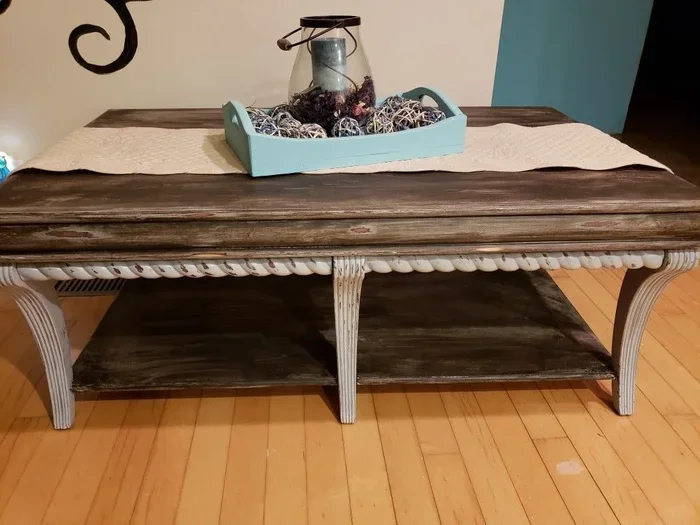
The two-tone paint method is one of the most popular techniques for creating a vintage coffee table. Start by painting the entire surface with a base coat of a lighter color. Think cream, soft white, or pale gray. Let this coat dry completely, which usually takes about two hours depending on humidity and temperature.
Next, apply a darker top coat in a contrasting color. Deep brown, charcoal, navy blue, or forest green all work beautifully for this technique. Apply this second coat generously and let it sit for just a few minutes before you begin distressing the surface. Working while the top coat is slightly wet gives you more control over the final effect.
While the top coat is still soft, use your sandpaper to gently sand back the surface. The lighter base coat will show through in the areas you sand, creating a beautiful layered effect. This mimics the way paint wears away over years of use, revealing the original surface underneath in a natural pattern.
Focus your sanding on the edges, corners, and any raised details or decorative elements. These are the areas where natural wear would occur first on a real antique. The contrast between the two colors creates visual depth and interest that screams vintage charm. Step back frequently to check your progress and ensure the effect looks natural.
Pro Tip: If you want an even more authentic look, apply a thin wash of dark paint mixed with water over the entire finished surface. This ties everything together and gives the table a unified aged appearance that looks like it has been through years of gentle use.
Choosing the Right Stain for Your Wood
If you prefer a natural wood look, staining is the way to go for your coffee table. Choose a stain color that is darker than the wood’s natural tone. Walnut, espresso, and early American stains all create beautiful vintage effects that enhance the wood grain beautifully.
Apply the stain with a clean cloth or brush, working in the direction of the wood grain. Wipe away excess stain after just a few minutes for a lighter, more subtle effect. For a deeper, richer look, let the stain sit longer before wiping it off. Experiment on a scrap piece of wood first to find the perfect shade for your piece.
You can also layer stains to create a custom color that is uniquely yours and suits your home decor. Apply a light stain first, let it dry completely, then add a darker stain on top. The layers blend together and create a complex, aged appearance that single coats simply cannot achieve. This technique adds richness and depth to the finished piece.
After staining, apply a clear matte finish to protect the surface. Avoid glossy or satin finishes, as they look too modern and take away from the vintage aesthetic. A matte or flat finish gives your coffee table that soft, aged appearance that is so characteristic of true vintage furniture pieces.
Adding Authentic Vintage Hardware and Details
Hardware details can make or break the antique look on your coffee table. Modern screws, shiny hinges, and plastic feet pull the eye forward and remind people of the table’s true age. Upgrading these small elements makes a surprisingly big difference in the overall appearance of the finished piece.
Updating Legs and Feet
The legs of your coffee table are one of the first things people notice when they look at the piece. If your table has plain modern legs, consider replacing them with tapered wooden legs or turned legs that have a classic profile. These shapes are strongly associated with antique furniture and instantly elevate the overall look and feel of the table.
You can find replacement legs at most hardware stores or online retailers. Look for legs with a slight taper and a vintage finish that complements your paint or stain color. Some legs come pre-distressed, which saves you time and effort. Simply screw them into place with matching screws, and your table starts looking decades older right away.
If replacing legs is not an option, you can wrap existing legs with rope or jute twine instead. This adds a rustic, farmhouse charm that complements the antique aesthetic beautifully. Use a hot glue gun to secure the rope in place, wrapping it tightly and evenly around each leg for a polished, finished look.
Quick Tip: Add small felt pads to the bottom of each leg after you finish. This protects your floors from scratches and gives the table a finished, professional look that shows attention to detail.
Decorative Touches That Sell the Look
Small decorative details add the finishing touches that make your coffee table look genuinely antique and well-loved. Consider adding corner protectors made from brass or aged metal. These small pieces catch the light beautifully and suggest a table that has been cared for over many years in a loving home.
You can also add small decorative nails or tacks along the edges or legs of the table. These are commonly found on vintage furniture and are easy to install with a small hammer. Place them at even intervals for a charming, old-world detail that adds character without overwhelming the design.
For a truly unique touch, try adding a vintage-style drawer pull or small handle to a side shelf if your table has one. Brass or wrought iron pulls in an antique finish tie everything together and add a real sense of history and craftsmanship to the piece. These small details are what separate a good antique look from a great one.
Styling Your Newly Antique Coffee Table
Now that your table has that beautiful aged look, it is time to style it properly. The way you decorate your coffee table brings the entire vintage vision to life. A well-styled coffee table looks like it belongs in a charming cottage or a curated antique shop, not like a freshly painted project.
Coffee Table Styling Ideas
Start with a base layer of a textured runner or a piece of aged fabric. Linen, burlap, or a vintage floral pattern all work wonderfully for this purpose. Lay this across the center of the table to anchor the entire arrangement and give it a grounded, collected-over-time feel.
Next, add a small stack of vintage-style books or old magazines. Hardcover books with worn spines create instant character and warmth. You can also use books as risers to elevate other decorative items on the table, adding height and visual interest to your arrangement.
Place a small vintage tray in the center of the books. This creates a natural focal point and keeps smaller items organized and intentional. Inside the tray, add a small candle, a vintage-style clock, or a tiny potted plant. These items work together to create a warm, inviting display that feels curated and personal.
Do not forget the coffee! If you enjoy your morning brew while relaxing by your newly styled coffee table, you might want to learn how to make coffee in a microwave oven for quick and easy refreshments that pair perfectly with your beautifully styled vintage table. Having a warm cup nearby completes the cozy, inviting atmosphere of your living room.
For a cozy evening touch, arrange a few vintage-inspired coasters and a small bowl of snacks on the table. When your guests bring treats or you have leftovers, knowing how to warm up cold pizza in the oven means you can always offer something delicious to enjoy around your stunning antique coffee table with friends and family.
Keep styling simple and uncluttered. A well-styled antique coffee table should look effortlessly charming, not overdone or cluttered. Choose three to five items and arrange them with intention and care. Leave some open space on the table to let each piece breathe and shine on its own. Less is often more when it comes to vintage styling.
Maintaining Your Antique Finish
Once you have put in the work to create your vintage coffee table, you want the finish to last for years. Proper maintenance preserves the antique look and keeps your coffee table looking beautiful and authentic over time. A few simple habits go a long way in protecting your hard work.
Use a soft, dry cloth to dust your table regularly. Avoid harsh chemical cleaners that can strip away your finish and undo all your careful work. A simple mixture of mild soap and warm water works well for cleaning. Wipe it down gently and dry it immediately to prevent moisture from settling into the wood and causing damage.
Place coasters under all drinks and use a tablecloth or runner during meals whenever possible. These simple habits protect your finish from water rings, heat marks, and scratches that can age your table prematurely. Even an antique-looking table benefits from a little extra care and attention to keep it looking its best.
If you notice small scratches or worn spots over time, you can touch them up easily with leftover paint and sandpaper. A quick dab of matching paint and a light sand will make any new marks disappear and keep your coffee table looking authentically aged and well-maintained. Keep your leftover supplies stored safely for future touch-ups.
Avoid placing your table in direct sunlight for long periods. UV rays can fade your finish and cause uneven aging that looks accidental rather than intentional. If your table sits near a window, consider using curtains or blinds to filter the light during the brightest parts of the day and preserve your beautiful finish.
Conclusion
Making a coffee table look antique is a rewarding project that anyone can do with a little patience and the right guidance. You start by assessing your table and choosing the right distressing method for the material you are working with. Then you apply paint or stain in layers that mimic years of natural wear and gentle use. Adding vintage hardware and styling the table with care brings the entire vision together into a cohesive, charming look.
The beauty of this project is that there is no single right way to do it. Every coffee table tells a different story, and your finished piece will reflect your personal style and creative vision. Whether you prefer a rustic farmhouse look or a more refined vintage aesthetic, the techniques in this guide give you the tools and confidence to succeed.
Take your time, enjoy the creative process, and remember that imperfections are what make an antique piece truly beautiful and unique. Your newly styled coffee table will become the centerpiece of your living room and a conversation starter for every guest who visits your home.
If you are looking for more ways to refresh your living space and make the most of your time at home, learning how to reheat something in the oven is a handy skill that keeps your snacks and treats warm while you relax by your stunning vintage coffee table and enjoy the fruits of your creative labor.
Frequently Asked Questions
What is the best paint for making a coffee table look antique?
Chalk paint works best for achieving an antique look on wood furniture. It adheres easily, dries to a matte finish, and distresses beautifully with minimal effort. You can also use latex paint mixed with a bit of joint compound for a thicker, more authentic aged texture. Both options are affordable and easy to find at most hardware stores near you.
How do you make new wood look old without using paint?
You can use a vinegar and steel wool solution to darken the wood naturally and create an aged tone. Sanding the edges and corners also creates a worn appearance that suggests years of use. Applying dark wax to the finished surface adds depth and shadows that mimic the natural aging process. These techniques work together beautifully to age wood without any paint at all.
Can you make a glass coffee table look antique?
Yes, you can focus on distressing the wooden base or frame of a glass coffee table to achieve the vintage look. You can also add vintage-style etchings or decals to the glass surface for extra character. Upgrading the base with antique-style legs or adding decorative hardware to the frame gives the entire piece a vintage feel that is hard to resist.
How long does it take to make a coffee table look antique?
A simple makeover takes about one to two days, including drying time for paint and stain between coats. More detailed projects with multiple layers of paint and wax can take up to three days to complete. The actual hands-on work usually takes only a few hours, but letting each layer dry properly is important for the best and most durable results.
Is distressing a coffee table expensive?
Not at all. Most distressing projects cost under fifty dollars in supplies and materials. You need sandpaper, paint, stain, and a few basic tools that you may already own. If you buy a thrift store table as your base, the total cost can be even lower. The project is one of the most affordable furniture makeovers you can do at home with your own hands.
Can you reverse an antique finish if you do not like the result?
Yes, you can sand back the finish and start over with a fresh approach. Use a medium-grit sandpaper to remove the paint and stain layers carefully. Work gently to avoid damaging the wood underneath the finish. Once the surface is bare and clean, you can try a different color or technique until you achieve the look you truly want for your space.