How Long To Cook Thick Chicken Breast In Oven Perfectly
Cooking thick chicken breast in the oven is easier than you think when you know the right time and temperature. This guide covers exact cooking times, oven settings, and pro tips to get juicy, tender chicken breast every single time. Whether you are a beginner or a home cook, you will find everything you need to bake chicken breast perfectly in this simple, step-by-step article.
There is nothing quite like a perfectly baked chicken breast. It is juicy, tender, and full of flavor. But let us be honest. Cooking thick chicken breast in the oven can feel tricky. You might end up with dry, tough meat more often than you would like.
The good news is that it does not have to be this way. Once you understand the right oven temperature, cooking time, and a few simple tricks, you can bake chicken breast like a pro. This guide will walk you through everything step by step.
We will cover the exact time you need, the best oven settings, common mistakes, and easy tips to make your chicken taste amazing. Whether you are cooking for dinner tonight or meal prepping for the week, this article has you covered.
Key Takeaways
- Thick chicken breast needs 20-30 minutes at 400°F for juicy, fully cooked results.
- Always use a meat thermometer to check that the internal temperature reaches 165°F.
- Brining or pounding the chicken helps it cook evenly and stay moist.
- Let the chicken rest for 5-10 minutes after baking to lock in juices.
- Boneless vs bone-in chicken breast has different cooking times you need to know.
- Seasoning and oil before baking adds flavor and helps create a golden crust.
- Avoid overcooking by following the time guide and checking early.
📑 Table of Contents
- Why Thick Chicken Breast Needs Special Attention
- The Best Oven Temperature for Thick Chicken Breast
- How Long to Cook Thick Chicken Breast In Oven
- Step-by-Step Instructions for Perfect Baked Chicken Breast
- Tips for Juicy, Flavorful Chicken Every Time
- Common Mistakes to Avoid When Baking Chicken Breast
- Expert Insights on Baking Thick Chicken Breast
- Quick Tips for Busy Weeknights
- Conclusion
Why Thick Chicken Breast Needs Special Attention
Thick chicken breast is different from thin cuts. It is more than an inch deep in most cases. This extra thickness means the outside can overcook before the inside reaches a safe temperature. That is the number one reason people end up with dry chicken.
When you oven bake chicken breast that is thick, the heat has to travel deeper into the meat. If you crank the temperature too high, the outside burns while the center stays raw. If you cook too low, the chicken dries out over a long period.
Finding the sweet spot is key. The right baking chicken technique balances heat and time. It cooks the chicken through evenly without stripping away moisture. That is exactly what we will help you do in this guide.
Understanding Chicken Breast Thickness
Not all thick chicken breasts are the same. Some are 1.5 inches thick. Others are 2 inches or more. The thicker the cut, the longer it needs in the oven. A pounded chicken breast that is even in thickness will cook much more predictably than an uneven one.
If you buy chicken breast from the store, it often has a tapered end. The thin side will overcook while the thick side is still underdone. You can fix this by slicing the thick end or pounding the chicken to an even size. This small step makes a big difference in your chicken breast recipe results.
The Best Oven Temperature for Thick Chicken Breast
The temperature you choose is the biggest factor in how your chicken turns out. Too hot and the outside dries out. Too low and the chicken takes too long and loses moisture.
Most experts agree that 400°F is the ideal oven temperature for thick chicken breast. At this heat, the chicken cooks fast enough to stay juicy but slow enough to cook through evenly. It also helps the outside get a light golden color without burning.
Some people prefer 375°F for a slower, gentler cook. This works well if your chicken is very thick or if you are using a bone in chicken breast. The lower temperature gives the heat more time to reach the center without overcooking the edges.
Here is a quick comparison to help you decide:
- 400°F: Best for boneless thick chicken breast. Cooks in about 20-25 minutes.
- 375°F: Great for bone-in chicken breast or extra-thick cuts. Takes about 25-35 minutes.
- 425°F: Good for a crispy outer crust. Works for thinner thick cuts around 1.5 inches.
No matter which temperature you pick, always preheat your oven first. A cold oven will throw off your cooking time and lead to uneven results.
Why 400°F Is the Gold Standard
400°F has become the go-to temperature for a reason. It hits the sweet spot between speed and moisture retention. The chicken gets a nice sear on the outside while the inside stays tender and juicy.
At this temperature, the proteins in the chicken cook without squeezing out too much liquid. The result is juicy chicken with a slightly crispy exterior. It is also the temperature most chicken breast recipes online recommend, which means plenty of tested and trusted results to back it up.
How Long to Cook Thick Chicken Breast In Oven
Now for the question everyone wants answered. How long to cook thick chicken breast in oven? The answer depends on a few factors. The thickness of the cut, whether it is bone-in or boneless, and your oven all play a role.
Here is the general guide for oven baked chicken breast at 400°F:
- Boneless thick chicken breast (1.5 to 2 inches): 20 to 25 minutes
- Bone-in thick chicken breast (1.5 to 2 inches): 25 to 35 minutes
- Extra thick chicken breast (over 2 inches): 28 to 35 minutes
- Pounded even-thickness chicken breast: 18 to 22 minutes
These times are a starting point. Every oven is different. Some run hot, some run cold. That is why checking the internal temperature matters more than watching the clock.
Bone-In vs Boneless Cooking Time
Bone in chicken breast takes longer to cook because the bone acts as an insulator. The heat has to work around it to reach the meat near the bone. This means you need to add about 5 to 10 extra minutes compared to boneless cuts.
Boneless thick chicken breast cooks faster and more evenly. It is the easier option if you are short on time. But bone-in chicken often has more flavor and stays juicier during cooking. Both are great options for oven roasted chicken dinners.
How to Tell When Chicken Breast Is Done
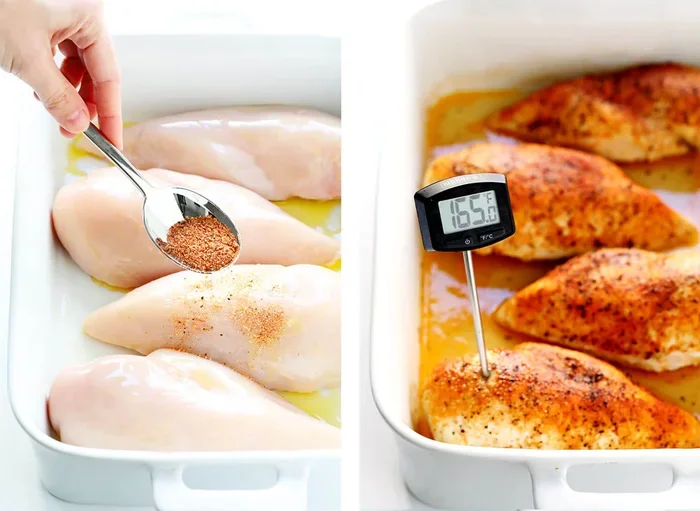
The only foolproof way to know your chicken is done is to use a meat thermometer. Insert it into the thickest part of the breast. When the chicken internal temperature reads 165°F, it is safe to eat.
Do not rely on the juices running clear alone. That method is not always accurate. And do not cut into the chicken to check. That releases all the juices you worked hard to keep inside.
If your chicken is not quite at 165°F yet, just put it back in the oven for a few more minutes. Check again every 3 to 5 minutes until it reaches the right temperature.
Step-by-Step Instructions for Perfect Baked Chicken Breast
Now that you know the time and temperature, let us walk through the full process. These steps will help you get consistent, delicious results every time.
Step 1: Prep the Chicken
Start by removing the chicken from the refrigerator about 15 to 20 minutes before cooking. Letting it come closer to room temperature helps it cook more evenly. Cold chicken going straight into a hot oven creates uneven cooking.
Pat the chicken dry with paper towels. Dry chicken gets crispier than wet chicken. This is a simple step that many people skip, but it makes a real difference in the final texture.
Step 2: Season Generously
Seasoning is where you can get creative. A simple mix of salt, pepper, garlic powder, and olive oil works beautifully. You can also use paprika, cumin, or Italian seasoning for more flavor.
Rub the oil and seasoning all over the chicken. Make sure you get some under the skin if you are using skin-on chicken. This adds flavor right next to the meat and helps the skin crisp up during baking chicken.
Step 3: Choose Your Pan and Position
Place the chicken on a lined baking sheet or in an oven-safe dish. A wire rack set over a baking sheet works especially well. It allows air to circulate around the chicken, which helps the bottom cook evenly.
If you do not have a wire rack, just use a regular baking sheet. Avoid crowded pans. Give each piece of chicken some space so the heat can flow freely around it.
Step 4: Bake and Monitor
Put the chicken in the preheated oven on the middle rack. Set your timer based on the thickness and whether it is bone-in or boneless.
Do not open the oven door too often. Every time you open it, heat escapes and your cooking time gets thrown off. Trust the process and check only near the end of the estimated time.
Step 5: Rest the Chicken
Once the chicken hits 165°F internally, take it out of the oven. Let it rest for 5 to 10 minutes before cutting. This resting period allows the juices to redistribute throughout the meat.
If you cut into it right away, the juices run out and the chicken dries out fast. A little patience at this stage makes a huge difference in how juicy your oven roasted chicken turns out.
Tips for Juicy, Flavorful Chicken Every Time
Getting great chicken is not just about time and temperature. A few extra tips can take your baked chicken breast from good to outstanding.
Brine the Chicken for Extra Moisture
Brining is one of the best things you can do for thick chicken breast. A simple brine of water, salt, and sugar helps the meat absorb and hold onto moisture during cooking. Even a 30-minute soak makes a noticeable difference.
To brine, dissolve 1/4 cup of salt and 2 tablespoons of sugar in 4 cups of warm water. Let it cool completely before adding the chicken. Submerge the chicken for 30 minutes to 2 hours. Then pat it dry and season before baking.
Use a Baking Sheet with Foil or Parchment
Lining your pan makes cleanup a breeze. Parchment paper also prevents the chicken from sticking. It is a small effort that saves you time and frustration later.
Add a Little Butter or Oil Before Baking
A thin layer of olive oil or melted butter on the chicken adds flavor and helps the outside brown nicely. It also creates a barrier that locks in moisture during the chicken cooking time in the oven.
Cook in Batches If Needed
If you are cooking multiple breasts, do not overcrowd the pan. Overlapping or stacking chicken pieces traps steam and leads to soggy skin. Use two baking sheets if you need to. The extra space is worth it for better texture.
Common Mistakes to Avoid When Baking Chicken Breast
Even experienced cooks make mistakes with chicken. Here are the most common ones and how to avoid them.
Skipping the Meat Thermometer
This is the biggest mistake people make. guessing whether chicken is done by color or timing is unreliable. A meat thermometer costs a few dollars and takes the guesswork out completely. It is the single best tool for perfect chicken breast doneness.
Cooking from Cold
Putting frozen or ice-cold chicken straight into the oven leads to uneven cooking. The outside overcooks while the center stays cold. Always let your chicken sit at room temperature for 15 to 20 minutes first.
Overcooking by Just a Few Minutes
Thick chicken breast can go from perfectly juicy to dry in just a few minutes. Set your timer and check early. It is always better to pull the chicken out at 160°F and let it rest. The temperature will rise a few degrees on its own.
Not Letting It Rest
Cutting into chicken right after it comes out of the oven is tempting. But the juices need time to settle. Those 5 to 10 minutes of resting make your chicken noticeably juicier and more flavorful.
Using the Wrong Pan
Dark pans absorb more heat and can cause the bottom to burn. Glass pans take longer to heat up. A light-colored metal baking sheet is your best bet for even chicken baking results.
Expert Insights on Baking Thick Chicken Breast
Professional chefs and cooking experts agree on a few key principles for perfect oven baked chicken. Here is what the experts want you to know.
Start with quality chicken. Fresh, high-quality chicken breast from a good source cooks better and tastes better. Look for chicken that is pink and firm, not pale or slimy.
Even thickness is everything. If your chicken breast has a dramatic taper, take the time to pound it flat. A uniform thickness means uniform cooking. This is the secret that separates good chicken from great chicken.
Do not fear the high heat. Some people are afraid of cooking chicken at 400°F or above. But high heat actually helps seal in moisture if the cooking time is short enough. The key is not to leave it in too long.
Season the inside too. If you are butterflying or stuffing your chicken, make sure you season the inside as well. Flavor from the inside out makes every bite better.
Quick Tips for Busy Weeknights
Not everyone has hours to spend in the kitchen. Here are some quick tips for making oven roasted chicken breast fast and easy during a busy week.
- Meal prep on Sunday. Bake several chicken breasts at once and store them in the fridge for the week.
- Use a quick brine. Even 15 minutes in a saltwater solution improves moisture.
- Pound the chicken thin. Thinner chicken cooks faster, which saves time on busy nights.
- Preheat the oven while you prep. This saves 10 to 15 minutes of total cook time.
- Slice and serve immediately. Sliced chicken works great in salads, wraps, and grain bowls for easy lunches.
Chicken breast is one of the most versatile proteins you can cook. It works in sandwiches, stir-fries, pasta dishes, and on its own with a side of vegetables. Once you master the oven method, the possibilities are endless.
Conclusion
How long to cook thick chicken breast in oven really comes down to three things: temperature, time, and technique. At 400°F, most thick boneless chicken breasts need 20 to 25 minutes. Bone-in cuts need a few extra minutes. The most important tool you can use is a meat thermometer to check for 165°F in the thickest part.
Remember to let your chicken rest after baking, season it well, and avoid the common mistakes that lead to dry meat. With the tips and guidelines in this article, you have everything you need to make juicy chicken breast in the oven every single time.
Start with these basics and then experiment with your own flavors and seasonings. The more you practice, the more confident you will become. Soon, baking chicken breast will feel like second nature. You will not even need to think about it. Just set the timer, check the temperature, and enjoy the results.
So go ahead. Preheat that oven, grab your thick chicken breast, and put this knowledge to work. Your next meal is going to be delicious.
Frequently Asked Questions
Can I cook thick chicken breast at 350°F instead of 400°F?
Yes, you can. Cooking at 350°F will take a bit longer, usually around 30 to 40 minutes for thick cuts. The lower temperature means the chicken cooks more slowly, which can help keep it moist. Just be sure to check the internal temperature to make sure it reaches 165°F.
Should I cover chicken breast with foil while baking?
It is usually best to bake chicken breast uncovered. Leaving it uncovered allows the outside to crisp up and the moisture to evaporate evenly. If your chicken is browning too fast, you can loosely tent it with foil for the last few minutes of cooking.
Can I use frozen thick chicken breast in the oven?
Yes, but it will take significantly longer. Frozen chicken needs about 50% more cooking time compared to fresh chicken. Make sure the internal temperature reaches 165°F all the way through. For best results, thaw the chicken first in the refrigerator overnight.
How do I know if my thick chicken breast is overcooked?
Overcooked chicken feels dry and tough when you cut into it. The meat will be chalky white with no moisture. Using a meat thermometer helps prevent this. Once the temperature hits 165°F, pull the chicken out immediately to avoid drying it out.
Is it safe to eat chicken that is slightly pink inside?
No, you should always cook chicken until the internal temperature reaches 165°F throughout. Color is not a reliable indicator of doneness. Some chicken can look slightly pink even when fully cooked, but the only safe way to know is with a meat thermometer.
Can I add vegetables to the same pan as the chicken?
Absolutely. Roasted vegetables pair perfectly with oven baked chicken breast. Just make sure the vegetables are cut small enough to cook in the same time as the chicken. Add denser vegetables like carrots or potatoes first, then add softer veggies halfway through cooking.